Thursday, June 24, 2010

Spicy Apple-Maple Tempeh Sausage Patties


I've been experimenting so much lately with vegetarian meat substitutes because as I stated, I'm trying to completely cut all fake, processed meat products from my diet. I've found that if I make double batches, form patties and keep them in the freezer, I'm more likely to not grab a box at the grocery store. One of my favorite meat substitutes is tempeh, which is simply fermented soybeans. I've read quite a bit about the link from soy to breast cancer as my Mom developed breast cancer two years ago (and beat it!), and from what I've read, soy in its whole form is ok, it's the processed soy products and oils that are more risky. So for me, that means tofu, tempeh and soymilk are ok! 
Soysausages are very convenient to top a pizza, serve with breakfast or throw in a sandwich, but again, super processed. So I thought I'd attempt soysausages with tempeh. I really liked these, but wish they had been a bit tighter. I think perhaps if I made them and froze them and then cooked the patties, they might not crumble as much, but they were still great. To incorporate the apple-maple flavor and add moisture, I used maple syrup and applesauce, and then simply flavored them with traditional sausage spices. 
I will definitely be making these again soon, with different variations and methods of cooking. For now though, I'm going to call this attempt a success! 

Spicy Apple-Maple Tempeh Sausage Patties

1 10 oz. package of plain tempeh
1 egg white
1/4 c. unsweetened applesauce
2 tbsp. pure maple syrup
2 tsp. fennel seeds
2 tsp. dried rubbed sage
1 tsp. salt
1/2 tsp. black pepper
1/2 tsp. crushed red pepper flakes

Cut tempeh in 1" chunks, add to a food processor with fennel seeds.
Pulse until tempeh is in a crumb, about the texture of ground beef.
Pour into a mixing bowl, add egg white, applesauce, maple syrup, sage, salt, pepper and crushed red pepper flakes.
Stir well to combine, refrigerate for 10 minutes.
Form into 5 patties (I use a hamburger press to get them really tight).
At this point, you can wrap them in saran wrap then foil and freeze or cook.
Heat a griddle over medium heat, spray with nonstick spray or EVOO, add patties.
Cook for 5 minutes, then gently flip and cook for another 5 minutes.

Wednesday, June 23, 2010

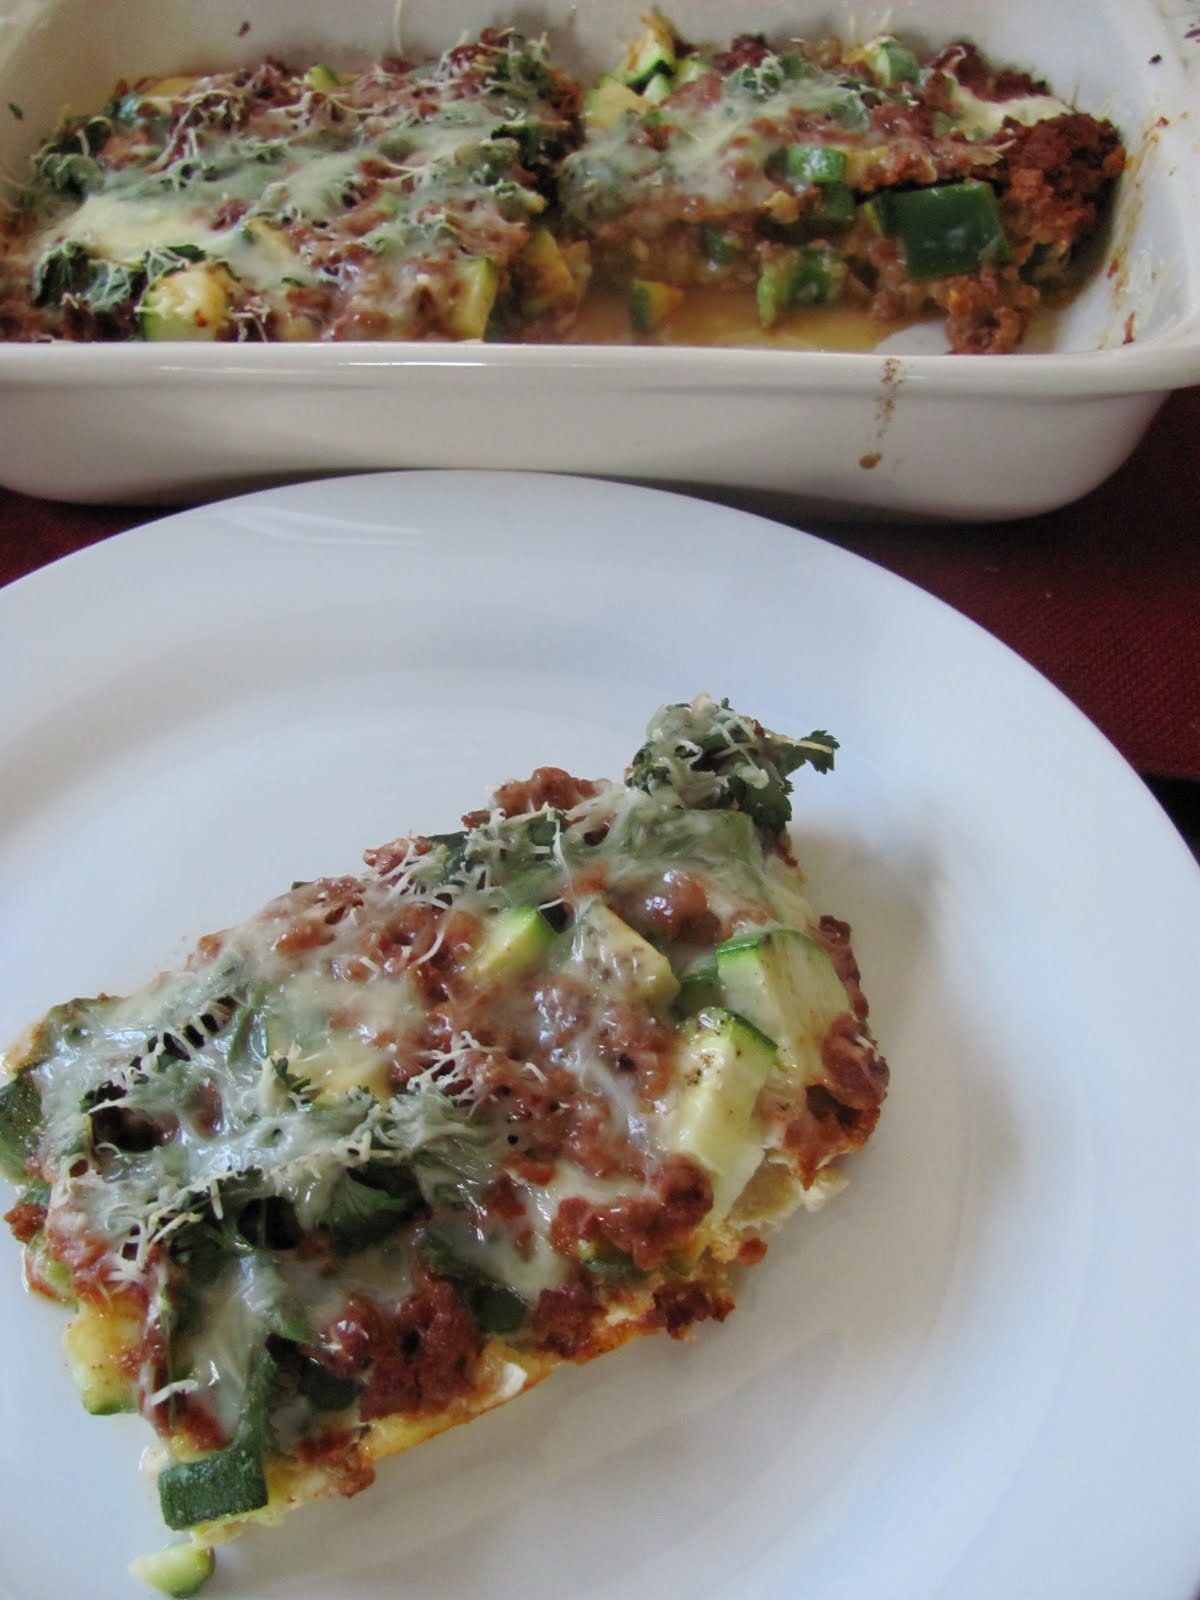
Farmer's Casserole, Mexican Style


From time to time, I have readers email me with questions, recommendations, and recipe suggestions. Recently, Leela emailed me the recipe for Farmer's Casserole, Mexican Style. She thought it sounded like something I would enjoy, and she was correct! This is an easy meal to assemble, and is like breakfast for dinner. I made a few changes from Leela's recipe because I wanted to add in more veggies to make this a one pan dinner. Also, I used Trader Joe's Soyrizo in place of chorizo, one of the only faux meat products I just can't quit! The dish has so much flavor, few ingredients, easy prep and clean up. Aside from the length of cooking time, it's a perfect weeknight meal (though while I waited for it to cook, I was able to do some chores around the house!)

Farmer's Casserole Mexican Style
from Leela

4 corn tortillas
1/2 c. shredded Monterey jack cheese (or any Mexican style cheese)
1 c. crumbled chorizo/soyrizo
2 scallions, sliced then (white and green parts)
1/2 c. chopped cilantro
1 4 oz. can diced green chiles
1/4 c. picked jalapenos
1 zucchini, halved and sliced
1 green bell pepper, finely diced
4 eggs (or 2 eggs and 4 whites)
1 cup milk (I used skim)
Salt and pepper

Preheat oven to 350*
Spray a baking dish with nonstick cooking spray.
Line the bottom with tortilla strips, criss-crossing them to leave no gaps.
Sprinkle the chorizo, green onions, chilies, cilantro, zucchini and peppers over the tortillas.
In a small dish, combine the eggs, milk, salt and pepper.
Pour over the casserole, sprinkle with cheese.
Bake for 40-45 minutes, until eggs are set.
*Because I added raw zucchini and peppers, the dish was a little wet, next time I might sauté the vegetables first to release a bit of the liquid. 

Tuesday, June 22, 2010

Succotash Salad with Black Bean-Squash Patties


I typically do my grocery shopping on Saturday afternoons, so Saturday at lunch I try to do a clean out the fridge lunch. I hate to bring home groceries when there's anything in the fridge because I like to start the week with a clean slate, and make sure I don't throw away anything. The only things left in there when I head out to the store are condiments. 
This blog is starting to sound more like therapy and confessions each day, huh? 
So anyway... while cleaning out the fridge on a Saturday afternoon, I came across a few ears of corn (because now it's on sale 10/$2!), tomatoes from the garden, haricots verts, a couple small summer squash, and half a log of goat cheese. I decided to make a random succotash type salad and top it with bean cakes. The meal was a definite winner. Not only did it clean out the fridge, but it's healthy, filling, and fresh. 

Succotash Salad with Black Bean-Squash Patties

Salad:
2 ears of corn, husked
1 pint cherry tomatoes, halved
1/2 lb. haricots verts, trimmed and cut in 1" segments

Dressing:
1 shallot, minced
1/4 c. apple cider vinegar
1 lime, juiced
1 tbsp. honey  
2 tbsp. EVOO
Salt and pepper

Black Bean Patties:
1 c. summer squash, finely diced
1 15 oz. can black beans, drained and rinsed
1/2 c. oatmeal, ground (or breadcrumbs)
1 egg white, beaten
1 tsp. chili powder
1 tsp. cumin
Salt and pepper

Accompaniments:
2 oz. crumbled goat cheese
Torn cilantro leaves

Clean corn cobs of strings, cut off kernels.
Bring 2" of water to a boil in a pot, add haricots verts and corn kernels, boil for 1 minute, drain and set aside.
Heat a griddle over medium.
In a large mixing bowl, combine squash, black beans, ground oats, egg whites, chili powder, cumin, salt and pepper, mash together with a fork to break up beans.
Use a spatula and divide mixture into patties (I made 5, pictured 3) and place on the griddle. 
Cook for 5 minutes, then flip and cook for another 5 minutes.
Add all dressing ingredients to the serving dish, whisk together.
Add corn, haricots verts, and tomatoes. Gently toss to mix in dressing.
Top with squash patties, crumbled goat cheese and cilantro. 

Monday, June 21, 2010

Summer Berry Crumble


I have a big confession to make. I am a food hoarder. This past weekend could have put me in a mental hospital. First, Whole Foods tweeted that cherries were on sale for $1.99/lb for one day only. Ok, so I'll stop by WF after work and pick up what, maybe 20 lbs? Ok, ten. Then, I opened up the Publix ad and found that Blueberries were 2/$3, raspberries were 2/$4 and blackberries were 2/$5. Plus, I had coupons for $1.50/1 carton of berries. That's FREE blueberries. Fifty cent raspberries! One dollar for a large carton of blackberries! And it was a store coupon, so I could print it as many times as I wanted and go back to Publix over and over and over. Then I discovered that it was pickin' time at the local blueberry farms. Let me take you back to last summer's blueberry picking...12 lbs. in an hour.  Like I said, I have a problem.  
See, when you know your absolute most favorite foods are super cheap with the smallest carbon footprint of the year (cause of course, you can still buy raspberries in January, but they're shipped halfway around the world and cost a fortune), you MUST stock up. 
So that is what I did. I went to Whole Foods, bought 12 lbs of cherries, and then fought with myself to not go back an hour later and get more. I compulsively printed coupons and stopped by Publix every time I left the house. And now I have pounds and pounds of berries and cherries. I'll probably eat about half of them in their true form, maybe 1/4 will go in oatmeal or yogurt, but I also wanted to do a tiny bit of baking. I have to admit, frozen berries are almost as good as fresh in baking, but fresh just always wins out. 
So I decided for dessert to make something that was going to let the fresh, juicy berry shine. I thought a simple crumble with a vanilla bean ice cream would do just that. To make the crumble healthier, I used a bit of butter, but then mixed in applesauce, which worked perfectly. Simple, healthy, summer. 

I apologize for the sub-par photos, they don't do the crumble justice. However, I simply could not wait to eat it. Also, I would probably double the crumble mixture next time, I wanted it to be thin and light, but it was so delicious I wish I had made more.


Summer Berry Crumble
(serves 4 normal people, I could eat the whole pan)

1 lb. cherries, pitted and halved
1 pint of blueberries
1 pint of blackberries
1/2 pint raspberries
1 tsp. sugar
1 tsp. cornstarch
pinch of salt
1 tsp. almond extract

1/2 c. rolled oats
1/4 c. white whole wheat flour
1/4 c. packed brown sugar
Pinch of salt
1 tsp. baking powder
2 tbsp. butter, cold
1/4 c. unsweetened apple sauce

1 pint vanilla bean ice cream, for serving

Preheat oven to 325*
In a mixing bowl, toss together berries, sugar, cornstarch, almond extract and a pinch of salt. 
Pour into a baking dish.
In a small bowl, mix together oats, flour, brown sugar, salt and baking powder.
Use a fork or pastry cutter and cut in butter.
Add applesauce and stir to combine.
Use fingers to crumble mixture on top of berries evenly in small blobs.
Place in the oven and bake for 20-25 minutes, until bubbly and golden brown.
Serve warm with vanilla ice cream.


*To pit my cherries, I use a straw, you can see photos here. Maybe one day I'll get a real cherry pitter! http://ashleescooking.blogspot.com/2008/07/cherry-rhubarb-cobbler.html

Symon Sundays - Crispy Gnocci with Morels and Spring Peas & Spicy Stuffed Peppers

This week's Symon Sundays recipes were chosen by Gia. It's hard to believe this is the final recipe in round 2! We're really moving through the book, and the dishes just keep getting better! This round we especially hit the pasta and appetizer sections hard.
The first recipe Gia chose was the Crispy Gnocci with Morels and Spring Peas. I knew we were going to make this for close to 3 months, so I had my morel radar on every time I was out. I found them at Whole Foods for $17.99/1 oz. package dried, and decided to hold out for fresh or bulk. Right before we left for Memorial Day vacation, I found them fresh for $49.99/lb, and I was thrilled. Of course $50/lb is expensive, but I needed an ounce, so that was only going to be about $3-4. I knew I'd go back as soon as we got back from vacation to buy the morels. Can you see where this story is headed? Of course, just my luck, they were gone 5 days later! I couldn't bring myself to purchase $17 worth of morels, so I decided to use dried porcini mushrooms that I had on hand. 
For the gnocci, I have never made them with ricotta rather than potatoes, and fried rather than boiled. I have to say I really enjoyed these gnocci. Though they were fried, they seemed to be lighter than traditional potato gnocci. They also were much easier to make than the potato version. I did cut back on the butter and used a little porcini stock.


Gia's other selection were these sausage stuffed peppers. I used Anaheim peppers, which were spicy but also sweet when roasted. I used a homemade sauce I had on hand, and spicy Italian chicken sausage from Whole Foods. These were simple to make, and delicious! I would definitely make these in mini peppers and serve them as an appetizer in the future! 

Tasha's Gnocci (check out Tasha's blog for the complete recipe!)


Joanne's Peppers


Friday, June 18, 2010

Pina Colada Cupcakes


After my party was over, there were a few varieties of cupcakes that were leftover. I photographed those singularly, and posted the recipes to them (Fuzzy Navel, Limoncello, Mojito, Margarita) in the past month. So I didn't have a really nice photo of the remaining varieties (Irish Car Bomb, Mudslide and Pina Colada), and thought maybe I wouldn't blog about them. But then I realized that if those were the varieties with no leftovers, it means they were the most popular, and I should certainly blog them! In the photo above, the Pina Colada are the 4th level from the top, with the cherry on top. 
All of the cupcakes I made were a first run except for the Pina Colada, my first variation can be found here. In the previous recipe, I used a coconut cake, pineapple rum filling, and coconut buttercream. I didn't change the recipe too much this time, but there are a few adjustments. These include adding rum to the cake batter, not using a filling, and instead adding caramelized rum pineapple to the buttercream and omitting the coconut milk. Also, obviously the garnish changed from toasted coconut to cherries, which I think add more color and a whimsical feel. 
Either way, you can't go wrong with these cupcakes.... but if I had to choose, I liked this variety better. The buttercream was less stiff, more buttery and gooey. I also don't like straight up buttercream, the pineapple adds a nice change. One note - be sure to crush it very well or it can clog your piping tip! 

Pina Colada Cupcakes
(Rum Coconut Cake with Caramelized Pineapple Buttercream)

Coconut Cupcakes:

3 sticks of butter, softened
2 c. sugar
5 eggs
2 tsp. almond extract
1 tsp. vanilla extract
3 cups flour (I used closer to 3.5)
1 tsp. baking powder
1/2 tsp. baking soda
1/2 tsp. salt
3/4 c. buttermilk
1/3 c. rum
8 oz. unsweetened coconut, flaked

Preheat oven to 325 degrees.
In a stand mixer, cream the butter and sugar on high speed until light and fluffy, about 4-5 minutes.
Add the eggs, one at a time, scraping the bowl down as needed.
Add the vanilla and almond extracts, baking powder and soda and salt. 
Combine the buttermilk and rum in a measuring cup.
Alternately, add the flour and buttermilk mixture to the mixer on low speed, starting and ending with flour.
(With this recipe, I have found that I tend to need a bit more flour that Ina specifies so the cupcakes dome properly and stay dense, she doesn't include weight measurements, which would help)
Line a muffin tin with 24 cups, fill each cup 2/3 full.
Bake for 23-25 minutes, or until golden brown and set. 
(This batter gets closer to 30 cupcakes for me)


Caramelized Pineapple Buttercream

2 cups fresh pineapple, finely diced
1/2 c. brown sugar
1/2 c. spiced rum or 1/2 c. rum + 1 cinnamon stick
1 tsp. vanilla extract
2 sticks of butter, softened, separated
2 lbs. powdered sugar

Heat a sauté pan over medium heat, melt 1/2 stick of butter.
Add pineapple and brown sugar with a pinch of salt, cook for 10 minutes, or until pineapple is golden brown and caramelized.
Turn heat to high, add rum and reduce until liquid is almost evaporated.
Remove from heat, add vanilla extract, stir, cool for 10 minutes.
Add to a dish and refrigerate until chilled, about an hour.
Add 1 1/2 sticks of butter to a stand mixer, cream.
Slowly add powdered sugar, 1/2 c. at a time, if mixture gets too thick, add a touch of cream.
When all sugar is combined with the butter, add the pineapple mixture and mix to combine.
Spoon into a piping bag and ice cupcakes, top with cherries. 
Freezer leftover buttercream in an airtight ziplock freezer bag for up to 3 months (I had about 2 cups of extra buttercream).

Thursday, June 17, 2010

Rosemary Parmesan Grilled Polenta


Polenta has become one of my favorite starch sides recently. It has a similar quality to mashed potatoes when served creamy style, with a lot less work. It also can be served in cut out form, which requires a bit more work, unless you take a store shortcut and but a premade log. If you'd like to see how I make my polenta rounds, visit this post, and definitely try out that recipe! It's absolutely delicious!
Since we've been on this grilling kick, I've been brainstorming different things to grill. Polenta was a definite no brainer, as I've seen grilled polenta rounds at many restaurants. To make this polenta little more special, I simply added parmesan and rosemary to the mixed polenta, then added a little crumble of it on top after it flipped to create a little cheesy crust. This polenta was outstanding, firm and crisp on the outside, and smooth and buttery inside. I served this alongside skewers of chicken sausage, mushrooms and Brussels sprouts for a complete meal. 


Rosemary Parmesan Grilled Polenta

1 1/2 c. vegetable stock
1/2 c. nonfat milk
2/3 c. polenta (not quick cooking)
1/2 tsp. salt
1/2 tsp. white pepper
2 tbsp. fresh minced rosemary, separated
1/4 c. plus 2 tbsp. parmesan cheese, separated

Bring stock and milk to a boil in a saucepot, stream in polenta, whisking constantly.
Turn heat to low, stir polenta and continue to cook as long as package directs (mine was 15 minutes).
Remove from heat, stir in salt, pepper, 1 tbsp. rosemary and 1/4 c. parmesan cheese. 
Line a small baking sheet with parchment, spread polenta on baking sheet, about 1/4-1/2" thick.
Place in the refrigerator and chill for 2+ hours.

Heat grill to medium-high, spray with nonstick grill spray.
Cut polenta rounds out, place on the grill, cook for 5 minutes, flip.
Add remaining rosemary and parmesan cheese in a small dish, sprinkle over polenta.
Close grill over and cook for another 5 minutes.
Remove from heat and serve. 

Wednesday, June 16, 2010

Curried Cous Cous


I've been craving a curry dish lately, but with the temperatures near 100*, I couldn't imagine enjoying a big bowl of warm veggies and rice. I decided to do a few searches for a curry salad, and see what came up. Of course there were a few curried chicken salads, but I wanted something grain and vegetable based. I was intrigued by this Ina Garten recipe, it was vegetarian, full of curry and other spices, sweet and savory and cold! 
I followed her recipe closely, however I did substitute Trader Joe's Harvest Grain Blend for the cous cous, which I think added great texture and a little extra dimension. I also chose to shred my carrots rather than dice, and omitted the parsley. I was going to add cilantro, but forgot until I began eating the dish! 
Ina suggests eating this at room temperature, but I enjoyed it chilled.

Curried Cous Cous
adapted from Ina Garten, 2 large dinner servings 

2/3 c. cous cous or TJ's Harvest Grain Blend
1 tsp. EVOO
1 1/3 c. water or vegetable stock
1/4 c. plain greek yogurt
1 tsp. Rice vinegar
1 tbsp. curry powder
Salt and pepper
2 medium carrots, peeled and shredded
1/4 c. dried cranberries
1/4 c. toasted, sliced almonds
2 scallions, thinly sliced
1/4 small red onion, minced
Chopped cilantro or parsley, if desired

Prepare cous cous according to package directions (For mine, I brought water to a boil, added grain blend and EVOO, turned to a simmer, covered and cooked for 10 minutes)
When all water is absorbed, cool cous cous, fluff with a fork and add to a large mixing bowl.
In a small dish, whisk together vinegar, curry and yogurt, pour over cous cous.
Gently toss to combine.
Add remaining ingredients, gently stir to combine.
Place in the refrigerator and chill for 2+ hours.
Taste and adjust seasonings before serving.

Tuesday, June 15, 2010

Buffalo Chickpea Patties


Through the years, I probably have tried almost every fake meat product on the market. They never taste exactly like the meat product they're replacing, but since I don't generally like the taste of meat, it didn't bother me too much. It's a nice, quick shortcut for a dinner to use the frozen patty type products, and their nutritional information isn't too bad. However, these products are quite processed, and after reading more and more about processed soy, I'm trying to get away from it. 
I've been very successful at making bean patty burgers in place of a hamburger, but one of my favorite faux meat products is buffalo chik'n nuggets and patties. I decided to look at the ingredients on the box while grocery shopping to get an idea of what I should put in them. That was absolutely no help as I couldn't even pronounce or understand what some of the ingredients were!
I'm pretty happy with my end product. It's not as crunchy and dippable, but made a great burger, had fantastic buffalo flavor, no artificial ingredients, and cost a lot less than a package of MSF Chik'n Patties!

Buffalo Chickpea Patties

1 15 oz. can garbanzo beans, drained and rinsed
1/2 c. rolled oats
1/4 c. buffalo sauce, plus more for serving
1 egg white
1 small yellow onion
1 tsp. garlic powder
Salt and pepper

For serving:
Buffalo sauce
Ranch or blue cheese
Carrot Sticks
Celery (or cucumber, in my case)
Buns, lettuce, tomato and crumbled blue cheese, if served as burgers

Add chickpeas to a bowl, use a potato masher and mash until about 2/3 of the chickpeas are pasty and 1/3 are in pieces or whole.
Add the buffalo sauce to the chickpeas.
Add half of the oats to a food processor, pulse to create a crumb, add to the chickpeas.
Beat the egg white in a small dish to a froth, add to the chickpeas.
Grate onion into the chickpeas, finally add the garlic powder, salt and pepper. 
Use a spatula and fold mixture, combining ingredients well. 
Heat a griddle over medium, spray with nonstick spray or add 1 tbsp. EVOO.
Use a 1/3 measuring cup to portion out chickpea mixture onto griddle, this yields about 5 patties.
Cook patties for 5-7 minutes, until crispy and brown, flip gently and cook for another 5-7 minutes.
Serve immediately to retain maximum crispness.

Monday, June 14, 2010

Southwest Sweet Potato Hash


When I was in college and living in the dorms, I was forced to have the 19 meals per week plan. When I first arrived at college, I was still a vegetarian, and hoped to lose weight rather than gain the freshman 15. The food selection was pretty poor at my school, even for dining hall standards. Unlike larger schools with multiple dining halls, mine had one, and it seemed like the same things were offered all of the time. One can only eat salad bar crappy pizza for dinner so many nights in a row... 
Luckily, our dorms had decent kitchens with a stove and oven, and no one else on the hall ever used it. Whenever I wanted to cook, I had the kitchen to myself. The only problem was the kitchen was on the opposite end of the hall. I also only had 1 santoku knife, 1 cutting board, a pot, and a nonstick skillet. Not only was I limited by cooking method, but I was also working for $5.25/hr. in the admissions office, so cheap meals were also key. 
My husband and I met the second night at school our freshman year, and we were pretty much inseparable after that. We pretty much split our dinners between the dining hall, going out to eat, and cooking. He immediately became my sous chef, and was great at running down the hall to my dorm room when I'd forget an ingredient, and then he was also great at helping me clean up. So yes, he eats well each night, even way back when we first started dating... but it comes at a price! He's still fetching ingredients, pots and pans, and doing the dishes. I get so reminiscent about the good old college days... onto the dish!
One of the first meals I ever cooked up for us was this Southwest Sweet Potato Hash. It was easily made in one pot, had a few cheap veggies and eggs, and for the seasoning, I used a packet of chili seasoning (which I have replaced with jarred spices). I can't tell you how many times I made this and had to ask around the hall for a beer. No one ever believed me when I told them it was to deglaze my pan! 
So tell me, did you cook in college.... or was your dining hall great?


Southwest Sweet Potato Hash

1 large sweet potato
8 oz. button mushrooms, sliced
1 green bell pepper, diced
1 yellow bell pepper, diced
1 small red onion, diced
2 ears of corn, kernels cut off cob
2 garlic cloves, minced
2 tsp. ancho chili powder
2 tsp. cumin
1 tsp. coriander
1 tsp. smoked paprika
Salt and fresh black pepper
1 cup beer, whatever you have on hand
2 eggs
Tabasco Sauce

Pierce sweet potato with the prongs of a fork, wrap in a damp paper towel and microwave for 5 minutes.
Heat a large nonstick skillet over medium heat, add 1 tbsp. EVOO.
As you chop vegetables, add to the skillet, starting with mushrooms, peppers, onions, corn and garlic.
Allow vegetables to caramelize for and release liquid, about 8 minutes, then season with salt and pepper. 
Dice sweet potato, make a well in the center of the skillet and add sweet potato cubes, brown sweet potato pieces and season all vegetables with chili powder, cumin, coriander and paprika.
Turn heat to medium-high, add beer, reduce until almost evaporated. 
Plate hash, wipe out pan and return to medium heat. 
Spray with nonstick cooking spray, crack eggs into pan and cook for 3-4 minutes. 
Season with salt and pepper, flip and cook to desired doneness.
Serve over hash, top with hot sauce.

Recipe notes and variations:
-I used to serve this over grits, and didn't add corn, but because I had a few ears of corn on hand, I added that rather than serve the hash over grits. 
-Occasionally I would add some shredded cheddar cheese, sour cream, and minced cilantro to the top of the dish
-JJ especially liked when I added ground sausage to the hash or crumbled bacon on top