Friday, July 17, 2015

Morning Glory Muffins


I was never a huge muffin fan growing up, but then everything changed. When I was pregnant, muffins became my absolute favorite food group. After every normal check-up I stopped by the Panera down the street for a Pumpkin Muffy, and a few days a week in the afternoon I opted for a low-fat blueberry muffin from Dunkin' Donuts. But I said yes to any muffin at any time. I don't consume quite as many muffins these days but my love for them hasn't waned a bit over the last four years.

I know muffins can get a bad rap as breakfast or even a snack food because there can be so much hidden sugar and fat, but these muffins are a bit on the healthier side. Muffins have become a rare brunch treat for me, but they can certainly be a more common breakfast given the right ingredients.

I first made these muffins about 8 years ago with the Tuesdays with Dorie blogging group, and have tweaked the recipe and made them many times since. I know, who tweaks a Dorie recipe? I felt there was a bit too much sugar, plus I like more whole wheat in my baked goods, and finally I upped the carrot substantially. Over the years as I've tested out Carrot Cake recipes and Oatmeal Raisin Cookie recipes (my husband's favorite cake and cookies, respectively) we've discovered that we do not care for cinnamon and vanilla extract paired together. I also prefer to give my cinnamon a little oomph with a slight hint of ginger, but nutmeg is also lovely with the right recipe.

I've since made these muffins several times for family and friends and they're always a big hit!

Morning Glory Muffins
adapted from Dorie Greenspan Baking From My Home To Yours

1 1/2 cups all-purpose flour
1 1/2 cups whole wheat pastry flour
1 tbsp. baking powder
1 1/2 tsp. ground cinnamon
1/2 tsp. ground ginger
1/4 tsp. baking soda
1/4 tsp. salt
1/2 cup sugar
2 tbsp. molasses
2/3 cup canola oil
2 large eggs
3/4 cup milk
2 cups loosely packed shredded carrots
1/2 cup shredded unsweetened coconut flakes
1/2 cup raisins (or cranberries or a mix)
1/3 cup pecans, toasted and chopped

Preheat the oven to 375* degrees
Line 12 muffins tins with liners or grease if not using liners
In a medium bowl, combine the flour, baking powder, cinnamon, ginger, baking soda and salt
Whisk to combine
In the bowl of a stand mixer combine sugar, molasses and canola oil
Add in the eggs and beat until incorporated
Add in the dry ingredients in two additions, alternately with the milk, mixing each addition just until incorporated
Mix in the shredded carrot
Using a rubber spatula, gently fold in the coconut, raisins/cranberries, and nuts.
Divide the batter evenly among the muffin cups
Bake for about 20 minutes, then remove the muffins to a wire rack to cool completely

Wednesday, July 15, 2015

Baked Samosa Patties


When we moved to Michigan I didn't know a single person here. I'm no stranger to moving to a new city, so I got right down to friend-making business. I joined several meet-up groups, my sorority alumni group, a great church, and gained friends as I began working. After a few months I became good friends with a woman I met and we decided to start a book club. After a few more months of collecting new friends and inviting them to join, we created a great group of 5 - soon to be 6 members.
After chatting over email we discovered that in our group there was a vegan, 2 vegetarians, a gluten-free woman and 2 omnivores. We knew we wanted to have our book club meetings at each others homes and make it a pot-luck, so we all had our work cut out for us with regard to food choices. Then one woman suggested we theme each book club so the food matches the book! It's been a culinary challenge that I am happy to take on!
For the last meeting we read my selection, The Martian, which I highly recommend. So obviously for the theme, it had to be potatoes! My first instinct was baked samosas with wonton wrappers... but they're not vegan or gluten free! Then I saw gluten-free prepared dough at the store, but that's not vegan! So finally I decided to buy GF flour and use Earth Balance and olive oil in my dough. Sadly, the dough was a bit brittle and I was unable to mold it, so we had samosa tostatas.
With a few pounds of potatoes left and a strong craving for more samosas it finally hit me - samosa patties! I wish I had the idea before book club, but I'm glad it occurred to me because these were delicious! The filling is all that really matters in a samosa, so the absence of a wrapper was no big deal. They're also much healthier without the dough and being fried. We topped these with a bit of leftover mango chutney and served them alongside some crispy chickpeas and roasted cauliflower.

Our next theme is "heavenly food" - and vegan/GF suggestions?

Baked Samosa Patties

2 lbs. russet potatoes, peeled and diced
2 c. cauliflower florets
2 tbsp. olive oil, divided
1 small yellow or red onion, diced
3 garlic cloves, minced
1 serrano pepper, seeds and ribs removed, minced
1" of fresh ginger root, grated
3 tsp. curry powder (I love TJ's)
1 tsp. ground cumin
1/2 tsp. groud turmeric
1/2 tsp. fennel seeds
1 c. frozen peas
1 lime, juiced
Kosher salt
Fresh black pepper
1-2 tbsp. earth balance buttery spread (optional)

Preheat oven to 425*
Place potatoes in a pot of cold water, salt generously, cover and bring to a boil.
Uncover and cook for 5 minutes, add cauliflower and cook for another 5 minutes.
Drain in a colander and set aside.
While potatoes cook, add 1 tbsp. olive oil to a saute' pan over medium heat.
Add onion, garlic and serrano pepper, season with salt and cook for 5 minutes, until onions begin to brown.
Add drained potato/cauliflower mixture to a mixing bowl, mash with a potato masher until vegetables are all slightly broken down.
Add onion mixture, ginger, curry powder, cumin, turmeric, fennel seeds, peas and lime juice, gently fold ingredients into potato mixture.
Taste and adjust seasonings, adding pepper and if desired, earth balance.
Mixture should  be a bit pasty but still have small chunks of potato and cauliflower, mash with a spatula as needed.
Line a cookie sheet with foil, grease with remaining 1 tbsp. olive oil.
Form mixture into about 8 patties, shaping into discs with hands (if it's still too hot to handle, refrigerate for 10 minutes), place on cookie sheet.
Bake for 15 minutes, then flip patties gently and cook for another 10 minutes.
Remove from heat, serve with chutney or raita.

*Another option is to pan-fry the patties in a bit of oil rather than bake

Monday, July 13, 2015

Baked Falafel


I can remember when I had falafel for the first time, it changed my life. I was 22 and living in Bloomington, IN (such a wonderful place to live, by the way). I was starting to try more and more ethnic food and found that the possibilities were endless when you stepped outside Italian (what I grew up eating) and American style cooking. My husband and I grabbed lunch at a Lebanese restaurant and after perusing the menu, falafel sounded like something we'd like. They were absolutely amazing, crunchy with so much flavor! I immediately went home and tried to recreate them with canned chickpeas. I attributed the mushy texture to the fact that I baked them rather than fried them. From then on I decided it was best to just buy falafel.

Fast forward a few years to my husband and I watching Diners, Drive-Ins and Dives before bed one night. It's our guilty pleasure, what can I say? I wouldn't eat half the things showcased, but there are occasional gems and we always try to make it to those restaurants when we are in a new city. Guy was at a falafel joint and as the chef was showing him his falafel recipe it all made sense - you don't use cooked chick peas! You start with dried, soak for 12-24 hours, and throw them in the food processor to get the little nutty bites. My mind was blown, and it made total sense! The only problem? I had the world's worst, loudest, and smallest food processor in the world. So I mostly continued to buy falafel.

Then last December for our 7th wedding anniversary, my parents bought JJ and me the mother of all food processors. I was elated, finally a chance to make proper falafel! Since then I haven't looked back, they're a weekly staple in our home. And the baked version tastes almost as crisp and flavorful as the fried, a win in my book! I serve these with many different sauces and sides, such as baba ganoush, tahini sauce, tzatziki or chutney (pictured here).

Baked Falafel

1 3/4 c. dried chickpeas
2 garlic cloves, chopped
1 small onion, quartered
1 tbsp. cumin
Cayenne to taste
1 c. flat leaf parsley
Salt and fresh ground black pepper
1/2 tsp. baking soda
1 tbsp. fresh lemon juice
1/4 c. olive oil

Place chickpeas in a large bowl and cover with about 5-6 c. of water, cover and periodically check on the beans for 12-24 hours, until soft enough to squish with your fingers.
Preheat the oven to 400*
Drain chickpeas, place in a food processor with the garlic, onion, cumin, cayenne, parsley, salt, pepper, baking soda and lemon juice.
Pulse until the ingredients are finely minced, but not pureed. 
Stop and scrape down sides as needed, add 2 tbsp. olive oil.
Taste and adjust seasonings
Line a baking sheet with foil or parchment, grease with olive oil.
Use a 1/4 or 1/3 measuring cup, pack the mixture in then release into your hands to roll into a patty, place on the baking sheet and continue until you're out of chickpeas. 
Brush the tops of the patties with oil then place in the oven.
Bake for 10-15 minutes, then flip and bake for another 10-15 minutes, depending on the thickness of the falafel.
Remove from the oven and serve with pita and accompaniments.


Friday, July 10, 2015

Vegan Stuffed Cabbage Casserole


Hello out there! Thank you so much for sticking with this blog during my 1 year hiatus (or maybe you just forgot to delete me from your reader - either way, thanks!)

It's been quite a year and I'll skip the details but we moved away from Idaho in August and landed in Michigan! I definitely left a huge piece of my heart there and vow to one day have an 208 area code once again. However, we're close to family now and west Michigan really is a treasure trove of beautiful nature and some amazing produce. We have truly enjoyed settling into life here and I feel fortunate and comfortable calling it home.

My cooking and eating habits have also evolved a bit more over the last year and I'm leaning much more toward vegan. I hope to take the leap soon and become 100% vegan at home with small variations for eating out, but it's a work in progress. I've also been in therapy for my eating habits (as many of you might remember, I'm maintaining an 85-90 lb. weight loss). Most of the time I'm in a healthy place where I don't over analyze each morsel of food that I consume. It's quite freeing to not be in a "constantly dieting" mindset. If you have an eating disorder, whatever it may be, I cannot tell you how beneficial therapy is. I'd also be happy to chat with anyone with questions, feel free to email me!

So I'm sure in the coming months I'll delve more into Michigan, veganism, EDs, our amazing travels out west and more. I recently accepted a part time job as my baby is now in pre-k and my hope was to be part time once she started kindergarten. I'm trying to slow down a bit and be more mindful of what I devote my time to. My blog brings me happiness, a creative outlet, so I decided it was time to resurrect it!

So on to this recipe! For the last 8 months I've subscribed to an organic produce delivery and almost every week there is a head of cabbage in my green box. I love slaw salads, but my husband and daughter do not. I googled cabbage recipes and of course stuffed cabbage was most common. Making stuffed cabbage rolls can be daunting, so I decided to do a deconstructed casserole version. And since I made it the first time, I've made it with a few variations, such as quinoa for the rice (we prefer rice) and quorn or beyond meat crumbles for the tempeh (we prefer tempeh). I also have found a great use for leftover Chinese take-out rice - this casserole! It's very hearty, filling and comforting and can take as little as 15 minutes to make, depending on your ingredients (quick rice, no bake-off). I top mine with a vegan "parm" made with walnuts and nutritional yeast (hence the green looking topping), but we've also had it dolloped with goat cheese or parmigiano reggiano. You can truly customize this with pantry staples and your taste.

**I'd love to be more active in the blogging community. If you'd like to leave your blog in the comments, I'll be sure to add you to my reader and start some conversations**

Stuffed Cabbage Casserole
Veggie by Season original recipe

1 tbsp. olive oil
1 head of cabbage, about 3 lbs., diced 
1 large onion, finely diced
3 garlic cloves, minced
1 28 oz. can tomatoes (I prefer whole San Marzano with basil)
2 c. prepared brown rice (or quinoa, I use short grain brown)
1 package of tempeh, crumbled (or faux beef crumbles)
2 tbsp. dried oregano
1 tbsp. fennel seeds
Salt and pepper
Crushed red pepper flakes, to taste
Parmigiano-Reggiano, Goat Cheese, or omit for vegan

Preheat oven to 400*
Preheat large, deep, oven-safe skillet over medium-high heat with olive oil.
Add cabbage and onion, toss and cook frequently until vegetables begin to caramelize, about 8-10 minutes. 
Add garlic and a heavy pinch of salt and continue to cook for another 2-3 minutes. 
Add tomatoes (if whole, squish by hand or use a blender to reach desired consistency), rice, tempeh, oregano, fennel, crushed red pepper flakes and fresh ground black pepper. 
Turn heat to low, stir well to distribute, taste and add salt as necessary.
Top with cheese, if desired, and place skillet into the oven. 
Bake for 20 minutes, or until edges crisp and mixture is bubbly.
Serve immediately with additional pepper flakes and cheese. 

Sunday, June 29, 2014

Pasta with Mushrooms and Artichokes


The night before Thanksgiving I knew I had to make a pasta dish for carbo loading purposes. While we weren't with the whole family at the Cincinnati Thanksgiving 10k, we did run the 5k in Boise (plus I added another 3.1 around the block to get the true T-day 10k feeling). It was my first time pushing Violet in the jogging stroller during a race and we had so much fun together. The Boise race was dog friendly so she was entertained as we ran past them and they ran past us.

While I'm a marinara lover through and through, I didn't want something so acidic before the race. I found this pasta dish from Giada DeLaurentiis that included mushrooms, artichokes AND marsala, three of my absolute favorites. The only changes I made were reducing the cream/using half and half and I used marinated grilled artichokes for a bit more flavor in the sauce. If you haven't tried these artichokes, I highly recommend you do, they were amazing!

Pasta with Mushrooms and Artichokes
slightly adapted from Giada DeLaurentiis

3 tbsp.. olive oil
1 small onion, finely chopped
1 lb. mushrooms, cleaned and chopped
Kosher salt
1 c. dry Marsala wine
1 lb. short cut pasta
1 jar of grilled artichokes in marinade
3/4 c. grated parmesan
1/2 c. half and half
chopped flat leaf parsley
1 tsp. fresh black pepper
Crushed red pepper flakes, if desired

Bring a large pot of water to a boil, add salt and drop in pasta, cook to al dente, drain and set aside.
Heat olive oil in a large, deep skillet over medium heat.
Add onion and cook for a minute, add mushrooms and saute' until water has evaporated and mushrooms have cooked down, about 10 minutes.
Season with salt and pepper, add Marsala and continue cooking until half the wine has evaporated.
Add pasta, artichokes, half of the parmesan and half and half to the skillet, toss with the mushrooms to mix and heat through.
Top with remaining parmesan, parsley and crushed red pepper flakes.

***Stop back every day until Christmas Eve for 12 new cookie recipes!***

Saturday, June 28, 2014

Mushroom Stout Pie with Potato Biscuits


We've had a few dreary, rainy days this week in Boise so I jumped at what is probably my last chance to make a warm and hearty stew before summer really sets in. I have truly embraced the potato while living out here, so potato biscuits were right up my alley. The filling was hearty and filling but very healthy. The recipe is written for either kidney beans or tofu, so I decided on kidney beans as I always have them in the pantry but rarely find much use for them outside of Minestrone and Veggie Burgers.


Mushroom Stout Pie with Sweet Potato Biscuits
adapted from  Post Punk Kitchen 

3 c. vegetable stock
2 tbsp. olive oil
1 large onion, diced
4 garlic cloves, minced
8 oz. cremini mushrooms, sliced
1 tsp. dried rosemary
2 tsp. dried thyme
1/2 lb carrots, peeled and sliced
10 oz. stout beer 
2 tbsp. tomato paste
Fresh black pepper
Salt
1/2 c. AP flour
3 c cooked kidney beans

for the biscuits
1 1/2 c. AP flour
1 tbsp. baking powder
1 tsp. salt
1 c. mashed sweet potato (baked off the previous night, fork mashed)
3 tbsp. olive oil
3/4 c. nonfat buttermilk

Preheat a Dutch oven over medium heat, saute' onions in olive oil until translucent, about 5 minutes.
Add a pinch of salt and garlic, cook for one minute and stir to ensure garlic doesn't burn.
Add mushrooms, celery, thyme, rosemary and saute' for an additional 5-7 minutes, until mushrooms begin to brown and release liquid.
Add carrots, stout, tomato paste, pepper and salt, bring to a simmer and reduce liquid by half, add vegetable stock and cover. Simmer for five minutes.
Mix flour into one cup of cold water with a fork, be sure there are no lumps. Slowly add to pot, whisking with a fork. Add the kidney beans and stir well, turn heat off and keep covered. 
Preheat oven to 425*
Make biscuits - sift flour, baking powder and salt into a large bowl. 
In another bowl, use a fork to mix potatoes, olive oil and buttermilk. 
Make a well in the flour bowl and add potato mixture, mix gently with a fork until dough forms, knead a few times but be careful to not overmix. 
Drop heaping spoonfulls of dough onto stew around the pot.
Bake for 25 minutes, until biscuits are puffy and stew is bubbly.

Thursday, May 1, 2014

Vegetarian Buffalo "Chicken" and Spiced Brown Sugar Waffles


Well I can't believe it's been 4 months since I blogged last! Where has the time gone? Due to a new job, no daylight for photographing food, writing two novels, editing said novels and just overall being burnt out, this blog obviously took a hiatus. Oh, and Trader Joe's opened so I fell victim to the ease of delicious prepared food. However, I am taking a break from their Spelt Risotto and Sweet Potato Gnocci to start cooking a bit more from scratch. If you're still with me, thank you :) I appreciate your readership!

I probably first heard of chicken and waffles when I moved to North Carolina for college, and it seemed so weird to me. We rarely had fried chicken growing up, and our waffles were always at breakfast smothered in syrup and fruit. However, I saw them recently in a magazine and decided the sweet and savory combo sounded fantastic. I try to limit our fake meat consumption to once a week, and Trader Joe's chickenless fingers are my husbands favorite fake meat. We love any and all Buffalo chicken combinations, so I figured using a sweeter waffle then dousing these with buffalo sauce would taste great.

I used this recipe for Spiced Brown Sugar Waffles from Williams-Sonoma for the waffle portion of this meal as it turned up in a search for sweeter waffles. These waffles were delicious, just sweet enough with a hint of spice. They take a few extra steps, but it's worth it for a crisp outside and fluffy inside. If you decide to go with a traditional waffle, you may want to drizzle some maple syrup along with buffalo sauce, or skip the buffalo sauce all together (but....don't). My husband liked to make his waffle and chicken into a sort of taco, but these were delicious any way you make them. I served these with a bacon-less wedge salad on the side.

Vegetarian Buffalo "Chicken" and Spiced Brown Sugar Waffles

1 package chickenless chicken nuggets or tenders
1/2 c. buffalo sauce
4 waffles, recipe below

3 eggs, separated
1 3/4 c. buttermilk
1 stick butter, melted (or canola oil, I used 50/50)
1/2 tsp vanilla extract
1 3/4 c. unbleached all purpose flour
1 tsp. baking soda
1/2 tsp. salt
3/4 tsp. ground cinnamon
1/2 c. firmly packed brown sugar

Cook chickenless tenders according to package directions. 
While chicken cooks, prepare waffles.
Preheat waffle iron to medium-high heat.
Whisk together egg yolks, buttermilk, butter and vanilla.
Sift flour, baking soda, salt, cinnamon and sugar together, stir into wet mixture .
In another bowl, beat egg whites until peaks form, fold into other mixture until just incorporated.
Grease waffle iron, spoon batter onto iron (about 1/3-1/2 c. depending on iron) and cook until golden, about 5-6 minutes.
Keep warm on a plate covered with foil until serving. 
Serve with chickenless tenders, a drizzle of buffalo sauce and maple syrup, if desired.

Friday, December 13, 2013

Red Velvet Shortbread Cookies


As I was browsing cookie recipes on the Better Homes and Garden's website (how I got there, I have no idea!) I saw this recipe and knew it would be perfect for my dad. His favorite cookies tend to be shortbread or my un-iced gingerbread men/sugar cookies. His favorite nut is the pistachio, and these suggest dipping the cookie in either sprinkles or pistachios. I did make two versions, one with sprinkles and one with pistachios. 

The red velvet aspect makes it more festive and the subtle hint of cocoa powder makes them taste just like red velvet cake. If you don't have time to make them for Christmas, they'd also be perfect for Valentine's Day! (I doubled this recipe the first time, then tripled it the second, you will get about 15-18 cookies per single recipe below)

Red Velvet Shortbread Cookies
directions rewritten, recipe from Better Homes and Gardens

1 1/4 c. all purpose flour
1/3 c. sugar
2 tbsp. unsweetened cocoa powder
1/4 tsp. salt
1/2 c. butter
1 tbsp. red food coloring
3 oz. white chocolate, chips or chopped
Finely chopped pistachios (about 1/2 c.) or nonpareils (about 2 tbsp.)

Cream butter and sugar, add salt cocoa powder and red food coloring, mix well.
Gently fold in flour until it is absorbed. 
Lay a piece of plastic wrap out and form dough into a log, tightly wrap and refrigerate for 1 hour.
Preheat oven to 325*
Line a cookie sheet with parchment.
Slice cookies 1/4" wide and place 2" apart on cookie sheet.
Bake for 18-20 minutes, until puffed and set, cool on a wire rack to room temperature. 
Melt white chocolate in a small dish, dip cookies in chocolate and then sprinkle with nuts or nonpaerils, lay on plastic wrap to dry, about an hour. 
Place in an airtight container for up to a week.

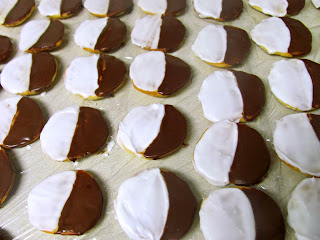
Black and White Cookies


For a few years I've been wanting to make black and white cookies but they seemed intimidating. They're the kind of thing that if you screw it up, people will notice. They have such a distinct flavor and look and when they're good, they're GOOD. They're more of a cake-cookie than a hard, sturdy cookie and the secret getting the perfectly flat top is flipping them over and icing the bottom!

My older sister is a big black and white cookie fan so I decided to bite the bullet and try out black and whites for her Christmas cookie package. I used Smitten Kitchen's recipe and steps exactly so I would not mess up a single step. I'm not going to rewrite them because they're long and involved, I'll just give you a link to the recipe. Make these! Make them now! Smitten Kitchen's Black and White Cookies

Thursday, December 12, 2013

Fruitcake Cookies


Starting in late October, I create a document where I copy and paste Christmas cookie ideas for the year. I generally try to make about 6-8 of the old favorites and 6-8 new cookies. Since my Kitchenaid mixer didn't make it to Boise, along with my rolling pin, silpat, cookie cutters and a few other baking essentials, I had to rethink the list. While I normally make Gingerbread men cut outs, sugar cookie Christmas trees, chocolate sugar cookie snowflakes and spritz cookies, they weren't an option this year.

As I was noting recipes I thought to myself how it would be fun to make a certain cookie that each member of my family would really like. So over the next few days you'll see different cookies that I made hoping to make each family member feel extra special!

First up is my husband! He is one of the only people I know who love fruitcake. Seriously... So when I saw these Ina cookies I knew they'd be a hit with him. I made a few small changes to the original recipe. First, I couldn't get dried figs at the store and I didn't feel like trying another so I used dates. Turns out my husband prefers dates! Next, I soaked the fruit/nuts in Bourbon rather than sherry. Lastly I left out the candied cherries and used dried cherries instead. Do not be afraid of these cookies, yes Fruitcake is a polarizing thing, but they're so good! They plethora of dried fruit and nuts is just lightly held together with a brown sugary dough, totally delicious!

Fruitcake Cookies
loosely based on Ina Garten's recipe 

1 c. diced dried dates
1 c. diced dried apricots
1/2 c. golden raisins
1/2 c. dried cherries, chopped
1/2 c. dried cranberries
3 tbsp. Bourbon
1 tbsp. fresh squeezed lemon juice
1 tbsp. lemon zest
3/4 c. chopped pecans
1 c. butter, softened
1/2 tsp. ground cloves
2/3 c. light brown sugar, packed
1 large egg
2 2/3 c. all purpose flour

Toss dried fruit and pecans in a bowl, drizzle with bourbon, lemon juice and zest, add a pinch of kosher salt.
Cover and let fruit sit overnight at room temperature.
Cream butter and sugar in a large mixing bowl.
Add egg and cloves, mix well.
Add flour and mix until it is just combined, do not overmix.
Add fruit mixture and gently fold to distribute evenly.
Chill dough for at least one hour.
Preheat oven to 350*
Scoop dough by heaping tablespoons full into palms, roll into a ball then gently flatten into a disc, place 2" apart on a parchment lined cookie sheet.
Bake for 15-17 minutes until golden brown.
Cool on a metal rack and store in an airtight container for up to a week.