Showing posts with label parmesan. Show all posts

Sunday, June 29, 2014

Pasta with Mushrooms and Artichokes


The night before Thanksgiving I knew I had to make a pasta dish for carbo loading purposes. While we weren't with the whole family at the Cincinnati Thanksgiving 10k, we did run the 5k in Boise (plus I added another 3.1 around the block to get the true T-day 10k feeling). It was my first time pushing Violet in the jogging stroller during a race and we had so much fun together. The Boise race was dog friendly so she was entertained as we ran past them and they ran past us.

While I'm a marinara lover through and through, I didn't want something so acidic before the race. I found this pasta dish from Giada DeLaurentiis that included mushrooms, artichokes AND marsala, three of my absolute favorites. The only changes I made were reducing the cream/using half and half and I used marinated grilled artichokes for a bit more flavor in the sauce. If you haven't tried these artichokes, I highly recommend you do, they were amazing!

Pasta with Mushrooms and Artichokes
slightly adapted from Giada DeLaurentiis

3 tbsp.. olive oil
1 small onion, finely chopped
1 lb. mushrooms, cleaned and chopped
Kosher salt
1 c. dry Marsala wine
1 lb. short cut pasta
1 jar of grilled artichokes in marinade
3/4 c. grated parmesan
1/2 c. half and half
chopped flat leaf parsley
1 tsp. fresh black pepper
Crushed red pepper flakes, if desired

Bring a large pot of water to a boil, add salt and drop in pasta, cook to al dente, drain and set aside.
Heat olive oil in a large, deep skillet over medium heat.
Add onion and cook for a minute, add mushrooms and saute' until water has evaporated and mushrooms have cooked down, about 10 minutes.
Season with salt and pepper, add Marsala and continue cooking until half the wine has evaporated.
Add pasta, artichokes, half of the parmesan and half and half to the skillet, toss with the mushrooms to mix and heat through.
Top with remaining parmesan, parsley and crushed red pepper flakes.

***Stop back every day until Christmas Eve for 12 new cookie recipes!***

Tuesday, October 15, 2013

Tomato and Mozzarella Risotto


This past week, I did something that I haven't done in a few months, probably since we were living in Jacksonville. I went through some of my favorite websites and blogs (cookbooks are in storage, I'm really missing the Moosewood ones!) and printed out dozens of recipes and put them in a folder. On Friday, I went through the recipes and picked out six to make for dinner each night this week (we leave for a weekend trip on Friday!) It has been so nice to have a new variety of things, especially this risotto.

I made a few small changes from the original, a Cooking Light recipe, specifically adding some wine, using diced canned tomatoes, and a grate of Parmesan to finish the dish.  The flavors were delicious, basically a caprese salad, but warm and comforting, a nice way to taste the best flavors of summer in the cooling fall weather!

Tomato and Mozzarella Risotto


1 tsp. butter
1 tsp. olive oil
1/2 small yellow onion, minced
2 garlic cloves, minced
1 c. arborio rice
1/4 c. dry white wine
1 c. canned, diced tomatoes
3 c. vegetable stock, warmed
2 c. fresh baby spinach leaves
1 dozen basil leaves, roughly chopped
2 oz. fresh mozzarella, chopped
1 oz. fresh grated parmesan cheese
Kosher salt and black pepper, to taste

Heat a shallow skillet over medium heat.
Add butter and olive oil, melt together, then add onion and garlic, saute for 5 minutes.
Add rice, stir to gently toast for 2 minutes.
Add white wine, when liquid has reduced to half, add tomatoes and about 1/2 c. stock.
Once stock is absorbed, add another 1/2 c., continuing to stir rice every minute or two and adding more stock, as needed.
After about 20 minutes of adding stock and stirring risotto, turn heat off.
Fold in spinach and basil leaves, then add mozzarella and parmesan and gently fold.
Taste and add more salt, if necessary, it might be salty enough, season with black pepper.
Serve immediately.

Friday, April 12, 2013

Bulgur and Kale Casserole with Yogurt Topping


It's so hard to believe that next Thursday will be the last day of my CSA share. It's funny because I mentioned it to my mom, and it reminded her that theirs (in Ohio) starts in a few weeks! Although the CSA is ending, the Farmer's Market just opened, so don't you worry about me, I'll still have my fresh produce... and I hear Georgia peaches have made their way to the market!


Now that I've got one full CSA season under my belt, I feel like I can share some of my likes and dislikes. For the most part, I liked all of the vegetables, I'm not picky when it comes to veggies. However, it did get to be a bit monotonous. I could expect a hearty green like collards or kale (sometimes both!) every week. I did struggle to make recipes with them, there's only so much you can do with kale. However, through searching for kale recipes, I found quite a few keepers, like this casserole! I was forced out of my comfort zone a bit with ingredients, but also found some treasures (like Romesco Cauliflower and Watermelon Radishes). It also forced me to seek out new recipes using the ingredients, or put on my thinking cap and create some!


Vegetarian casseroles can be hard to come by, but this was both healthy and hearty, full of vegetables and protein. Since the photos never come out well, I did snap quite a few photos of the process. I actually made this dish twice recently, the photos in the initial attempt were awful. I made it exactly as written the first time with bulgur, the second time I only had quinoa, so I used that, but I have to say I MUCH preferred the bulgar (even though I love quinoa!)


It's another one of Joanne's Best of 2012 gems, and seriously, I can see why it was the best. The spices are delicious, it's warm and comforting, and was made with basic pantry staples!

Bulgur and Kale Casserole with Yogurt Topping
adapted from Eats Well With Others (originally from the NY Times)

1 tbsp olive oil
1 onion, chopped
4 garlic cloves, minced
1 28 oz. can crushed tomatoes
Salt and fresh black pepper
1/2 tsp. sugar
1/4 tsp. cinnamon
1/2 tsp. smoked paprika
1/4 tsp. ground cloves
1 lb. kale, stemmed and washed
1 c. coarse bulgur
1/4 c. finely chopped dill (I used 1 tbsp. dried)
1/2 c. grated parmesan
2 eggs
1 c. plain Greek Yogurt

Make tomato sauce: heat olive oil in a large skillet over medium heat, add onion and garlic, stir and cook until tender, add tomatoes, salt, pepper, sugar, cinnamon, paprika and cloves.
Turn heat to medium-high and cook until tomatoes are bubbling, bring down to low and simmer, partly covered until thick and fragrant, about 30 minutes.
Taste and adjust seasonings.
To cook bulgur: Bring 2 c. water (I added a vegetable stock cube) to a boil, add bulgur, when water comes back to a boil, turn to low, cover and simmer for 15-20 minutes, until liquid is absorbed.
Remove from heat and set aside.
Blanch kale in coiling water for 4 minutes, pour into a colander, rinse with cold water and squeeze dry, chop into thin strips.
Preheat oven to 350*
Oil a 3-quart baking dish, spoon tomato mixture into the bottom, add a layer of bulgur then a layer of kale, repeat.
Beat together eggs, yogurt and parmesan in a dish, spread over the casserole.
Bake for 35-40 minutes on a baking sheet (in case it bubbles over!)
Remove from oven, let casserole rest for 5 minutes, then serve.

Wednesday, February 20, 2013

Bean and Kale Ragout over Parmesan Polenta


So you may have noticed the recipes here since Christmas have been pretty "healthy" and vegetable-heavy. It's partly because of the CSA, and mostly because I've really been trying to lose more weight. I am so proud of how far I've come, but I also have these last 15-ish nagging pounds on me that I'd like to get rid of. I decided to make a goal of losing it before my birthday (May 14) and so far, so good! I hit a big milestone on Sunday of -90 lbs. and it's given me some great motivation to finally hit that magical -100lb. mark!

I am trying to lose the last 10 as I lost the first 90, slow, steady, diet and exercise, but I'm not going to lie and say crash dieting and restricting for a few weeks hasn't crossed my mind. But I want this to last, and I want it to be my lifestyle, so I'll keep plugging along. Dinners like this make me remember that I can eat healthy, but also eat delicious food and still stay within my calorie bank for the day.

I tried to find big, beautiful heirloom beans at Whole Foods, World Market, and another specialty shop, but the only thing I could find was large lima beans at Publix. While I'm not a lima bean lover or hater, I never would have guessed these were lima beans had I not prepared the meal. The kale was from the CSA, of course. I got this idea of cooking beans and kale in tomatoes from browsing recipes for kale, but didn't print out the recipe, and don't exactly remember what was in that recipe, so I guess I'll call this one an original!

Bean and Kale Ragout over Parmesan Polenta
Veggie by Season original

1 c. dry large lima beans, or any bean 
1 bunch of kale, any variety, stemmed and chopped
1 tsp. olive oil
1 small yellow onion, minced
2 garlic cloves, minced
1/2 c. dry red wine
2 c. diced tomatoes in juice
1 tsp. dried oregano
1/2 tsp. fennel seeds
Kosher salt and black pepper
3 c. vegetable stock
1 c. quick cooking polenta
Milk, as needed
1/4 c. Parmesan cheese, plus extra for garnish
Crushed red pepper flakes

Soak beans overnight in the refrigerator, drain and set aside.
Bring a pot of water to a boil, add kale and blanch of 2-3 minutes, until slightly wilted, drain and set aside.
Add oil to a pot over medium heat.
Add onion and garlic, season with salt and pepper, saute' for 5 minutes.
Add wine, tomatoes, oregano, fennel and beans, stir well, cover, turn to low and simmer for 20 minutes.
Add vegetable stock to a small pot, bring to a boil.
Add polenta and whisk continuously, add milk if necessary to thin. Turn heat to low and cook for 5 minutes, add Parmesan cheese, turn heat off and cover.
Add kale to bean mixture, stir and heat through.
Add polenta to a dish, spoon in bean mixture, top with Parmesan and crushed red pepper flakes, serve. 

Tuesday, February 12, 2013

Roasted Cauliflower Pizza with Garlic Goat Cheese


Lately I've seen a few recipes for pizza come up in my google reader with cauliflower as the crust. Seriously?  Why in the world would anyone replace delicious carby crust with cauliflower?! I know carbs are the enemy and whatnot, but let me tell you as an 85 lb. (and counting!) weight loser, it's not! Diet and exercise, counting calories, and a colorful, plant based diet at the answer! I have my pizza, and eat it too.

After receiving 3 heads of cauliflower in the CSA share last week, I decided to take the cauliflower pizza idea, and make it the topping. To make it flavorful and healthy, I used a 50/50 unbleached white flour/whole wheat flour pizza crust, and roasted garlic infused goat cheese as my base. Roasting vegetables gives them so much flavor, the cauliflower turns a little nutty and the garlic becomes sweeter and less pungent. A sprinkle of parmesan, some fresh thyme and scallions finished the pizza and let me tell you it was phenominal! I paired it with a garden salad and it was a healthy (but delicious) pizza night! For Christmas, we received a pizza stone, and it really does make a huge difference. This is the first time my homemade pizza has bubbled up like the best pizzaria's pizzas do, and yes, that's a life "win" for me!

Roasted Cauliflower Pizza with Garlic Goat Cheese
Veggie by Season original

Crust:
3/4 c. warm water (about 110*)
1 packet instant yeast
1 tsp. sugar
1 c. unbleached all purpose flour
1 c. whole wheat pastry flour
1 tsp. salt
1 tsp. olive oil

Toppings:
1 head of garlic
2 tsp. olive oil, divided
1 large or 2 small heads of cauliflower, cut into florets
Kosher salt
Black pepper
4 oz. goat cheese
1/4 c. grated Parmesan
2 fresh sprigs of thyme
2 scallions, thinly sliced
Crushed red pepper flakes

Preheat oven to 400*
Cut top 1/3 of garlic bulb off, place garlic on a square of tin foil, drizzle with 1 tsp. olive oil.
Pinch up sides and create an ball around garlic. 
Place in the oven and roast for 1 hour.

While garlic roasts, prepare crust.
Add water, yeast and sugar to the bowl of a stand mixer, swirl around to gently mix.
After yeast begins to bubble, attach dough hook to the mixer and add flour, salt and oil.
Turn mixer on low and knead dough for 8-10 minutes, add additional flour if necessary, dough should be slightly sticky, but pull away from sides of the mixer. 
Flour surface, form dough into a ball and rest, cover with a damp towel.

Add cauliflower to a baking sheet, toss with 1 tsp. olive oil, kosher salt and black pepper, place in the oven with the garlic and roast for 20 minutes.
When garlic is finished, cool and squeeze out 4-5 cloves into a dish, add goat cheese and mix well. 
Remove cauliflower from the oven and set aside while you prepare the crust, Raise oven temperature to 475*.
Stretch dough out and form a circle, top with goat cheese mixture, cauliflower, Parmesan, thyme, scallions and crushed red pepper flakes.
Place on a pizza stone and bake for 20-24 minutes, until crisp on the bottom and golden brown on top. 
Serve.

Saturday, January 19, 2013

Garlic-Parmesan Crusted Romanesco Cauliflower


Romanesco Cauliflower is probably the most interesting looking vegetable I've ever seen. The vibrant color, pointy florets and bumps add so much charm. I received two heads in my CSA share a few weeks ago, and spend hours (I'm not even kidding) looking for recipes to do this vegetable justice. I wanted the shape and color to stay in tact, so chopping it to pieces wasn't an option. Then I remembered using a technique on artichokes that would work well. I roasted a few heads of garlic with olive oil, smashed them with some Parmesan and slathered it on to create this delicious crust.  I think a drizzle of balsamic or a tomato chutney for dipping would take this dish even further, but we loved it as it too.


Garlic-Parmesan Crusted Romanesco Cauliflower

3 heads of garlic
1 tbsp. olive oil
Kosher salt and fresh black pepper
2 heads of Romanesco Cauliflower
1/2 c. grated Parmesan cheese
1 tbsp. butter, softened

Preheat oven to 425*
Slice the top 1/4 off the heads of garlic, place them on a piece of aluminum foil, drizzle with olive oil, salt and pepper, pinch up sides of foil to create a sealed packet, place on a baking sheet and into the oven.
While garlic roasts, steam cauliflower.
Prep the cauliflower by stemming, removing leaves, and washing well. 
Place in a pot, add 1" of water and heat over high.
Bring water to a boil, steam cauliflower for 5 minutes, until tender, turn heat off and set aside (keep the lid on and let it continue to steam/stay warm).
Add butter and parmesan to a small mixing bowl.
Take cauliflower out of pot and place in a baking dish that will hold cauliflower snugly.
After an hour, remove garlic from the oven and cool for a few minutes, then squeeze roasted cloves out into mixing bowl with cheese, use a fork to mash and stir well. 
Slather cauliflower with garlic mixture.
Turn broiler on low, place cauliflower under and broil for 3-5 minutes, keep your eye on it the entire time, and remove if it's too brown.
Serve immediately.

Saturday, January 12, 2013

Roasted Brussels Sprouts with Habanero Aioli


One thing that really surprised me about Jacksonville when we moved here three years ago, was how diverse and impressive the culinary scene is. When I was the Bite Club host, I was able to try some really unique and absolutely delicious restaurants. When I meet new people and they know I cook and love to try new restaurants, I'm constantly getting great recommendations. The only downside is these places are usually in Riverside or at the beach, and nothing close to where I live.

There's a small strip of restaurants in a movie theater near my house, and about a year and a half ago, Speckled Hen moved into one of the locations. After driving past it one day, I went home and googled the menu, and knew it would be a great place for us to try. It's called a Southern Gastropub, the have great beer on tap, the menu changes seasonally, and the best part is it's next to the movies (perfect for date night!) and it's a few miles from our house.

Back in October, I took my parents there, and saw their Fried Brussels Sprouts with Habanero Aioli on the appetizer menu. Sold! The sprouts were tender with a little crunch, dusted in parmesan cheese, drizzled with thick, syrupy balsamic vinegar and spicy habanero aioli. The Brussels sprouts were so good and so unforgettable  that when my grandparents came down last weekend, I requested that we go there for dinner so I could get them again.

When I got a stalk of Brussels sprouts in the CSA basket last week, I knew I had to make the appetizer at home. I didn't want to fry the sprouts, so I roasted them instead. They were not quite the same, but still tender and delicious. The balsamic I used was from The Olive Leaf, I reduced it a bit to make it more of a thick syrup, and I used Greek yogurt to make the aioli, lightening it up a bit. If you're in Jacksonville, check out the Speckled Hen (the Hummingbird Cake is phenomenal for desert!)

Roasted Brussels Sprouts with Habanero Aioli
inspired by Speckled Hen

1 lb. Brussels sprouts, trimmed, large ones halved
2 tbsp. extra virgin olive oil
Kosher salt and black pepper
1/4 c. parmesan cheese
1/2 c. aged balsamic vinegar
1/4 c. plain Greek yogurt
1 habanero, halved, seeds and ribs removed
Juice of 1 lemon
1 tsp. lemon zest
1 tbsp. parsley
1 garlic clove

Preheat oven to 450*
Toss Brussels sprouts with olive oil, salt and pepper on a rimmed baking sheet.
Roast for 20 minutes, flip and roast for another 5-10 minutes, until browned.
Meanwhile, reduce balsamic vinegar over medium heat in a small stock pot until it's a thick syrup.
Add yogurt, habanero, lemon juice, lemon zest, parsley, garlic and a pinch of salt to a blender, blend on high speed until all ingredients are pureed. 
Taste and season with salt and pepper.
Remove sprouts from the oven, arrange on a serving plate.
Top with parmesan, drizzle with balsamic and aioli, serve. 

Tuesday, January 3, 2012

Vegetarian Zuppe Toscana


If you read many food blogs, you'll see lots of 2011 "best of" and "top 10" posts... not here! While 2011 was a wonderful year for me personally, it was very quiet on the blog front because of pregnancy + newborn. This year, I plan to make blogging a top priority as I have been cooking up some delicious dishes and want to share them with you!  

On New Years Day, I planned to make Black Eye Peas, Collared Greens and Cornbread for dinner. I put the peas in the crockpot with vegetable stock, garlic and onions and let it cook while we went to church and the beach. Yes, we went to the beach on January 1! It was a gorgeous day and I knew we'd be watching football all afternoon. I told JJ it was time we take Violet to the beach and enjoy the day before planting ourselves in front of the TV. No need to be jealous, friends in the north, it's now in the 40-50's here...


After we got home from the beach, we both grabbed a bowl of peas from the crock pot. And then another, and another. And soon enough, 1/3 of our dinner was consumed at lunch time. So I had to go to plan B. 

Zuppe Toscana is one of my favorites, but I never thought to make a vegetarian version. It's usually made with sausage, so I used the flavors of sausage for the broth (as I did with this soup), and lentils for meaty part of the soup. I also have seen cream or milk in Zuppe Toscana, but I found the starch from the potatoes made the broth thick enough that it was unnecessary. This soup was just as delicious as it's meaty counterpart, and much healthier. 

Happy New Year!

Vegetarian Zuppe Toscana
Veggie by Season Original

2 tbsp. EVOO
1 yellow onion, minced
2 garlic cloves, minced
Salt and pepper
1/4 c. sherry
4 c. vegetable stock (I love these stock cubes)
4 small/medium russet potatoes, sliced in 1/4" rounds
1 1/2 c. brown lentils
2 tsp. dried oregano
1 tsp. ground fennel seed
1 tsp. dried rubbed sage
1/2 tsp. crushed red pepper flakes
4 c. kale leaves, chopped
Parmesan cheese, for serving

Heat a dutch oven or large soup pot over medium heat.
Add EVOO, onions and garlic, season with salt and pepper and saute' for 5 minutes.
Add sherry, scrape bits off the pan.
Add stock, potatoes, lentils, oregano, fennel, sage and red pepper flakes.
Bring to a simmer, then turn to low and cover.
Simmer for 30 minutes, until potatoes and lentils are tender.
Add kale to the top, cover and simmer for another 10 minutes.
Kale should be wilted, carefully mix into the soup - some potatoes will break, but try to keep them as in tact as possible. 
Taste, adjust seasonings, and be sure lentils are tender.
Serve with grated parmesan.


Sunday, November 13, 2011

Spaghetti and Spaghetti Squash with Lemon Garlic Sauce and Ricotta


Just when I think I can't eat any more eggplant and zucchini, squash invade the market and save me. Then I finally get to go back into my google reader, and scroll through the millions of recipes I have starred to try that showcase squash! I have to say, spaghetti squash is probably my least favorite, but if I find a recipe where it looks amazing, I'm willing to use it rather than my beloved butternut. 

I found this recipe on Eats Well With Others, so I knew it was going to be good. Joanne never steers me wrong, and has the same appreciation for squash that I do. I made this recipe as written, but added a handful of frozen sweet peas. Something about non-traditional pasta dishes with peas, I just love'em! For the pasta component, I only had vegetable fettuccini on hand, which made this bowl sure look weird! However, don't let the weirdness steer you away (or look at Joanne's photos, which look luscious and creamy). This is a great squashy, but not will-burn-you-out-on-it's-squashness dish. 

Spaghetti and Spaghetti Squash with Lemon Garlic Sauce and Ricotta
changed a bit from Eats Well With Others

1 spaghetti squash
8 oz. pasta
4 garlic cloves, minced
1/3 c. olive oil
1 tsp. lemon zest
1/3 c. lemon juice
1 tbsp. butter
2 tbsp. fresh chopped basil
2 tbsp. parmesan, plus extra for serving
1 c. ricotta cheese

Preheat oven to 375*
Slice squash in half lengthwise and remove seeds.
Place cut side down, fill halfway with water, roast for 45 minutes, or until fork tender. 
Cool for 10 minutes.
Boil a pot of water for spaghetti, cook until al dente. 
Heat a skillet over medium, add EVOO and garlic, saute' until tender.
Add zest, butter, juice, season with salt and pepper. 
Simmer for 2-3 minutes, add peas and basil, stir, remove from heat. 
Scrape squash into a large bowl, add pasta and toss.
Pour sauce over spaghetti mixture, toss parmesan cheese in, place in serving dishes.
Top with a generous scoop of ricotta, extra parmesan, and a pinch of crushed red pepper flakes.

Friday, September 16, 2011

White Bean and Vegetable Salad with Rosemary Vinaigrette


I've now got weeks of life with a newborn under my belt. I'm proud to say that cooking is getting quite a bit easier. I find that recipes with multiple short steps seem to work the best right now. Each morning, I think about what I'm going to make for dinner, then decide how every nap I can do a bit more. With this recipe, I had to cook the dried beans, harvest rosemary, make the dressing, chop the veggies, and let it sit and marinade. Of course this can all be done in a marathon of 10 steps, but for now, the 2-3 minute steps spread hours apart are working perfectly. 

One reason cooking itself is getting better is Violet is now happy to sit in her bouncer and watch me cook! Of course, her attention span is about 10 minutes, but I get to practice my cooking show skills on her. A newborn is definitely the toughest critic, I have to say. One awkward minute of silence and she starts screaming! Now I just need to figure out a way to get the photography portion of cooking down... It's still a struggle to time dinner perfectly that I can photograph it and eat it. I've had several great dinners lately that went unphotographed, but I do intend to make them again, and again, and again, if necessary, until it's photographed! 

Note: You can use canned white beans, but I find them mushier than cooked, dried beans.


White Bean and Vegetable Salad with Rosemary Vinaigrette

Salad:
1 c. dried navy beans, cooked, drained and chilled
1 pint cherry tomatoes, halved
1 cucumber, quartered, seeded and sliced
1/4 c. diced red onion
1/4 c. grated parmesan cheese

Vinaigrette:
1 roasted red pepper, jarred or fresh
1 garlic clove, smashed
1 sprig of fresh rosemary, about 1 tbsp. 
2 tbsp. sweetener (honey, maple syrup, agave)
2 tbsp. balsamic vinegar
1/4 c. EVOO
Salt and pepper

Place all vinaigrette ingredients in a blender, puree until smooth.
Taste and adjust seasonings.
Add all salad ingredients to a bowl, pour on vinaigrette, mix well.
Chill for 30 minutes and serve.


Monday, January 17, 2011

Supreme Pizza Quinoa Casserole


Thank you so much to everyone for your sweet comments on my last post. I will probably keep the pregnancy details to a minimum on here, it is a food blog after all! 

I am so happy to be cooking again, and have wholesome meals. When I saw this recipe on Peas and Thank You last week, I knew I'd have to make it soon. While I love pizza, it's not always the healthiest option. Plus, vegetarian protein is hard to come by on a pizza! 

This recipe is originally written vegan, but I made a few changes. First, I used cottage cheese in place of a raw  cashew puree, but you can also use ricotta or cream cheese. I prefer cottage cheese because it's full of protein and low in fat and calories. My favorite brand is Organic Valley's 2% Small Curd. Next, I sprinkled the top of this bake with a tiny amount of parmesan and mozzarella, to really make it seem like a baked pasta dish. 

The last change I made was to saute' vegetables separately, then mix them with the quinoa mixture before baking rather than top the bowls with topping like Mama Pea did. I used my favorite pizza toppings - peppers, mushrooms, onions and sun dried tomatoes. 

This dish is extremely versatile, and can be made for 2 to twenty with some simple adjustments with ingredient amounts. I made a large casserole, serving 4-6. This is a great make ahead meal that you can prep on the weekend for weeknight dinner, or something you can make a big batch of and eat over several days. You can also take it back to vegan or add pepperoni, sausage, ham or other non-vegetarian pizza toppings! And best of all, this dish was extremely cheap to make, the only splurge was buying organic cheeses, but they were on sale plus I had coupons at Whole Foods, so the entire casserole was around $10 (with lots of leftover cheese). 


Supreme Pizza Quinoa Casserole
adapted from a vegan version on Peas and Thank You

3 c. vegetable stock
1 1/2 c. quinoa
8 oz. button mushrooms, sliced
1 green bell pepper, diced
1 red bell pepper, diced
1/2 red onion, diced
3 garlic cloves, minced
1 15 oz. can tomato sauce
1 c. 2% Small Curd Organic Cottage Cheese
1/2 c. shredded mozzarella, divided
1/4 c. grated parmesan, divided
1 tbsp. dried basil
1 tsp. dried oregano
1 tsp. fennel seeds, crushed
1/2 tsp. crushed red pepper flakes
Salt and pepper, to taste
10 sun-dried tomatoes, diced

Preheat oven to 350*
Bring stock to a boil in a pot.
Rinse quinoa under running water for a minute, until no longer murky. 
Add quinoa to vegetable stock, stirr and turn to simmer. 
Cook for 15-18 minutes, until stock is absorbed, stirring every few minutes.
Heat a saute' pan over medium heat, add 1 tbsp. olive oil.
Add mushrooms, peppers, onion and garlic, stir and saute' for 10 minutes, until liquid is cooked out and vegetables begin to caramelize. 
Remove from heat.
When quinoa is cooked, add tomato sauce, cottage cheese, half of the mozzarella and parmesan, basil, oregano, fennel, crushed red pepper flakes, and season with salt and pepper to taste.
Stir well, add vegetables from pan and sun-dried tomatoes, stir well.
Pour into a casserole dish, sprinkle with remaining cheese.
Place in the oven and bake for 30-45 minutes, until cheesei s golden and casserole is bubbly.
Serve immediately, refrigerate leftovers for a few days, if it lasts that long! 

Wednesday, October 27, 2010

Parmesan Stuffed Artichokes


I can still remember the first time I ate a fresh artichoke. I was 12 years old, at my friend and neighbor Leah's house for dinner. Her mom placed the artichoke in the middle of the table along with a dish of melted butter. I looked at Leah, unsure what to do. She pulled off a leaf, dunked it in the butter, and scraped the flesh off with her teeth, tossed the leaf aside and grabbed another. Who knew it was so simple... and delicious! 

Now here I am, 13 years later, finally getting around to having fresh artichoke for the second time. I feel like I've cheated myself out of years of pleasure! But honestly, making artichokes is not only a tedious process, but a scary one at that! I decided to finally be brave and dive right in. I mean, I hack apart pineapples, squash, and I've even cracked several coconuts. Certainly I can handle an artichoke! 

When I saw they were on sale and in season last week, I decided now was the time. So I scanned some recipes online and found that a breadcrumb-parmesan stuffing was simple and popular. Then I looked at a few youtube videos and tutorials on how to handle this beast. I tried to document it as best I could in the photos below. 

This was my husband's first time eating a fresh artichoke, and he is now a huge fan. The artichoke was tender and flavorful, the stuffing was salty and savory, and we both were wishing I had made a dozen. I will definitely be playing around with the stuffing options for these in the future! 

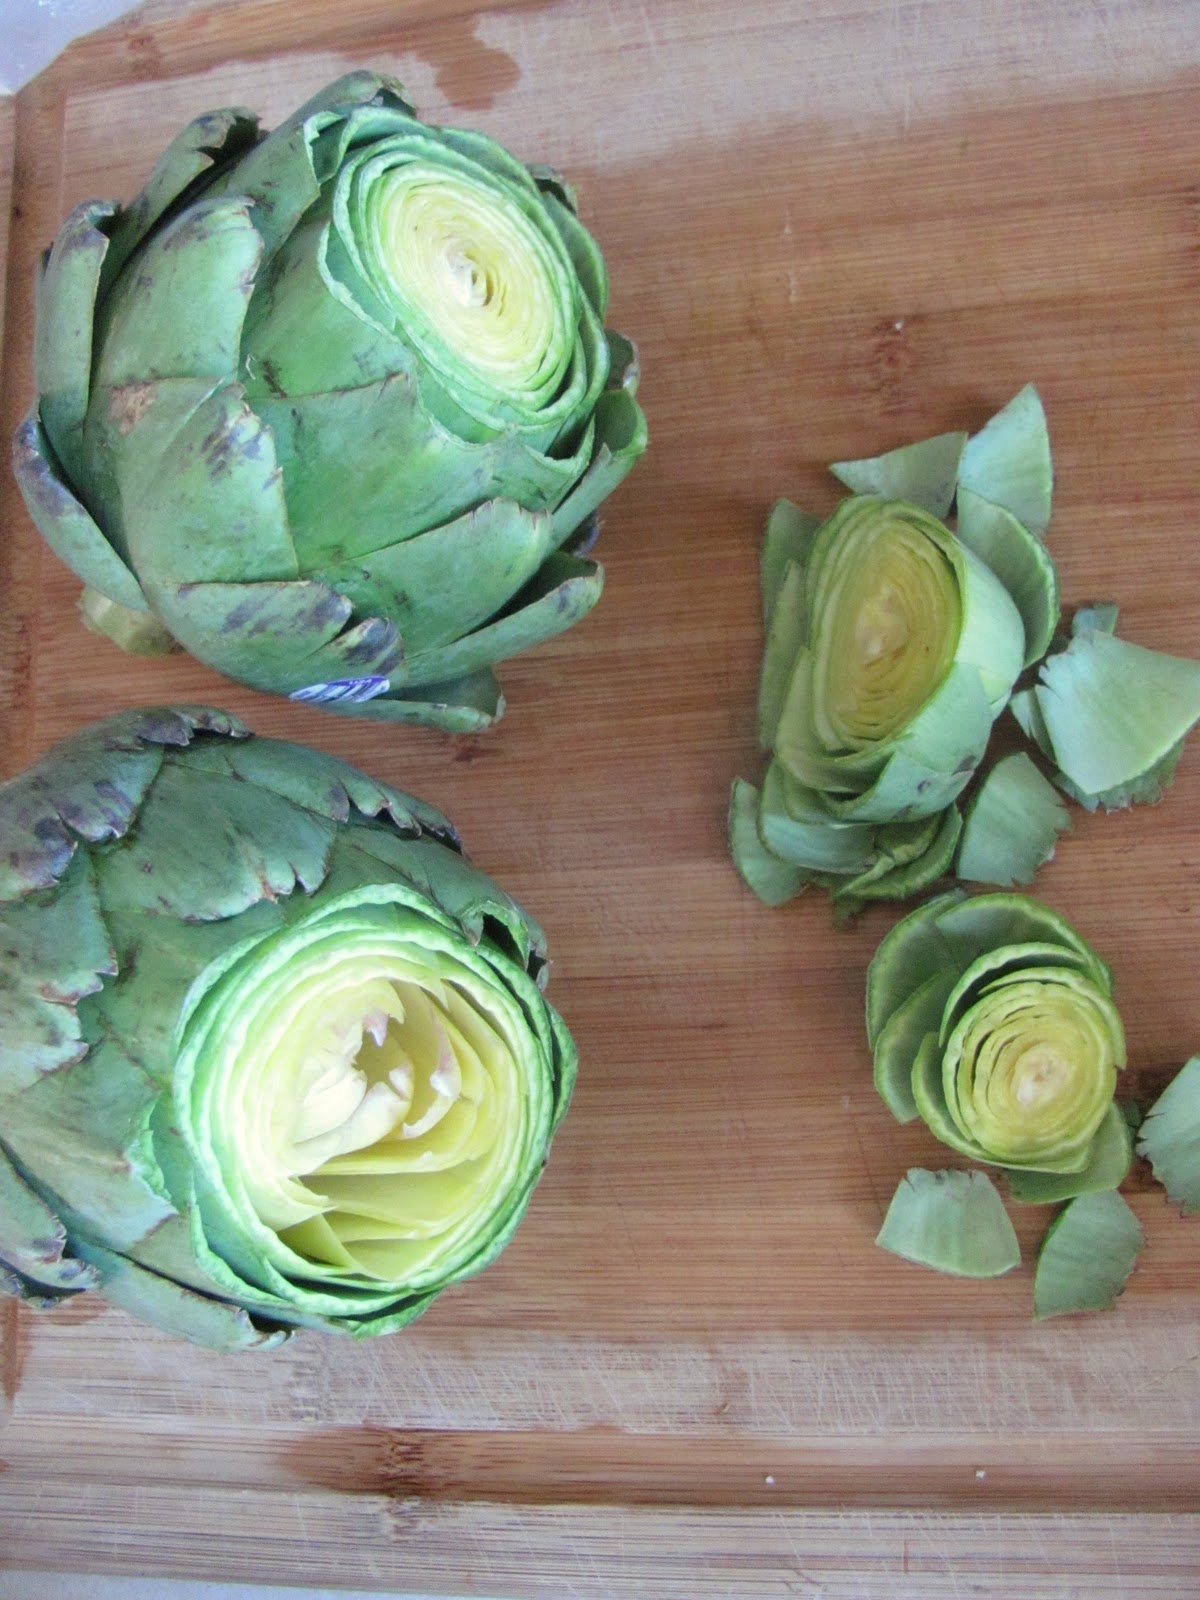
Step 1: Gather artichokes, a lemon, and tools. I wasn't sure what I'd use, so I grabbed a few things. In the end I used my knife, scissors and a melon baller. 


Step 2: Cut off the stems. Though you can eat them when they're peeled, since I was baking mine cup side up, I cut it off completely to help stabilize the artichokes.

Step 3: Cut off the top third or fourth of the artichoke, depending on length.

Step 4: Pull off the bottom third of leaves that are tough. Use kitchen scissors to snip off the top third of the remaining leaves.


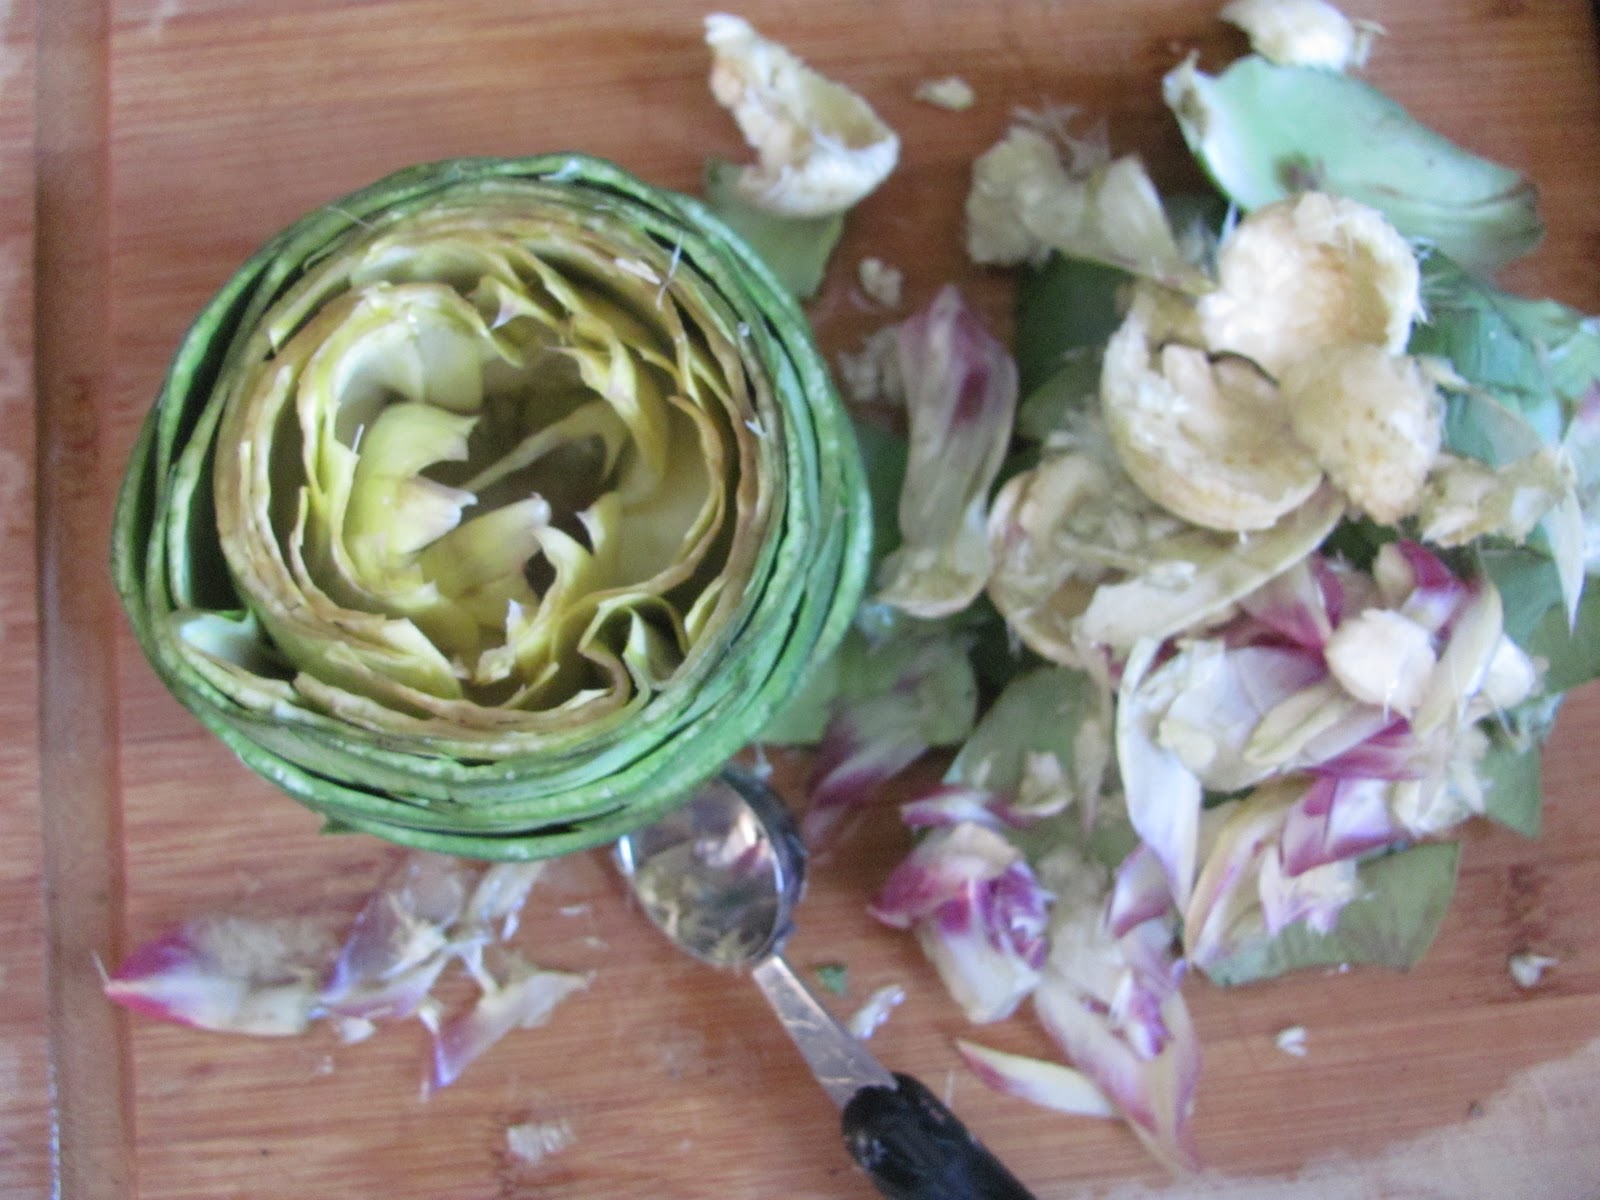
Step 5: Use fingers to stretch out artichokes and loosen the center. Pull out the center leaves that are pulpy and purple.


Step 6: Use a melon baller to scoop out any pithy center pieces. Do not scoop through the bottom!


Step 7: Cut lemon in half, Squeeze the juice over each artichoke then place the lemon on top while you clean and prep the water. At this point, artichokes can be wrapped and refrigerated for a few hours with the lemon on top.


Step 8: Place artichokes and lemons in a pot filed with water 2/3 of the way up artichokes. Turn heat to high and bring to a boil. Turn heat to low and simmer for 40 minutes, partially covered.


Step 9: Preheat oven to 400*. Prepare stuffing mixture. Remove artichokes from water bath carefully (they will be tender) and place in a baking dish. I used a loaf pan to help them stay up.

Step 10: Use half of each stuffing mixture to stuff artichokes. Press mixture between the leaves and into the center. Place in the oven and bake for 25 minutes, until crisp on the edges and stuffing is browned.

Step 11: Very carefully transfer to a plate (I used a spatula for bottom support and tongs to hold it together) and serve.


Parmesan Stuffed Artichokes

2 artichokes, prepared
1 lemon, halved
1/4 c. Italian style breadcrumbs
1/4 c. grated Parmesan cheese
1 small yellow onion, very finely minced
1 garlic clove, pasted
Black pepper
2 tbsp. EVOO

In a small dish, toss together breadcrumbs, parmesan, onion, garlic and pepper.
Stuff into artichokes, then drizzle with EVOO.
Follow directions as listed above for artichoke preparation and baking.


Monday, October 11, 2010

Chef Symon's Mom's Lasagna


I'd like to think that if I ever met Chef Symon, we would have so much in common and we'd be best foodie friends. As I got to 'know' him more through reading his cookbook, it seemed more and more likely. I found out he loves dogs, as their photos are peppered throughout his cookbook (um, mine too)! It's also clear he loves pickles and pickled things (give me a pickle and call it dinner)! And finally, he is from Ohio, and has a deep love for Cleveland (ok, I'm a Cincinnati girl, but my sister lives in Cleveland and I love the city)! 

Then I read his prologue to this recipe. His mom's lasagna, a Sunday specialty, slow cooking sauce, pasta baked with creamy cheeses, the scent lingering from the oven all day long... he's describing my childhood! My dad's favorite food for as long as I can remember was my mom's lasagna. Since it's labor intensive, she made it from scratch every few weekends, always an all day affair. She would only use Polly-O brand ricotta and mozzarella and grated Parm from the Italian specialty store. The sauce would cook all day, bubbling away, and we'd all fight over the crunchy corners at dinner time.

My mom would add ground beef to the sauce sometimes, but not always. However, Chef Symon's mom doesn't mess around. She uses veal neck bones, beef, sausage and pork. And three pounds of cheese. Though I do love to indulge and have one splurge-type meal each week, I don't eat meat and couldn't use 3 lbs. of cheese. Instead, I added mushrooms for some body and texture, cut the mozzarella, made my 2% ricotta from scratch, and picked up these beautiful lasagna noodles!


While this lasagna isn't exactly the same as Michael Symon's, it still evokes the feeling of Mom's homemade, Sunday specialty. The scent reminds me of being a kid, waiting for Mom to yell, "Dinner time!" And the feeling that perhaps one day, I'll have kids hoping that every Sunday I'll be in the kitchen constructing a lasagna for dinner.

Thank you to Kim of Stirring the Pot for choosing this week's Symon Sundays recipe. This completes Round 5, our selections are up for the next round, check the schedule in the right column!

Tips and Trades:
-I made my ricotta from scratch, which is very simple to do, and it tastes amazing! A 1 lb. tub of organic ricotta is around $5, but I purchased a 1/2 gallon of organic 2% milk for $3 and made 1 lb., almost half price!
-The fresh basil in this dish really brings a nice, fresh burst of flavor. Because the recipe has so much cheese (and meat, if you go with the original), I recommend not skimping on the basil.
-I prefer to make my lasagna with uncooked noodles, make my sauce a little more watery, and bake the lasagna off and have the noodles cook while absorbing the liquid. It keep the lasagna from being wet, and saves the annoying process of cooking the noodles. The noodles will grow though, so make sure there is a bit of space in the pan for them to expand!

Mom's Sunday Lasagna

1/2 lb. lasagna noodles
1 lb. ricotta cheese
1/2 c. grated Parmesan cheese
1 yellow onion
3 garlic cloves
8 oz. cremini mushrooms
Kosher salt and pepper
1/4 c. tomato paste
1/2 c. red wine
1 28 oz. can San Marzano tomatoes (whole)
1 tsp. dried Italian seasoning blend
1/2 tsp. crushed red pepper flakes
1 c. vegetable stock or tomato juice
1 c. fresh basil, roughly chopped or torn

Heat a pot over medium heat.
Add 1 tbsp. EVOO.
Add onions and garlic to a food processor, pulse until very finely minced, add to the pot.
Add mushrooms to the food processor, pulse to a fine mince, add to the pot.
Season veggies with salt and pepper, sauté for 10 minutes, until liquids are cooked out.
Add tomato paste and red wine, reduce liquid by half.
Add tomatoes, break up with a wooden spoon, add dried seasoning, crushed red pepper flakes and stock.
Stir well, cover, turn to low and simmer for 1 hour. 
Preheat oven to 350*
Turn heat off from sauce, add basil and fold in.
Spoon sauce to cover the bottom of a casserole dish.
Layer the noodles, spoonful of ricotta, sprinkle of Parmesan, and another ladle of sauce. 
Cover with another noodle, and repeat until noodles and cheese are gone.
Ladle the remaining sauce over top noodle layer, cover with foil and place in the oven.
Cook lasagna for 45 minutes, uncover, sprinkle with a layer of Parmesan and place back in the oven.
Bake for 10 minutes.
Remove from the oven, rest for 10 minutes, then slice and serve.


Please visit the other Symon Sundays Participant's blogs listed here. For the authentic recipe from the book, be sure to check out Kim's blog, Stirrting the Pot!
Joanne at Eats Well with Others (Project Food Blog Star Contender!)

Thursday, June 17, 2010

Rosemary Parmesan Grilled Polenta


Polenta has become one of my favorite starch sides recently. It has a similar quality to mashed potatoes when served creamy style, with a lot less work. It also can be served in cut out form, which requires a bit more work, unless you take a store shortcut and but a premade log. If you'd like to see how I make my polenta rounds, visit this post, and definitely try out that recipe! It's absolutely delicious!
Since we've been on this grilling kick, I've been brainstorming different things to grill. Polenta was a definite no brainer, as I've seen grilled polenta rounds at many restaurants. To make this polenta little more special, I simply added parmesan and rosemary to the mixed polenta, then added a little crumble of it on top after it flipped to create a little cheesy crust. This polenta was outstanding, firm and crisp on the outside, and smooth and buttery inside. I served this alongside skewers of chicken sausage, mushrooms and Brussels sprouts for a complete meal. 


Rosemary Parmesan Grilled Polenta

1 1/2 c. vegetable stock
1/2 c. nonfat milk
2/3 c. polenta (not quick cooking)
1/2 tsp. salt
1/2 tsp. white pepper
2 tbsp. fresh minced rosemary, separated
1/4 c. plus 2 tbsp. parmesan cheese, separated

Bring stock and milk to a boil in a saucepot, stream in polenta, whisking constantly.
Turn heat to low, stir polenta and continue to cook as long as package directs (mine was 15 minutes).
Remove from heat, stir in salt, pepper, 1 tbsp. rosemary and 1/4 c. parmesan cheese. 
Line a small baking sheet with parchment, spread polenta on baking sheet, about 1/4-1/2" thick.
Place in the refrigerator and chill for 2+ hours.

Heat grill to medium-high, spray with nonstick grill spray.
Cut polenta rounds out, place on the grill, cook for 5 minutes, flip.
Add remaining rosemary and parmesan cheese in a small dish, sprinkle over polenta.
Close grill over and cook for another 5 minutes.
Remove from heat and serve. 

Thursday, April 1, 2010

Pumpkin Ravioli in Broth with Vegetables and Beans


Pumpkin ravioli are one of my absolute favorite foods, but I don't have them often because it's hard to find a way to prepare them that doesn't involve some sort of creamy sauce or brown butter. Even if you make your sauce "light" with a cannelini bean, cottage cheese or tofu puree, it still has a tendency to overpower the pumpkin flavor.
Last week I was scrolling through the recipes on Herbivoracious and found this recipe for Pumpkin Ravioli in a light broth with vegetables and beans, it was perfect! A complete meal featuring pumpkin ravioli, but also with beans and vegetables in a simple broth - just what I was looking for.
Unfortunately it's not fall, and sugar pumpkins are not available, so I used canned pumpkin puree, which was a chore to find! I also decided to really pump up the pumpkin by making the ravioli dough with half pumpkin and half egg. Not only does this flavor the dough, but it makes it even healthier!
I loosely followed the recipes from Herbivoracious, and found this dish to be excellent! Though it may seem like a fall-like dish, the leeks and carrots and vegetable broth make it spring-frendly. I am looking forward to creating a dish with the other half of the ravioli I made and froze, and I've got a few ideas in mind!

Pumpkin Pasta

2 1/2 - 3 cups Unbleached All-Purpose flour
2 eggs
1/2 cup pumpkin puree
1/2 tsp. salt
1 tbsp. EVOO

Add 2 1/2 cups of flour to the bowl of a mixer, make a well in the middle.
Add eggs, pumpkin puree, salt and EVOO.
Attach dough hook, mix dough on low speed for 5 minutes.
If it is wet and sticky, sprinkle in more flour, if it is too dry, add warm water 1 tbsp. at a time.
Remove from mixer, knead for a minute, roll into a ball and rest for 10 minutes.
Divide dough into fourths, run through a pasta roller to create long, thin sheets.
Let dough rest again.
Yield enough dough for 3 dozen ravioli with leftover scraps.

adapted from Herbivoracious


1 cup pumpkin puree
1 tbsp. butter
1/2 onion, finely diced
2 cloves garlic, minced
1/4 teaspoon chili flakes
3 leaves fresh sage, chiffonade or 1 teaspoon dried
1/4 cup grated parmesan or romano cheese
1/4 teaspoon freshly grated nutmeg
Salt and pepper to taste

Heat a saute pan over medium-low, add the butter, onions and garlic.
Season with salt and pepper, saute for 4-5 minutes, until translucent.
Spoon into a mixing bowl.
Add chili flakes, sage, parmesan, nutmeg and pumpkin puree.
Stir to combine.

Scoop 1 tsp. mounds of mixture onto pasta sheets, place another sheet on top, press air out around filling, press edges to seal, slice off rough edges and cut pasta.
Place on a flour dusted baking sheet and place in the freezer, continue until finished.
Yield about 2.5-3 dozen ravioli.

adapted from Herbivoracious, serves 2

2 large leeks, white parts only, cleaned and sliced thin
1 tablespoons olive oil
1/2 onion, minced
3 medium carrots, fine dice
3 cloves garlic, minced 
2 bay leaves
1/2 cup white wine
1 15 oz. can cannelini beans or other white beans
4 cups vegetable stock
Salt and pepper to taste
Grated parmesan cheese and chili flakes for serving

Heat a soup pot over medium heat.
Add EVOO, leeks, carrots, onion and garlic, season with salt and pepper.
Cook for 5-10 minutes, until vegetables are slightly caramelized.
Add white wine, reduce by half.
Add stock, bay leaves and beans.
Simmer for 20 minutes.
While broth simmers, bring a large pot of water to a boil.
Season with salt, drop in ravioli (I made 1 dozen for 2 servings), cook for 5-7 minutes, until ravioli float to the top.
Remove from water with a slotted spoon and add to the broth.
Ladle broth and vegetables into a bowl, add ravioli, top with parmesan cheese and red pepper flakes.

Thursday, August 6, 2009

Grilled Ratatouille Pizza


Over the weekend I was flipping channels and Ratatouille was on! It's definitely one of my favorite movies. I have a soft spot in my heart for rodents... and I love food! After I watched it, I wanted to make Ratatouille, but it's more of a wintry dish, and I also have made it before...
So I thought about it for a while. Usually I take a concept or traditional food and think about how I can make it into pasta, burgers, or pizza. It's a pretty effective tool for creating a new dinner!
So pasta would pretty much be a pasta primavera, burger... I'm still thinking about... pizza sounded perfect! At first I was going to use a marinara base, but then I decided to make it even more special and use goat cheese as the sauce base. This pizza was really good, and it's pretty!


Oh, and following the recipe is a photo of what not to do with zucchini. Most vegetables are best when they're small. They're sweeter and less seedy. However, sometimes they do get lost in the garden and you don't find them until they're bigger than you! Since my last 2 posts had photos of my little sister Becky, I'm trying to even it out with one of my big sister, Kristine!
(And in a few hours, I'm sure my dad will email me asking why he's not on the blog.... what? my family? competitive? no....)


Grilled Ratatouille Pizza

crust (makes 2 12" pizzas):
1 c. warm water
1 packet dry active yeast
1 tbsp. brown sugar
1/2 tsp. salt
1 1/2 - 1 3/4 c. organic unbleached flour
1 c. whole wheat flour
1 tbsp. EVOO

pizza:
6 oz. herbed goat cheese
1 eggplant
1 zucchini
1 summer squash
3 roma tomatoes
1 orange bell pepper
1/2 tsp. thyme
pinch of crushed red pepper flakes
salt and pepper
1/4 c. grated parmesan cheese

Add water, yeast and honey to a stand mixer bowl. Proof yeast 10 minutes.
Add flour and salt, turn mixer on low (with dough hook).
Mix for 5 minutes.
Pick up dough ball, it should be slightly sticky.
Spray the bowl with nonstick spray, place dough ball back in, cover with saran wrap.
Proof for 1 hour, punch down, proof for another hour.

Preheat oven to 400 degrees.
Divide dough in half, roll out and place on a pizza sheet pan.
Place in the oven and bake for 8 minutes.
While dough cooks, slice vegetables, toss in EVOO, salt and pepper.
Grill on a grill or grill pan for 3-5 minutes per side, until grill lines appear and vegetables are a little soft (do not grill tomato)
Take pizza crust out of the oven, spread with goat cheese, layer on grilled vegetables.
Sprinkle with thyme, crushed red pepper flakes and parmesan.
Bake for another 8-10 minutes, or until cheese is melted.


Wednesday, June 3, 2009

Farfalle with Roasted Broccoli and Red Pepper Pesto


I wanted to make something light and simple to go with the meatloaf last night, so I went with a pasta dish. I decided to add broccoli, but rather than steam it, I roasted it. For the pesto, I had some red pepeprs and sun dried tomatoes, so rather than choose between the two, I used both. I think it's my new favorite non-basil pesto! This dish is simple, flavorful, and could be a meal all by itself.


Farfalle with Roasted Broccoli and Red Pepper Pesto

1/2 lb. farfalle (I use Barilla plus)
1 head of organic broccoli florets
parmesan cheese, for garnish

pesto:
1 fresh roasted red pepper
10 sun dried tomatoes
1 garlic clove, chopped
1/4 c. pine nuts
1/4 c. parmesan cheese, grated
10 basil leaves
1 tbsp. tomato paste
1 tbsp. EVOO
1-3 tbsp. vegetable stock
salt and pepper
pinch of crushed red pepper flakes


Preheat oven to 400 degrees.
Toss broccoli in salt, pepper and EVOO on a lined baking sheet.
Roast for 15-20 minutes.
Cook pasta, drain and put back in pot.
In a blender or food processor, add all pesto ingredients (except stock) and process until smooth.
Add stock to reach desired consistency.
Pour over pasta.
Add broccoli to pasta, toss.
Plate and garnish with parmesan.


A Year Ago: Appetziers for Mom's Cancer Free Tea Party
Tomato and Goat Cheese Tea Sandwiches
Gorgonzola Stuffed Spanish Olives
Cucumber and Herbed Cheese Tea Sandwiches
Caramelized Pear and Walnut Profiteroles
Chicken, Artichoke and Red Pepper Tapenade
Caprese Skewers with Balsamic Reduction