Showing posts with label appetizers. Show all posts

Wednesday, July 15, 2015

Baked Samosa Patties


When we moved to Michigan I didn't know a single person here. I'm no stranger to moving to a new city, so I got right down to friend-making business. I joined several meet-up groups, my sorority alumni group, a great church, and gained friends as I began working. After a few months I became good friends with a woman I met and we decided to start a book club. After a few more months of collecting new friends and inviting them to join, we created a great group of 5 - soon to be 6 members.
After chatting over email we discovered that in our group there was a vegan, 2 vegetarians, a gluten-free woman and 2 omnivores. We knew we wanted to have our book club meetings at each others homes and make it a pot-luck, so we all had our work cut out for us with regard to food choices. Then one woman suggested we theme each book club so the food matches the book! It's been a culinary challenge that I am happy to take on!
For the last meeting we read my selection, The Martian, which I highly recommend. So obviously for the theme, it had to be potatoes! My first instinct was baked samosas with wonton wrappers... but they're not vegan or gluten free! Then I saw gluten-free prepared dough at the store, but that's not vegan! So finally I decided to buy GF flour and use Earth Balance and olive oil in my dough. Sadly, the dough was a bit brittle and I was unable to mold it, so we had samosa tostatas.
With a few pounds of potatoes left and a strong craving for more samosas it finally hit me - samosa patties! I wish I had the idea before book club, but I'm glad it occurred to me because these were delicious! The filling is all that really matters in a samosa, so the absence of a wrapper was no big deal. They're also much healthier without the dough and being fried. We topped these with a bit of leftover mango chutney and served them alongside some crispy chickpeas and roasted cauliflower.

Our next theme is "heavenly food" - and vegan/GF suggestions?

Baked Samosa Patties

2 lbs. russet potatoes, peeled and diced
2 c. cauliflower florets
2 tbsp. olive oil, divided
1 small yellow or red onion, diced
3 garlic cloves, minced
1 serrano pepper, seeds and ribs removed, minced
1" of fresh ginger root, grated
3 tsp. curry powder (I love TJ's)
1 tsp. ground cumin
1/2 tsp. groud turmeric
1/2 tsp. fennel seeds
1 c. frozen peas
1 lime, juiced
Kosher salt
Fresh black pepper
1-2 tbsp. earth balance buttery spread (optional)

Preheat oven to 425*
Place potatoes in a pot of cold water, salt generously, cover and bring to a boil.
Uncover and cook for 5 minutes, add cauliflower and cook for another 5 minutes.
Drain in a colander and set aside.
While potatoes cook, add 1 tbsp. olive oil to a saute' pan over medium heat.
Add onion, garlic and serrano pepper, season with salt and cook for 5 minutes, until onions begin to brown.
Add drained potato/cauliflower mixture to a mixing bowl, mash with a potato masher until vegetables are all slightly broken down.
Add onion mixture, ginger, curry powder, cumin, turmeric, fennel seeds, peas and lime juice, gently fold ingredients into potato mixture.
Taste and adjust seasonings, adding pepper and if desired, earth balance.
Mixture should  be a bit pasty but still have small chunks of potato and cauliflower, mash with a spatula as needed.
Line a cookie sheet with foil, grease with remaining 1 tbsp. olive oil.
Form mixture into about 8 patties, shaping into discs with hands (if it's still too hot to handle, refrigerate for 10 minutes), place on cookie sheet.
Bake for 15 minutes, then flip patties gently and cook for another 10 minutes.
Remove from heat, serve with chutney or raita.

*Another option is to pan-fry the patties in a bit of oil rather than bake

Monday, November 18, 2013

Baked Samosas


I love Indian food but hate paying for take out. I've been trying more and more to make it at home but it never tastes quite as authentic. Sometimes I think my 'make your own take-out' meals aren't *as* good because I don't use butter/oil/sugar with reckless abandon the way restaurants do. My absolute favorite Indian appetizer is the Samosa. Generally they're fried dough pockets full of curried potatoes, peas and onion and they're served with a chutney of some sort. These are of course healthified by using wonton wrappers and baking rather than frying the samosas. However they still have the same delicious flavor and crunch of their less-healthy original version. 
I
 made a simple pear-raisin chutney and would have preferred something not so chunky. A sweet chutney condiment definitely lessens the heat and saltiness of these and adds a nice balance. I used large wonton wrappers but you could also make these bite-sized for appetizers and go with the small squares.  

Baked Samosas
adapted from Foodtv

2 large Idaho Russet potatoes
2 tbsp. olive oil
1 yellow onion, medium dice 
3 garlic cloves, minced
1 c. frozen peas
1" square nub of fresh grated ginger root
1 tsp. ground cumin
1 tsp. ground coriander
2 tsp. salt
1 tsp. pepper
1 tsp. spicy curry powder
1/4 c. cilantro leaves, minced
1 package wonton wrappers

Mango, Date, Pear or Tamarind Chutney, if desired

Preheat oven to 400*
Wash and dry potatoes, pierce with a fork and wrap in aluminum foil.
Bake until cooked through, about 60 minutes.
Cool, peel and discard skins, then dice potatoes (they'll crumble some, it's ok), add to a large mixing bowl
Heat a skillet over medium, add oil, onions and garlic. 
Saute for 5 minutes, until softened, add cumin, coriander, salt, pepper, curry powder and peas.
Pour into mixing bowl with potatoes and gently toss to combine. 
Lay wonton wrappers out on a dry surface, keep a small bowl of water closeby
Add 1/4 c. spoonfuls to the wonton, then use finger to paint water around the edges, fold over and close.
Place on parchment lined cookie sheet.
When you're finished with all samosas, place in the oven and bake for 10-20 minutes, until golden brown and crisp. 
Serve immediately. 

Tuesday, March 26, 2013

Homemade Sushi - No special gadgets necessary!


I have been wanting to try homemade sushi for a very long time, but I was always intimidated. Having a sushi place on every corner here in Jacksonville made it so much easier to just call in an order than try. As I browsed the aisles while grocery shopping last weekend, sushi rice and nori were on sale at Whole Foods. I decided to bite the bullet and give it a try. I spent the next three days trying to find a bamboo rolling mat, but had zero luck. I did a youtube search on how to make sushi without a bamboo mat, and it seemed easy enough. By the time I purchased the rice, vinegar, nori and all the various fillings, it did get a little pricey, but it was probably still cheaper than eating out, plus I could make custom rolls! 

I decided to try making brown rice sushi as well as white rice. I used Whole Foods short grain brown rice and prepared it the same way as the sushi rice, but I definitely preferred the white rice. I could have eaten the whole bowl full! The seasonings make it a little tangy and delicious. My only complaint about the sushi was I left it uncovered in the refrigerator, in roll form to set before I cut it, and then for the next few days, it stunk of seaweed! 

For my rolls, I used about 1/3 c. (dry) rice per roll, so the amount of rice you make compared to how many rolls you want can be multiplied that way. 


Vegetarian Sushi Rolls

1 package of nori, dried seaweed (I used this) - 3 sheets needed for 1 c. rice
1 c. sushi rice
1 1/3 c. water
1/4 c. rice wine vinegar
1 tbsp. sugar
1 tsp. salt

Optional fillings:
-Beet, Scallion and Goat Cheese
-Avocado, Cucumber, Carrot and Tofu
-Sweet Potato and Scallion (I used a few baked sweet potato fries!)
-Avocado and Mango
-Avocado and Peanut
-Avocado, Asparagus and Cucumber

To make the rice:
Rinse rice in a fine mesh sieve until it runs clear.
Add water and rice to a pot, bring to a boil, then reduce heat to low, stirring every few minutes.
Turn heat off after 15 minutes, and let rice sit until water is absorbed.
Add rice to a mixing bowl, season with vinegar, sugar and salt, stir well, cover and refrigerate until ready to use.

To roll:
Wet a dishtowel, ring dry. 
Lay flat on a counter top, add one sheet of nori.
Spoon rice over nori, using a plastic spatula, press into nori in an even, thin layer.
Add ingredients to center, fold nori over the fillings and press, then continue the roll and squeeze.
Unroll and place on a plate, seam side down.
Refrigerate until ready to slice and serve.


Wednesday, March 6, 2013

Basil Summer Rolls


 One of my favorite quick service restaurants is Mama Fu's, we just call it the Fu, and whenever we're thinking about where to go for lunch, the Fu is always mentioned. It is very healthy (if you order the right thing - steamed veggies, brown rice, sauce on the side), there are tons of vegetarian options, and it's fast. When dining with a temper-tantrum prone one and a half year old, getting food on the table as fast as possible is key. The basil summer rolls are one of my favorite dishes there because they're so fresh tasting, full of herbs and peanuts, and they hit the table in a minute or less after you order. The only downside is the price, $8 for 4 rolls, which isn't terrible, but I can make them at home for pennies. So I did!

Rather than just use rice noodles in the filling, I sliced up some napa cabbage from the CSA to bulk up the noodles and add even more veggies to the dish. The combination of fresh mint, basil and cilantro gives these rolls a ton of flavor, the bean sprouts and peanuts add some crunch, and the peanut dipping sauce takes them over the top. I like to give my peanut sauce a hefty squirt of sriracha for spice!

Basil Summer Rolls
inspired by Mama Fu's, sauce from chow.com

rolls:
12 rice paper rolls
1 oz. cellophane rice noodles
2 c. thinly sliced napa cabbage
1 c. fresh bean sprouts
1 large carrot, shredded
2 tbsp. fresh chopped mint
2 tbsp. fresh basil, julienne
2 tbsp. fresh chopped cilantro
1 tbsp. sesame oil
2 tbsp. chopped peanuts
2 tbsp. peanut dipping sauce (recipe follows)

peanut sauce (I quartered this)
3/4 c. creamy peanut butter
1/4 c. plus 2 tbsp. water
3 tbsp. hoisin sauce
2 tbsp. fresh lime juice
2 tbsp. soy sauce
1 tbsp. sugar
2 tsp. chile-garlic paste
1 garlic clove, pasted (I used 1 tsp. dried garlic)
1/2 tsp. sesame oil (omitted)

First, make the sauce by whisking together all ingredients.
Next, make rice noodles according to package, drain, roughly chop and toss in a large bowl with sesame oil.
Chill noodles, toss with remaining ingredients except rice paper rolls.
Dip rolls in warm water for 10 seconds, place on a cutting board, fill with 1/4 c. noodle mixture, roll. 
Continue until you run out of rice paper wrappers or filling, it should be close! 
Serve with dipping sauce and sriracha on the side.


Saturday, January 12, 2013

Roasted Brussels Sprouts with Habanero Aioli


One thing that really surprised me about Jacksonville when we moved here three years ago, was how diverse and impressive the culinary scene is. When I was the Bite Club host, I was able to try some really unique and absolutely delicious restaurants. When I meet new people and they know I cook and love to try new restaurants, I'm constantly getting great recommendations. The only downside is these places are usually in Riverside or at the beach, and nothing close to where I live.

There's a small strip of restaurants in a movie theater near my house, and about a year and a half ago, Speckled Hen moved into one of the locations. After driving past it one day, I went home and googled the menu, and knew it would be a great place for us to try. It's called a Southern Gastropub, the have great beer on tap, the menu changes seasonally, and the best part is it's next to the movies (perfect for date night!) and it's a few miles from our house.

Back in October, I took my parents there, and saw their Fried Brussels Sprouts with Habanero Aioli on the appetizer menu. Sold! The sprouts were tender with a little crunch, dusted in parmesan cheese, drizzled with thick, syrupy balsamic vinegar and spicy habanero aioli. The Brussels sprouts were so good and so unforgettable  that when my grandparents came down last weekend, I requested that we go there for dinner so I could get them again.

When I got a stalk of Brussels sprouts in the CSA basket last week, I knew I had to make the appetizer at home. I didn't want to fry the sprouts, so I roasted them instead. They were not quite the same, but still tender and delicious. The balsamic I used was from The Olive Leaf, I reduced it a bit to make it more of a thick syrup, and I used Greek yogurt to make the aioli, lightening it up a bit. If you're in Jacksonville, check out the Speckled Hen (the Hummingbird Cake is phenomenal for desert!)

Roasted Brussels Sprouts with Habanero Aioli
inspired by Speckled Hen

1 lb. Brussels sprouts, trimmed, large ones halved
2 tbsp. extra virgin olive oil
Kosher salt and black pepper
1/4 c. parmesan cheese
1/2 c. aged balsamic vinegar
1/4 c. plain Greek yogurt
1 habanero, halved, seeds and ribs removed
Juice of 1 lemon
1 tsp. lemon zest
1 tbsp. parsley
1 garlic clove

Preheat oven to 450*
Toss Brussels sprouts with olive oil, salt and pepper on a rimmed baking sheet.
Roast for 20 minutes, flip and roast for another 5-10 minutes, until browned.
Meanwhile, reduce balsamic vinegar over medium heat in a small stock pot until it's a thick syrup.
Add yogurt, habanero, lemon juice, lemon zest, parsley, garlic and a pinch of salt to a blender, blend on high speed until all ingredients are pureed. 
Taste and season with salt and pepper.
Remove sprouts from the oven, arrange on a serving plate.
Top with parmesan, drizzle with balsamic and aioli, serve. 

Tuesday, May 17, 2011

Crunchy Baked Zucchini Planks with Garlic-Lemon Aioli


About a year and a half ago, JJ and I were given a gift card to Maggiano's for our 2nd anniversary. We had never been there before, so we had the server sort of choose our menu for the night. We started with the appetizer combination platter, and the shining star of that dish was the fried zucchini with aioli. I can't say I remember much else about that meal, the zucchini was the star of the show! It was crispy and flavorful, and the aoili was the perfect pairing. I'm usually not a fan of creamy based sauces or ranch dressings, but this was phenomenal. We haven't been back to Maggiano's, but this zucchini has been on my mind since then, and I had been meaning to recreate it at home. 

On our weekly Farmer's Market excursion this week, like every week, I haphazardly pointed at produce and baskets and filled up my cart. I find that it's easier to go there first, see what looks best, then take it home and plan a weekly menu around it. I bought 2 baskets of zucchini, so I began to brainstorm some meal ideas. This simple dish was easily put together with only pantry staples, it's flavorful, cheap and easy to make. While I'm sure it would taste great fried, I actually preferred the baked version. For the aioli, I used Greek Yogurt rather than mayo, and I think it tasted better than the mayo version. The tang of the yogurt replaced the need for mayo + vinegar in the aioli, and it gave a punch of additional protein to the dish.

Crunchy Baked Zucchini Planks with Garlic-Lemon Aioli
inspired by Maggiano's 

3 medium zucchini
1/2 c. unbleached AP Flour
1 egg + 2 tbsp. water
1 c. panko breadcrumbs
1/2 c. Italian style breadcrumbs
Salt and pepper

2 garlic cloves, grated
Juice and zest of 1 lemon
1/2 c. plain 2% or fat-free Greek yogurt
Salt and white pepper
Minced parsley

Wash zucchini, slice off ends. Slice into 1/4" thin strips.
Line a colander with tea towels, lay zucchini slices in colander, salt, and add another towel on top, repeating the process until all zucchini are salted and covered. 
Place a bowl inside to press zucchini and set aside for 30 minutes.
(This step isn't necessary, but will keep zucchini extra crisp and less mushy when cooked)

In a small bowl, whisk together garlic, lemon juice and zest, yogurt, salt and pepper. 
Taste, add more salt and pepper if necessary. 
Add minced parsley, about 1 tsp. 
Cover and place in the refrigerator. 

Lay 3 shallow bowls out on the counter and a baking sheet fitted with a wire rack. 
In the bowl closest to the baking sheet, toss together breadcrumbs.
In the center bowl, crack the egg and whisk in water and 2 tbsp. flour, salt and pepper.
In the farthest bowl, pour in the remaining flour. 
Preheat the oven to 425*
Wipe down the excess moisture from zucchini slices, dredge in flour, then dip in egg, and press into the breadcrumbs. 
Place on the baking sheet and repeat until all zucchini is coated.
Place in the oven and bake for 20-25 minutes, until golden brown. 

Place planks on a platter and serve with aioli in a dish on the side. 


Wednesday, March 30, 2011

Bourbon Peach Chutney with Brie on Crostini


For the appetizer portion of my Bourbon dinner, I immediately thought of doing some type of fruit chutney sauteed with Bourbon. I find that most liquor has a certain sweetness that pairs well with fruit, you just have to find the right combination. Old Grand-Dad 114 is strong flavored Bourbon, the alcohol has a great presence, so it seemed like a good option for cooking. This chutney is delicious now with fresh peaches coming in season, but  can also be made with frozen peaches. The jalapeño adds a nice bite, and the Brie cools down the dish and gives it a creamy taste.  


Bourbon Peach Chutney with Brie on Crostini
Makes 12 pieces

1 loaf of grainy wheat French bread
1 8 oz. wheel of Brie
1 batch of peach chutney, recipe follows

Preheat oven to 400*
Slice bread on an angle into 12 pieces.
Lay on a sheet pan and place in the oven for 4-5 minutes, until toasted.
Slice Brie into 12 pieces, discarding rind.
Flip bread, top each slice with a piece of Brie.
Place back in the oven and cook for another 4 minutes or until cheese is melted to desired.
Top each slice of bread with a heaping tbsp. of chutney and serve. 

Bourbon Peach Chutney

1 tbsp. EVOO
2 shallots, finely diced
1 jalapeño, seeded and finely diced
3 large, firm peaches, blanched, skinned and diced
1/4 c. turbinado sugar
1/4 c. Old Grand-Dad 114 KY Straight Bourbon
1/3 c. Cider vinegar
Salt and white pepper, to taste

Heat a large saute' pan over medium heat.
Add EVOO, shallots and jalapeño, season with salt. 
Cook for 2-3 minutes, until tender.
Add peaches, cook for another 2-3 minutes.
Add sugar, stir to combine, then deglaze pan with Bourbon.
Turn heat to low, add vinegar and allow Bourbon and vinegar to reduce, about 5-10 minutes.
When chutney is thickened, taste and adjust seasonings, remove from heat and serve warm or refrigerate until using. 

Wednesday, February 9, 2011

Tex-Mex Black Eyed Pea Dip


For Superbowl Sunday, we were invited to a family get together that was pot luck style. I signed up to make an appetizer and dessert weeks ago, and figured I'd decide what to make closer to the date. A few weeks later, I had a strange craving for Black Eyed Peas, so I bought a pound of dried beans at the grocery store. After cooking them, I ate a small bowl and then put the remaining 7-8 c. of cooked beans in the fridge. And I was stumped... what to do, what to do? 

Finally, the morning of the Superbowl, I searched the pantry and fridge for ingredients to make a dessert and appetizer, and kept coming back to the Black Eyes Peas. Surely  there was some sort of dip or croquette I could make with them, so I did a little google-ing. I found a Paula Deen recipe that was shockingly healthy, and looked really delicious. I even had most of the ingredients on hand, so I got to work on it. I made a few changes, Paula's recipe seemed pretty basic (read: bland), so I decided to give it a Tex-Mex flavor, a cross between Chipotle's two salsas with the addition of beans. The end result was a delicious, fresh salsa/dip that was perfect with Tostitos scoops chips! This also made a little over 2 quarts of dip, so it was plentiful.

Note: I highly recommend cooking dried beans for this, canned tend to be mushy, and for this dip you want the peas to hold their shape and have a bit of a bite. I simply added 1 lb. beans to 8 c. salted water, brought to a boil, reduced and simmered for 45 minutes/1 hour, drained, cooled and stored in the refrigerator. 

Tex-Mex Black Eyed Pea Dip
heavily adapted from Paula Deen

3/4 lb. dried Black Eyed Peas, cooked
2 c. frozen corn kernels
1 pint cherry tomatoes, quartered
1 green bell pepper, finely diced
1 red bell pepper, finely diced
4 scallions, minced (or 1/4 red onion)
1/2 c. roughly chopped cilantro
1 small jalapeño, seeded and minced

dressing:
1 garlic clove, pasted with salt
Juice of 1 lime
1/4 c. red wine vinegar
1 tsp. chili powder
1 tsp. ground cumin
1 tsp. honey
1/2 c. EVOO
Kosher salt and black pepper, to taste

Add all salad ingredients to a large plastic storage container or serving bowl.
In a small bowl, whisk together garlic, lime juice, vinegar, chili powder, cumin and honey.
Slowly add EVOO, whisking constantly.
Taste, season with kosher salt and pepper.
Add dressing to the dip, toss well and refrigerate for at least an hour.
Toss well before serving, chilled, with scoops chips. 

Monday, February 7, 2011

Blue Cheese and Walnut Crackers


A few weeks ago, my mother in law gave me a 1 lb. tub of Amish Blue Cheese crumbles. While I've read conflicting reports about whether you can eat blue cheese or not when pregnant, it didn't even sound appetizing to me. So the cheese sat in the fridge for a couple of weeks, untouched. During my month-long stint watching Food Network and eating only bagels, I saw a holiday appetizer episode where Ina baked savory blue cheese shortbread crackers. The recipe called for 8 oz. of cheese, which I knew would make a substantial dent in the tub of crumbles, and it would cook the cheese so there wouldn't be the question of whether or not I could eat it. 

These crackers take very few ingredients, in fact I had all of the ingredients on hand last Saturday when I was cleaning out the fridge and came across the blue cheese hidden in the back. After making the dough, it needs to be formed into a log and chilled, so these crackers can be made ahead of time for a party, and kept in the freezer for slicing and baking at any time - even just for a snack! I was worried that the blue cheese would be too strong, or they would taste too much like a cookie gone bad, but they were outstanding! The bite of the blue cheese was dulled down, but still present, the nuts added a nice crunch, and the pepper reinforced the savory flavor. They were reminiscent of a cheese straw or a really fancy Cheez-It! 

As for the actual recipe, the only changes I made were subbing 1/2 c. whole wheat pastry flour for 1/2 c. of the all purpose, and omitting an egg wash for adhering the nuts, I had no trouble getting them to stick when pressing firmly. While the crackers were exceptional on their own, I couldn't help but think some kind of dip, smear, or spread would pair with it, but I couldn't think of anything that wouldn't make these too heavy, or too overpowering. My husband said buffalo chicken dip... any ideas? 

Blue Cheese and Walnut Crackers

1/4 lb. (1 stick) unsalted butter at room temperature
8 oz. blue cheese, at room temperature 
1 c. all-purpose flour
1/2 c. whole wheat pastry flour
2 tsp. kosher salt
1 tsp. fresh ground black pepper
1/2 c. chopped walnuts

In the bowl of a mixer with the paddle attachment, cream together butter and blue cheese for 1 minutes, or until smooth.
With the mixer on low speed, add the flours, salt and pepper and mix until dough comes together, adding water 1 tsp. at a time if necessary (I added 2 tsp.)
Place a piece of plastic wrap on the counter, use a spatula to remove dough from the bowl and onto the saran wrap. 
Using your fingers, form into a log about 12" long and 2" wide, wrap tightly and place in the refrigerator until you're ready to bake the crackers, or double wrap in foil and freeze.
After at least 1 hour, preheat oven to 350*
Unwrap dough log and sprinkle walnuts around the log, turn the log and press down on the nuts to encase the surface.
Line a baking sheet with parchment, slice the dough into 1/4" rounds and place 1" apart on the baking sheet, you should get around 30-36 crackers.
Place the crackers in the oven and bake for 22-25 minutes, rotating the baking sheet halfway through.
Using a spatula, place crackers on a wire cooling rack, and cool for at least an hour so crackers begin to harden. 
To store, place in an unsealed plastic bag or in an uncovered plastic storage container, sealing or covering will cause the crackers to soften, serve within a day or freeze baked crackers. 

Thursday, January 20, 2011

My 3rd Blogiversary & Tabbouli, Mandaloun Style

Today is a very momentous occasion on Veggie by Season, it's my third Blogiversary! Looking back over the past three years, beginning a blog has been absolutely one of the best decisions of my life. I have met so many other bloggers and enjoyed reading theirs through the tight-knit community, I have challenged myself to cook with new ingredients, techniques, and cuisines, and I have really tapped into my creative mind constructing recipes as well as writing about them. 

Looking back over the last year, my proudest blogging accomplishment was the POM Party victory. Being chosen in the top 10 among over 100 talented bloggers was really a special moment for me. Also, the Bakesale for Molly was another great moment during the last year. I was completely floored by the generosity of both the bakers and the bidders, and the way word spread among the blogging community and beyond. (As an aside, we were able to cover all of Molly's medical expenses, and I purchased 6 months of medication for her to take to her foster home, where she continues to reside awaiting adoption.)

Now in the past, I have celebrated my blogiversary in different ways. The first Blogiversary I made meatloaf cupcakes with whipped potato frosting, and last year I recapped my favorite recipes from the year. This year, I'm going in a little different direction. As I've said, blogging has led me to try many new ingredients, and even re-try things I thought I didn't like (cucumbers, turnips, lima beans, pears) and... parsley! I've always been completely opposed to parsley, and would substitute any other herb in it's place. Then, about a year ago, I tried tabbouli and I loved it. How could it be, I hated parsley?! More recently, I went to a Lebanese restaurant and ordered the Vegetarian Mezze platter, which featured tabbouli. Only this tabbouli was different - no blugur! It was completely parsley based, and I absolutely loved it.

I thought about it some more, and realized that when the parsley is minced into a fine piece, its flavors really come out, and it smells like lemon. I made this tabbouli based on my memory of the style of Mandaloun's, and it was very, very similar. Though I think I prefer just a bit of bulgur mixed in, this tabbouli is also something special. 

Thank you so much to everyone for your readership through the years. I never thought a blog would bring me so much joy and connect me with so many wonderful people. 


Tabbouli, Mandaloun Style
(no bulgur, authentic Lebanese)

3 bunches of parsley, stemmed
1 bunch of fresh mint leaves, stemmed
1 pint cherry tomatoes
1/2 English cucumber
3 garlic cloves
Juice and zest of 1 lemon
2 tsp. Red Wine vinegar
1/4 c. EVOO
Salt and fresh cracked black pepper

Wash parsley and mint in a large colander, shake and dry well.
In batches, place mint and parsley leaves in a food processor, pulse and process until leaves are in small, minced pieces.
Place in a large plastic storage container and repeat until all herbs are minced.
Quarter tomatoes, add to herbs.
Mince cucumber, add to herbs.
Using a microplane, grate garlic into vegetable mixture.
Zest the lemon into vegetable mixture, then slice in half and squeeze juice into mixture.
Add vinegar, EVOO, salt and pepper.
Place a sealed lid on and shake the mixture to mix well.
Taste, adjust seasonings.
Refrigerate over night or for several hours, taste again before serving to adjust seasonings.

Wednesday, October 27, 2010

Parmesan Stuffed Artichokes


I can still remember the first time I ate a fresh artichoke. I was 12 years old, at my friend and neighbor Leah's house for dinner. Her mom placed the artichoke in the middle of the table along with a dish of melted butter. I looked at Leah, unsure what to do. She pulled off a leaf, dunked it in the butter, and scraped the flesh off with her teeth, tossed the leaf aside and grabbed another. Who knew it was so simple... and delicious! 

Now here I am, 13 years later, finally getting around to having fresh artichoke for the second time. I feel like I've cheated myself out of years of pleasure! But honestly, making artichokes is not only a tedious process, but a scary one at that! I decided to finally be brave and dive right in. I mean, I hack apart pineapples, squash, and I've even cracked several coconuts. Certainly I can handle an artichoke! 

When I saw they were on sale and in season last week, I decided now was the time. So I scanned some recipes online and found that a breadcrumb-parmesan stuffing was simple and popular. Then I looked at a few youtube videos and tutorials on how to handle this beast. I tried to document it as best I could in the photos below. 

This was my husband's first time eating a fresh artichoke, and he is now a huge fan. The artichoke was tender and flavorful, the stuffing was salty and savory, and we both were wishing I had made a dozen. I will definitely be playing around with the stuffing options for these in the future! 

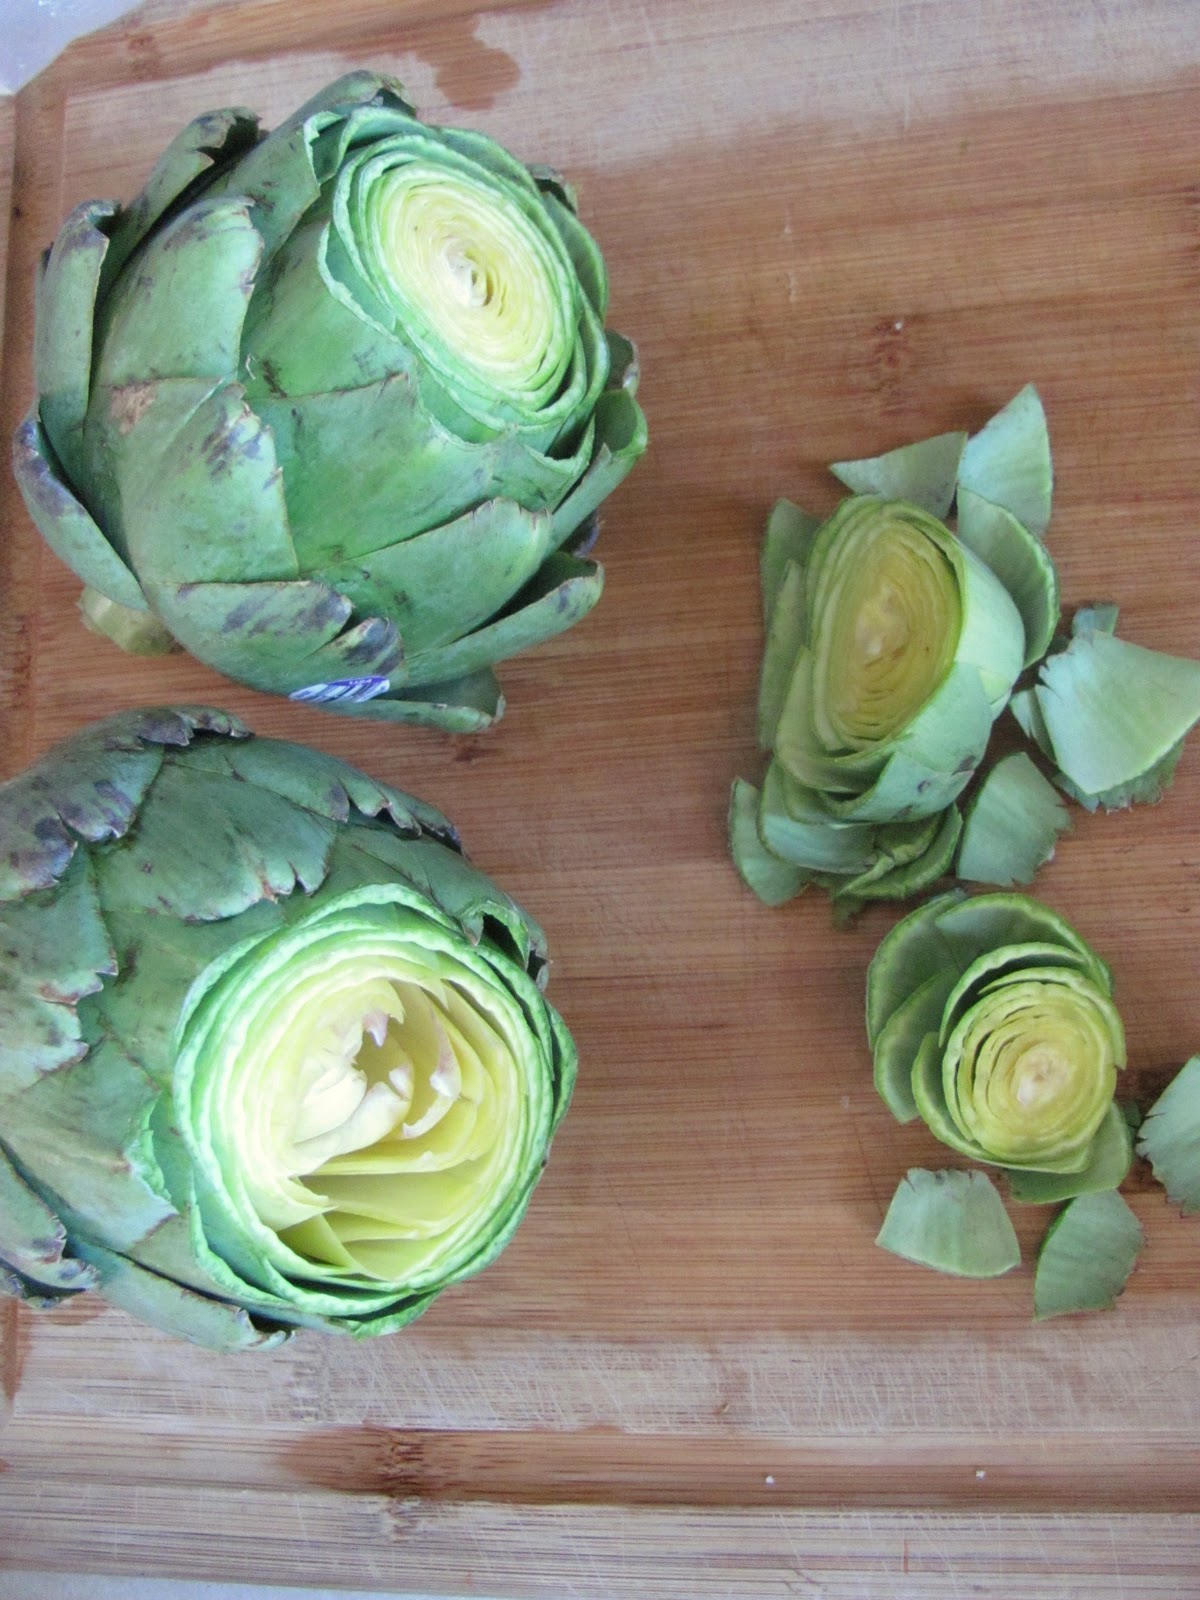
Step 1: Gather artichokes, a lemon, and tools. I wasn't sure what I'd use, so I grabbed a few things. In the end I used my knife, scissors and a melon baller. 


Step 2: Cut off the stems. Though you can eat them when they're peeled, since I was baking mine cup side up, I cut it off completely to help stabilize the artichokes.

Step 3: Cut off the top third or fourth of the artichoke, depending on length.

Step 4: Pull off the bottom third of leaves that are tough. Use kitchen scissors to snip off the top third of the remaining leaves.


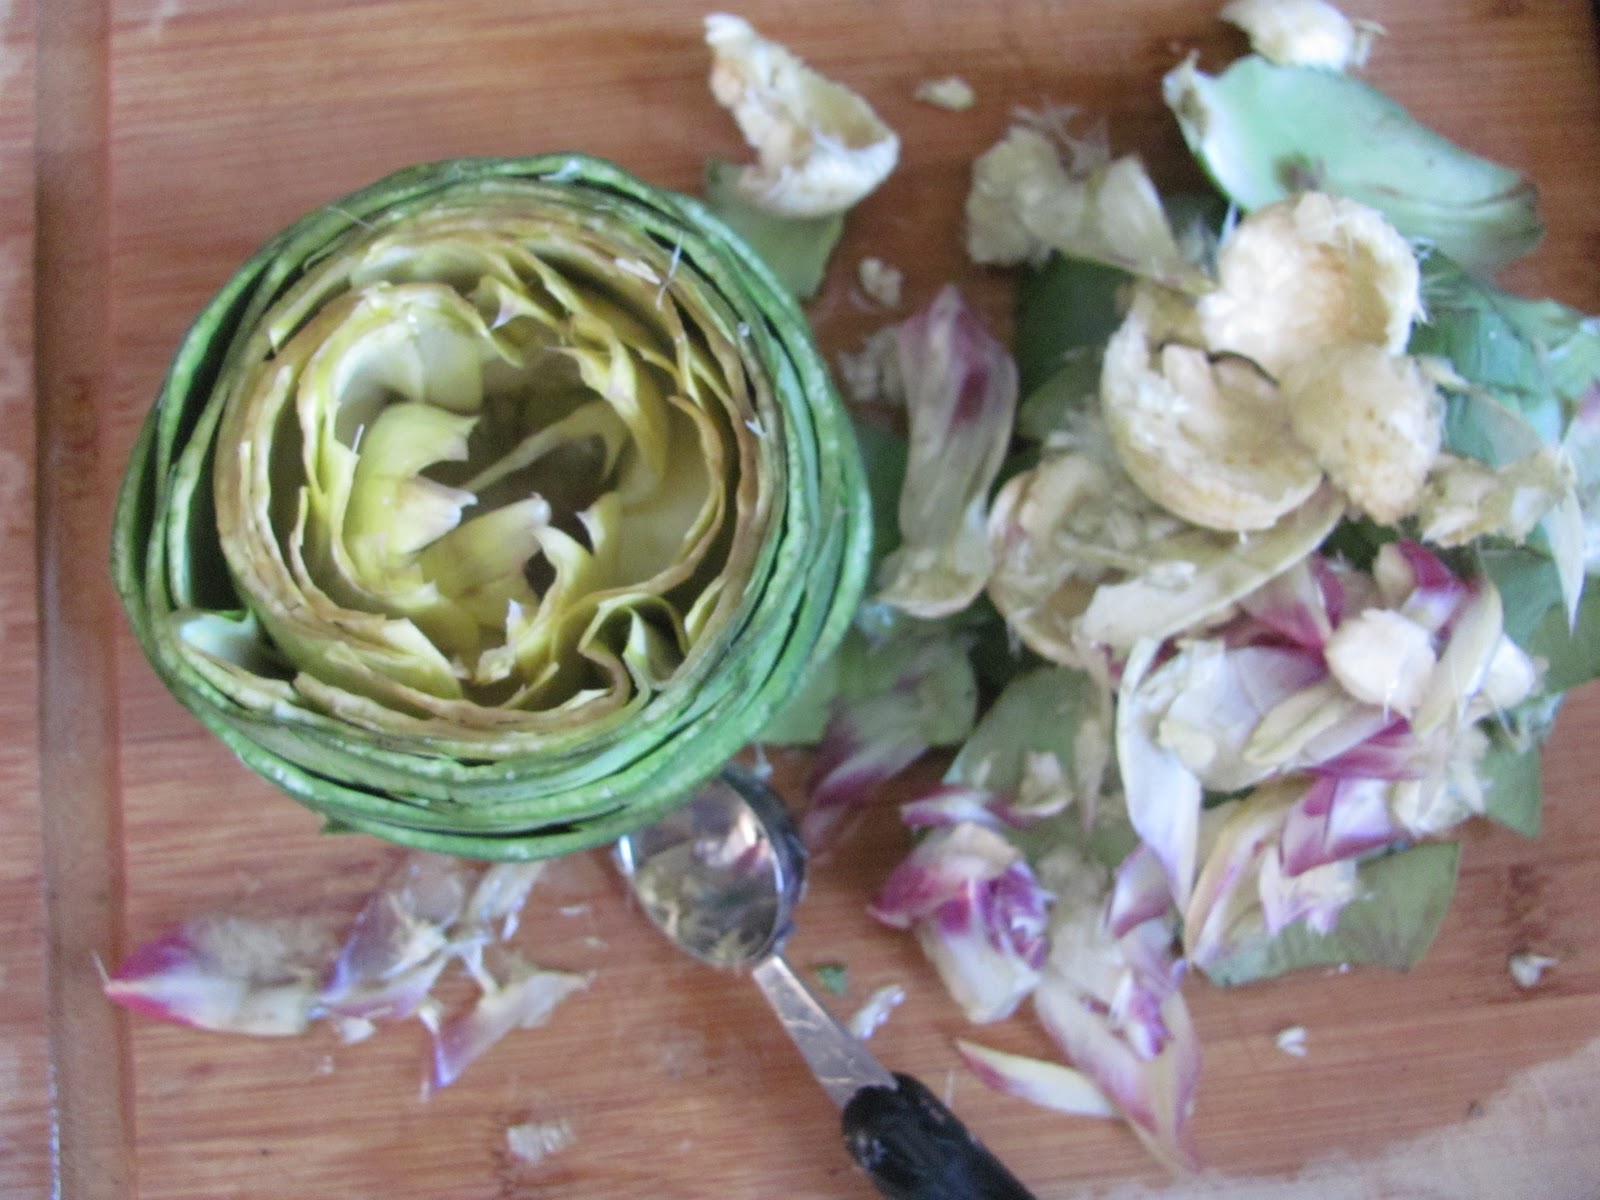
Step 5: Use fingers to stretch out artichokes and loosen the center. Pull out the center leaves that are pulpy and purple.


Step 6: Use a melon baller to scoop out any pithy center pieces. Do not scoop through the bottom!


Step 7: Cut lemon in half, Squeeze the juice over each artichoke then place the lemon on top while you clean and prep the water. At this point, artichokes can be wrapped and refrigerated for a few hours with the lemon on top.


Step 8: Place artichokes and lemons in a pot filed with water 2/3 of the way up artichokes. Turn heat to high and bring to a boil. Turn heat to low and simmer for 40 minutes, partially covered.


Step 9: Preheat oven to 400*. Prepare stuffing mixture. Remove artichokes from water bath carefully (they will be tender) and place in a baking dish. I used a loaf pan to help them stay up.

Step 10: Use half of each stuffing mixture to stuff artichokes. Press mixture between the leaves and into the center. Place in the oven and bake for 25 minutes, until crisp on the edges and stuffing is browned.

Step 11: Very carefully transfer to a plate (I used a spatula for bottom support and tongs to hold it together) and serve.


Parmesan Stuffed Artichokes

2 artichokes, prepared
1 lemon, halved
1/4 c. Italian style breadcrumbs
1/4 c. grated Parmesan cheese
1 small yellow onion, very finely minced
1 garlic clove, pasted
Black pepper
2 tbsp. EVOO

In a small dish, toss together breadcrumbs, parmesan, onion, garlic and pepper.
Stuff into artichokes, then drizzle with EVOO.
Follow directions as listed above for artichoke preparation and baking.


Friday, October 15, 2010

Hummu-Ghanoush


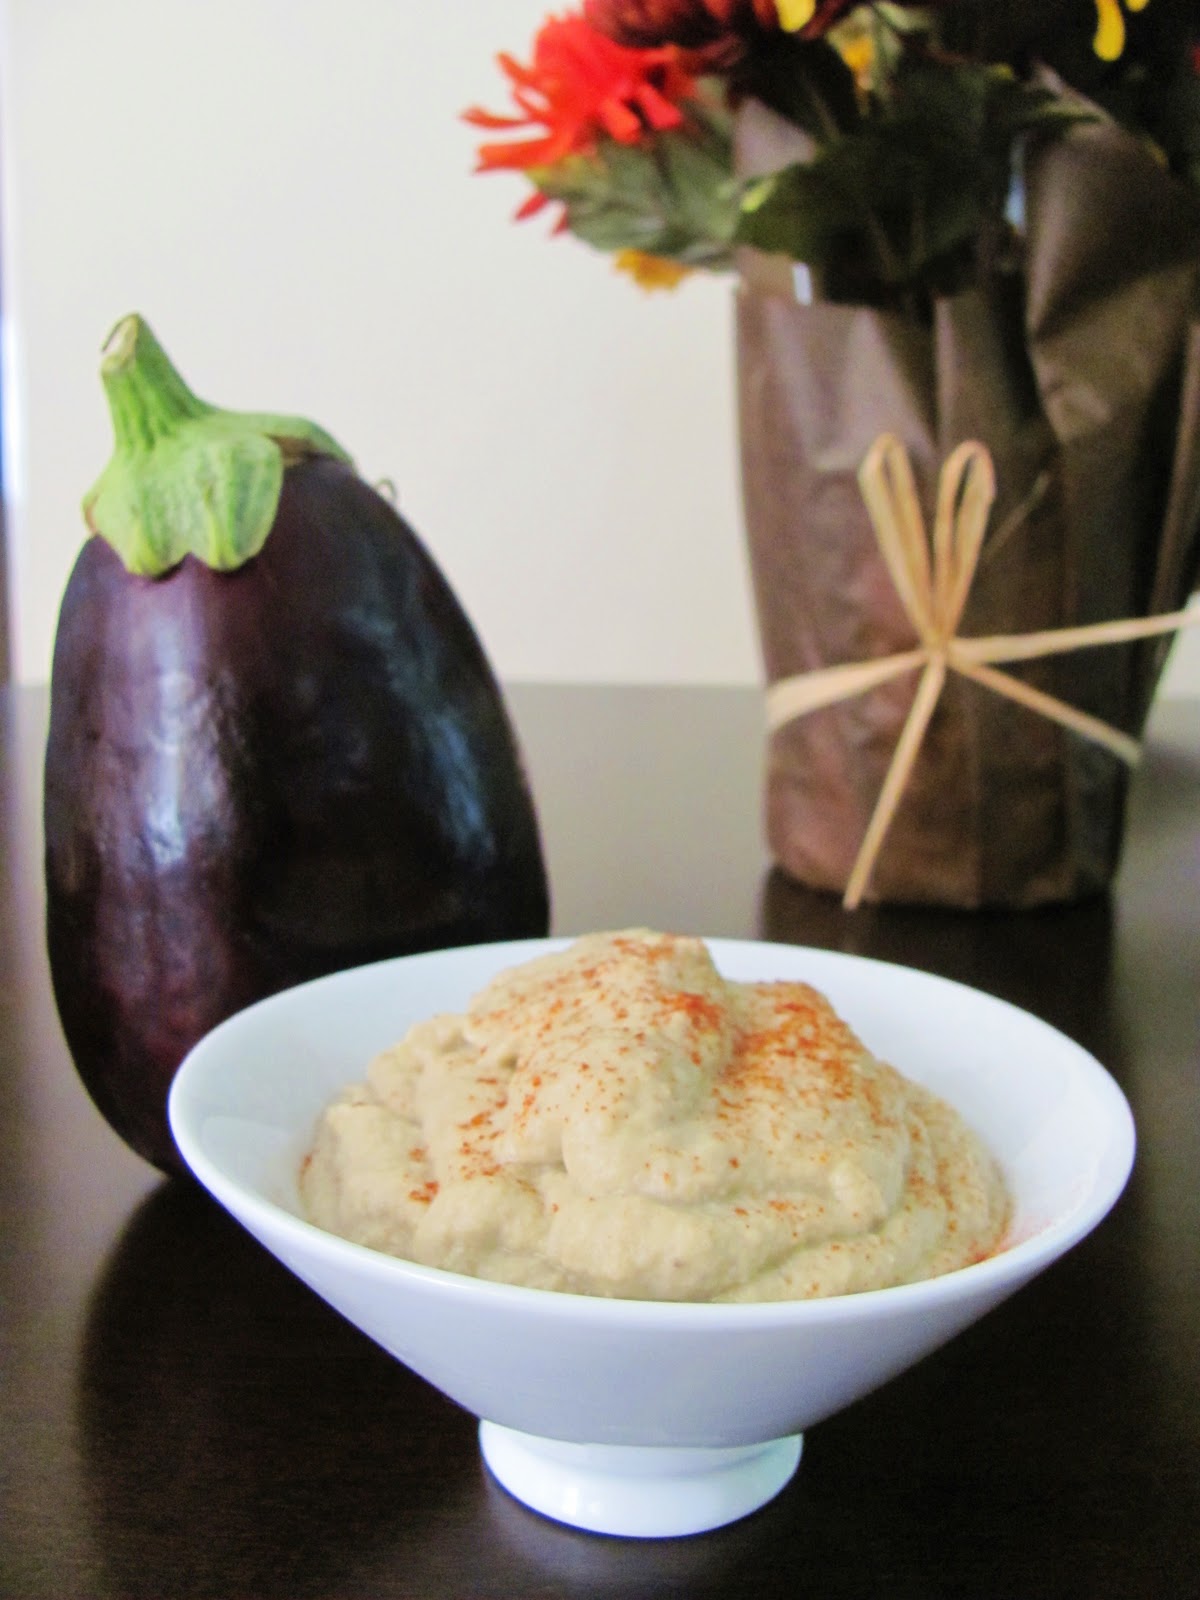
I'm a big fan of hummus and veggies. I have them as part of my lunch every day. However, since apparently eggplant grow phenomenally well in Florida, I've had quite the surplus. Instead, I've been making baba ghanoush each week, which I like, but it doesn't have the same nutritional stats, specifically the protein.

So as I do every weekend, I roasted up a few of the ripe eggplant and planned to make a batch for the week. However, as I was making the warm butternut and chickpea salad with tahini, I thought why not just add chickpeas and combine the two. Then I use up my eggplant while getting the protein from the chickpeas.

The eggplant flavor was definitely more present than the chickpeas, but this was delicious! If you're not a huge fan of baba ghanoush, this version might help ease you into it. And if you've got a garden full of eggplant like I do, this is a great way to use them! I bring my hummus or baba ghanoush to work each week and share it with my coworker, and he very much enjoyed saying "hummu-ghanoush" every day all week. That wasn't annoying...


Hummu-Ghanoush

2 eggplant, roasted and skinned (about 3 c.)
1 15 oz. can chickpeas, drained and rinsed
2 tbsp. to 1/4 c. well-stirred tahini 
Juice of 1 lemon
1 garlic clove, smashed (or 1 tsp. granulated if you don't like raw)
1 tsp. ground cumin
1 - 2 tbsp. EVOO
Kosher salt and pepper
Paprkia, for garnish

Place eggplant on a baking sheet, pierce with a fork a few times.
Roast for 1 hour, or until eggplant are deflated and shrivel a bit.
Cool for 10 minutes.
Peel off skin (or insides might just slip right out) and place into a blender or food processor.
Pulse to a chunky puree.
Add chickpeas, 2 tbsp. tahini, lemon juice, garlic, cumin, salt and pepper.
Pulse 10 times to mix, then run to puree mixture.
If necessary, add 1-2 tbsp. EVOO to thin the mixture.
Stop, taste and adjust seasonings, add additional salt, pepper, cumin and tahini, if necessary. 
Spoon into a dish, sprinkle with paprika and serve.
I prefer this warm, but my coworker likes it cold. It's really up to you! 

Thursday, October 14, 2010

Potato and Sauerkraut Fritters


Growing up on Long Island, just about all of our friends and neighbors were Italian. When I think of the favorite foods from my childhood, I have vivid memories of arancini (fried risotto balls stuffed with cheese), real Italian Ice, cannolis, and boatloads of pizza by the slice from a pizza parlor we could walk to from our house. I think it was a mile or two, and it felt like so long, but I think I'd run 100 miles for that pizza now.

Because I grew up with the Italian food, and my mom is an excellent Italian cook, I felt like I should be a honorary Italian. Besides Oktoberfest, beer and brats, who really knows anything about German food? It's not really known for elegance, romantic dinners and beautiful sounding words. Fettuccini a la Carbonara sounds much prettier than Sauerbraten und Kartoffeln. I loved my German heritage, but it didn't seem as cool or fun as the Greek and Italian dishes and families around me.

While I still find it hard to create diverse German dishes, I've learned to embrace my heritage. Creampuffs may have initiated the change, but it's knowing that the spaetzle press I use was once used by my great-grandmother decades ago. Or the Sauerbraten my mom taught me to make is a really old family dish. And the fact that there aren't many German restaurants open, which makes me feel like I have a hidden gem in my dining room when a German feast hits the table.

While I'm not a Bratwurst eating gal anymore, I still say the more kraut the better. Last fall, JJ and I went to an Oktoberfest and tried deep fried Sauerkraut and Potato fritters at a small booth. They were so delicious, salty, tangy, and crisp. I could have eaten a dozen, and even JJ, who doesn't like anything pickled, enjoyed the fritters. When I saw an ad for the Oktoberfest, I remembered the amazing fritters, and decided to make a baked version at home. These weren't as good as the deep fried fritters, but the flavor was still there and very present. I would serve these with a grainy, German mustard, but I was out. They're great paired with a nice Warsteiner!


Potato and Sauerkraut Fritters

2 lbs. yukon gold potatoes, peeled and diced
2 c. Sauerkraut, drained well
1/4 c. Sour Cream
Kosher salt and pepper
1/2 tsp. paprika
1 c. breadcrumbs (panko recommended, I used regular fine ground)

Place diced potatoes in a steamer basket, place over boiling water and steam until fork tender.
Cool to room temperature, then add to a mixing bowl with the sour cream.
Use a potato masher and mash potatoes so they're mostly mashed with a few pea-sized chunks of potato.
Add the sauerkraut, paprika and pepper.
Use a spatula to fold in and distribute.
Taste and adjust salt and pepper.
Place mixture in the refrigerator for 30 minutes.
Preheat oven to 450*
Add breadcrumbs to a shallow dish.
Form mixture into golf ball sized mounds, roll in breadcrumbs, then place on a baking sheet.
Repeat until all balls are made, yields around 12-16.
Place baking sheet in the oven and bake for 18-20 minutes, until golden brown and crisp.
Serve warm with German mustard.

Wednesday, September 29, 2010

Bruchetta with Melted Mozzarella Toasts


If you ask me what dish represents summer best, I'd have to say Caprese Salad, or any variation of tomatoes, basil and mozzarella. Fresh tomatoes picked right off the vine mixed with bright, sweet basil and fresh, creamy mozzarella to cut through the acidity... it's a trifecta of flavor. 

Every day after work, I go outside with the dogs and survey the crops. During the peak of cherry tomato season, I'd stand next to the planter and pluck one after another off the vine and into my mouth. I harvested daily, and the vines were replenished daily. The same can be said for my basil plants, I'd tear off a handful every other day or so for a dish, and it would be replenished the next day. I honestly can't put into words how rewarding it is to have a garden, even one as small and challenged as mine! 

When my roma tomatoes finally started coming in, they were plentiful. I picked a basketful and left them on the counter to eat at our leisure. We were having  company one evening, and I decided to utilize the fresh tomatoes. Simple bruschetta typically combines tomatoes, basil, onions, and balsamic with toasted bread, so to make this a bit more interesting, I decided to add melted fresh mozzarella to the bread. The end result was a great contrast of flavors, textures, and temperatures. Each ingredient's flavors held their own, and were in perfect harmony. 

Tips and Trades:
-Try using different tomatoes, such as heirloom, for a gorgeous colorful dish.
-Select any bread variety for additional flavor, I used a kalamata olive sourdough from Whole Foods Bakery.
-Eliminate the garlic if you wish, but we all loved it and weren't bothered by the bite of fresh garlic.

Bruschetta with Melted Mozzarella Toasts

2 lbs. diced, seeded Roma tomatoes
2 garlic cloves, minced
1/4 c. minced red onion
1 c. basil leaves, chiffonade
2 tbsp. balsamic vinaigrette
2 tbsp. EVOO
Salt and pepper
1 loaf of bread, sliced thinly on a bias
1 lb. ball of fresh mozzarella

Add garlic and onion to a mixing bowl.
Toss with balsamic vinaigrette, salt and pepper.
Set aside for 5 minutes.
Add tomatoes, basil and EVOO to the garlic and onions, toss well to combine.
Refrigerate for 30 minutes.
Preheat broiler to high.
Place bread on a baking sheet and broil for 2 minutes, watching carefully so it doesn't burn.
Remove from the oven, flip, top with mozzarella and place back under the broiler.
Broil for another 2-3 minutes, until melted and slightly browned, watch carefully!
Remove tomato mixture from the fridge, taste and season as necessary.
Place on a platter with toasts and serve immediately.


And now, if you remember reading this post, I wrote about my parents letting my sisters and I choose fruit trees to plant at our new house. My sister was looking through old photo albums and found this photo! Here she is with my dad, planting her apple tree! 


Tuesday, September 21, 2010

Baba Ghanoush


 I have always been enamored by vegetable gardens. Tiny seeds, planted in dirt, a little sun, a little water, and bountiful produce. I believe that because I saw the vegetables grow in the garden when I was young, I was more likely to try them. Watching my dad tend to the garden, weeding it, watering it, and my mom out there roto-tilling in compost during the spring, made me appreciate all that goes into producing one little eggplant. It's not easy work, but it is so rewarding when you harvest. 

When I moved to Florida and bought a house, I had big garden plans. So far I've had hits and misses as I learn about the Florida climate, soil, weather, and insects. I started my eggplant from seed in January, planted them outside in March, and they're just now producing. Nine months... my eggplant are my babies. I have about 20 more on the vines, and every weekend more buds appear, so it looks like well into December I'll be picking them! 


I've found that if I let them stay on the vines too long, they start to get pocks, which are light brown, eventually spreading and turning white. Anyone know what causes this? Every Sunday after my run, I do some weeding, planting, pruning, watering, and then a photo shoot for my garden blog (basically just photos to show growth progression). I decided to pick the three largest eggplant because they would probably start spotting if I didn't. 

When faced with three eggplant, I find myself with two options: Eggplant Parmesan or Baba Ghanoush. Since we planned to spend the afternoon watching the Red Zone channel and following our fantasy football teams, I decided a quick dip would be better than an afternoon in the kitchen tending to eggplant. 


I've seen many recipe variations depending on the country of origin for baba ghanoush, so I tasted and added ingredients as I made it. While grilling the eggplant is preferred, I was about to make granola and decided to roast it and kill two birds with one stone. 


Nothing makes me happier than spending the morning in my garden, harvesting vegetables during the day, and eating the veggies in a delicious dish at night. 

Tips and Trades:
-My eggplant are an Heirloom variety, but any eggplant variety will work! 
-Tahini is ground sesame seeds. While a jar can cost around $10, it should last quite a while. If you do purchase some to make baba ghanoush or hummus, try this recipe - you won't regret it! 

Baba Ghanoush

3 eggplant, roasted or grilled and peeled, about 4 c. pulp
2 garlic cloves, smashed
1/4 c. tahini
1 lemon, juiced
1 tsp. ground cumin
2 tsp. kosher salt
Fresh ground black pepper
Parsley, for garnish

Add all ingredients to a blender or food processor, run until smooth. 
If necessary, add EVOO or tahini to thin.
Taste and adjust seasonings (more salt might be necessary)
Eat immediately or refrigerate for up to a week. 

Sunday, June 6, 2010

Symon Sundays: Sheep's Milk Ravioli with Brown Butter and Almonds & Roasted Dates with Pancetta, Almonds and Chile

This week's Symon Sundays recipes were chosen by Tasha at The Brick Kitchen. Please visit her site and the other Symon Sundays participants to read about their opinions on the dishes! You can find links to their blogs and the Symon Sundays schedule on the right blog column.

The first dish chosen is from the appetizers section of Live to Cook. I had been eying it for months, and even considered making it for a dinner party, but it slipped my mind. Because it was paired with a pasta dish, I decided to turn it into a salad. There were few ingredients in this dish, but they all are packed with flavor and had something to add to the final product. I would definitely make this as an appetizer in the future, or use the combination of a spin off a warm bacon-dressed spinach salad, just chop the dates so the sweet punch of flavor is in each bite. 
Please visit Tasha's blog for the recipe! 

Roasted Dates with Pancetta, Almond and Chile

The second choice of Tasha's was Sheep's Milk Ravioli with Brown Butter and Almonds. I searched for Sheep's Milk Ricotta, but it wasn't available. Since the recipe called for really thick ricotta, and because I couldn't find sheep's milk, I decided to make my own ricotta. While the ricotta came out extremely thick and delicious tasting, it wasn't really a money saver as I had hoped. A half gallon of organic milk is around $4, and a tub of organic ricotta is around $4.50, so by the time I factor in my time to make it, the price is the same. However, it was fun to know I literally made this entire dish from scratch!
For the ravioli, the dough is made from only egg yolks and white flour, but I substituted a whole egg and a white, and used half whole wheat flour and half unbleached all purpose flour to make it healthier. For the sauce, I couldn't bring myself to use 12 tbsp. butter, so I used 1 tbsp., the juice of the orange, and some vegetable stock. The recipe called for parsley, but I don't like parsley, and love rosemary paired with orange, so opted for that combination. I also served the ravioli with steamed broccoli for a little extra veg in the meal. 
While I varied a great deal from the original recipe, and I'm sure a pool of brown butter would be amazing, my substitutions made this dish quite tasty! 

Sheep's Milk Ravioli with Brown Butter and Almonds

Making the ricotta:

Bring 1/2 gallon milk, 1/2 tsp. salt and 1/2 tsp. citric acid to 195*, rest for 5 minutes

Strain in cheesecloth for 5 minutes

Tie up and hang to strain in the fridge for a few hours, very thick ricotta!

Tasha's dates look fantastic! 

Joanne had the same idea and served hers over a salad, but used figs and added goat cheese and cranberries

Joanne also reduced her butter, and added some zucchini to her ravioli

Natashya added dill to her pasta, adding a nice punch of flavour!