Thursday, October 28, 2010

Roasted Squash and Wild Rice Salad


A few posts back, I admitted that I'm not a huge rice fan and don't make it very often. I usually tend to pass rice recipes by in magazines and cookbooks. However, in my last Vegetarian Times magazine, I saw an ad for Lundberg Family Rice's Roasted Squash and Wild Rice Salad. It looked so good! So I got online and googled the salad, and found not only the Lundberg version, but another recipe on 101 Cookbooks. I decided to kind of combine the two and add a few of own ideas. 

I used a large kabocha squash to make this salad, but any variety will work! I loved the idea from 101 Cookbooks using whole roasted shallots, so I added those as well. For protein, I almost fell back on my old stand-bys, garbanzo or tofu, but I decided to try something different. Since I was making a rice dish, I felt like Black-eyed Peas would be a great pairing. Though all beans taste relatively the same, these were delicious in this dish. Finally, I sprinkled the dish with cranberries and cilantro for some sweetness and a bright punch of flavor. It was a very balanced dish, and I can finally say my rice came out great! 

Roasted Kabocha and Wild Rice Salad with Black-eyed Peas 

2 c. prepared Wild Rice blend cooked in vegetable stock
*I used 2/3 c. rice and 2 c. stock and it came out perfectly
2 lbs. kabocha, peeled and cubed
10 small shallots, peeled
1 tbsp. EVOO
Kosher salt and pepper
2 c. black eyed peas, cooked, or 1 15 oz. can drained and rinsed
1/4 c. dried cranberries
1/4 c. chopped cilantro
Juice of 1 lemon
1 tbsp. honey

Preheat oven to 400*
Line a baking sheet with foil, add squash and shallots, drizzle with EVOO, sprinkle with salt and pepper, toss well.
Place in the oven and roast for 30 minutes, until tender and caramelized.
While roasting squash, cook rice.
When rice is tender and fluffy, add lemon juice and honey, toss to distribute.
Add black eyed peas, gently fold in to heat through.
Scoop half of the rice into a serving dish, layer with half the kabocha, then the rest of the rice, then the kabocha and shallots.
Sprinkle with cilantro and cranberries, serve warm.


FYI - Look for details coming soon about a blogger bakesale hosted on Veggie by Season. If you would like to bake something for the cause (injured, stray dog I found and will be taking to the vet Saturday), please email me at veggiebyseason@gmail.com

Wednesday, October 27, 2010

Parmesan Stuffed Artichokes


I can still remember the first time I ate a fresh artichoke. I was 12 years old, at my friend and neighbor Leah's house for dinner. Her mom placed the artichoke in the middle of the table along with a dish of melted butter. I looked at Leah, unsure what to do. She pulled off a leaf, dunked it in the butter, and scraped the flesh off with her teeth, tossed the leaf aside and grabbed another. Who knew it was so simple... and delicious! 

Now here I am, 13 years later, finally getting around to having fresh artichoke for the second time. I feel like I've cheated myself out of years of pleasure! But honestly, making artichokes is not only a tedious process, but a scary one at that! I decided to finally be brave and dive right in. I mean, I hack apart pineapples, squash, and I've even cracked several coconuts. Certainly I can handle an artichoke! 

When I saw they were on sale and in season last week, I decided now was the time. So I scanned some recipes online and found that a breadcrumb-parmesan stuffing was simple and popular. Then I looked at a few youtube videos and tutorials on how to handle this beast. I tried to document it as best I could in the photos below. 

This was my husband's first time eating a fresh artichoke, and he is now a huge fan. The artichoke was tender and flavorful, the stuffing was salty and savory, and we both were wishing I had made a dozen. I will definitely be playing around with the stuffing options for these in the future! 

Step 1: Gather artichokes, a lemon, and tools. I wasn't sure what I'd use, so I grabbed a few things. In the end I used my knife, scissors and a melon baller. 


Step 2: Cut off the stems. Though you can eat them when they're peeled, since I was baking mine cup side up, I cut it off completely to help stabilize the artichokes.

Step 3: Cut off the top third or fourth of the artichoke, depending on length.

Step 4: Pull off the bottom third of leaves that are tough. Use kitchen scissors to snip off the top third of the remaining leaves.


Step 5: Use fingers to stretch out artichokes and loosen the center. Pull out the center leaves that are pulpy and purple.


Step 6: Use a melon baller to scoop out any pithy center pieces. Do not scoop through the bottom!


Step 7: Cut lemon in half, Squeeze the juice over each artichoke then place the lemon on top while you clean and prep the water. At this point, artichokes can be wrapped and refrigerated for a few hours with the lemon on top.


Step 8: Place artichokes and lemons in a pot filed with water 2/3 of the way up artichokes. Turn heat to high and bring to a boil. Turn heat to low and simmer for 40 minutes, partially covered.


Step 9: Preheat oven to 400*. Prepare stuffing mixture. Remove artichokes from water bath carefully (they will be tender) and place in a baking dish. I used a loaf pan to help them stay up.

Step 10: Use half of each stuffing mixture to stuff artichokes. Press mixture between the leaves and into the center. Place in the oven and bake for 25 minutes, until crisp on the edges and stuffing is browned.

Step 11: Very carefully transfer to a plate (I used a spatula for bottom support and tongs to hold it together) and serve.


Parmesan Stuffed Artichokes

2 artichokes, prepared
1 lemon, halved
1/4 c. Italian style breadcrumbs
1/4 c. grated Parmesan cheese
1 small yellow onion, very finely minced
1 garlic clove, pasted
Black pepper
2 tbsp. EVOO

In a small dish, toss together breadcrumbs, parmesan, onion, garlic and pepper.
Stuff into artichokes, then drizzle with EVOO.
Follow directions as listed above for artichoke preparation and baking.


Tuesday, October 26, 2010

Creamy Roasted Cauliflower and Chestnut Soup with Balsamic Mushroom and Goat Cheese Quesadillas


My husband is a big fan of the soup and sandwich combo. It doesn't matter what kind of sandwich you serve with what kind of soup, he will dip it. He doesn't mind if the flavors don't match or compliment each other, in fact I don't even think he considers that when making his selections.


Rather than a sandwich, I decided to make quesadillas. Mostly because I had some tortillas on hand, but also because I was thinking about Tripp's amazing quesadillas with mushrooms, cheddar and spinach. Sadly, I didn't have spinach and cheddar, but I had the mushrooms and some goat cheese. To make the mushrooms pop, I caramelized them with balsamic vinegar. The vinegar added a deep, rich flavor that was softened with the creamy goat cheese.


For the soup, I went out on a limb. My husband doesn't like cauliflower, but I thought if it's in soup form, he might not be as opposed because he's all about the dip-ability concept. I wanted it to be creamy and velvety, but not fattening and rich. To achieve the velvet feeling, I added cannelini beans rather than cream. To make it different and somewhat gourmet, I added some roasted chestnuts to the soup and then also chopped them for a topping. Roasting the cauliflower brought out the nutty flavor, which was extra emphasized by the chestnuts, and fresh rosemary made the dish pop.


This soup and sandwich type meal was definitely very gourmet tasting, but very easy to prepare. It has an autumn feel to it without being a squash recipe (because I'm pretty sure the last 10 and next 10 recipes on here center around squash). You can certainly change up the ingredients and use what you have on hand. this is a very basic outline for a delicious lunch combo! At the last second, I stirred some white cheddar cheese into JJ's soup, and it was delicious. However, you can keep the soup vegan without it. 

Creamy Roasted Cauliflower and Chestnut Soup
with Balsamic Mushroom and Goat Cheese Quesadillas

Soup:
1 head of cauliflower, cut into florets
1 small yellow onion, quartered
2 garlic cloves
1 tbsp. EVOO
Kosher salt and pepper
1 c. roasted chestnuts, peeled
1 c. cannelini beans
3-4 c. vegetable stock
1 tsp. fresh minced rosemary

Preheat oven to 425*
Add cauliflower and onion to a baking sheet, drizzle with EVOO, sprinkle with salt and pepper.
Add un-peeled garlic cloves to the baking sheet and place in the oven.
Roast for 20-30 minutes, until cauliflower begins to caramelize and is soft.
Remove from the oven and cool for 5 minutes.
Add half of the cauliflower and onion mixture to a blender.
Peel the garlic cloves and add to the blender.
Add 1 c. vegetable stock to the blender and puree.
Pour into a soup pot on the stove over medium heat.
Add remaining cauliflower and another cup of stock to the blender. 
If you'd like to have some small chunks, pulse this mixture to desired consistency, or puree.
Pour into the pot.
Add beans, 1/2 c. chestnuts and 1 c. of stock to the blender, puree until very smooth.
Pour into the pot, stir well, add rosemary.
If soup is still quite thick, add another cup of stock.
Taste and adjust seasonings, add more salt and pepper as necessary.
Bring to a simmer, then ladle into soup bowls.
top with remaining chopped chestnuts and fresh rosemary sprigs.

Quesadillas:
4 flour tortillas
1 tbsp. EVOO
8 oz. cremini mushrooms, finely diced
1/4 small yellow onion, minced
Kosher salt and pepper
1/4 c. balsamic vinegar
1/2 c. crumbled goat cheese

Preheat a skillet over medium heat.
Add EVOO, mushrooms and onion, saute for 10 minutes, until mushrooms have given off most of their liquid and begin to caramelize.
Add salt, pepper and balsamic vinegar.
Reduce to a thick syrup, remove from heat and pour into a small dish.
Clean skillet, place back over medium heat.
Place tortillas in skillet, fill with 1/4 of the mushroom mixture and 1/4 of the cheese.
Toast for 2-3 minutes, flip and toast for another 2-3 minutes. 
Slice and serve with soup.

Monday, October 25, 2010

Ultimate Veggie Burgers (Chickpea Sprout Burgers)


I'm always on the lookout for new, interesting, and delicious veggie burger recipes. I really enjoy complex burgers with many flavors and textures, but they can take a while to make, especially when there are vegetables and grains that need to be pre-cooked.

One of my favorite veggie burger substitutes are Morning Star Farm's Chik'n patties. They are one of the faux meat products my husband will willingly eat, and they are quick and easy to prepare. However, they're quite processed and depending on your outlook, it's arguably healthier to just eat an organic chicken breast. When I saw this burger, it seemed to be quite similar to the chik'n patties. It relies heavily on eggs to give it a great protein punch and flavor, and sprouts to give it an interesting texture. I was hopeful with this recipe, and thought I might not call it the ultimate veggie burger, it was delicious! I modified the original recipe just a bit, and got 6 patties. This recipe was very easy and came together quickly.

While I normally shape my patties and freeze them, this time I cooked them, cooled them, and then froze them. I'm hoping that this technique yields better results when it comes to reheating the veggie burger for a quick weeknight dinner.


Ultimate Veggie Burgers (Chickpea Sprout Burgers)
adapted from 101 Cookbooks, from Super Natural Cooking

3 1/2 c. cooked chickpeas (or 2 15. oz cans, drained and rinsed
2 large eggs
Kosher salt and pepper
1/4 c. minced cilantro
1 small yellow onion, grated
1 c. micro sprouts (I used alfalfa)
1/2 c. whole wheat panko breadcrumbs
2 scallions, minced

Crack eggs into a large mixing bowl, whisk well.
Add half of the chickpeas to a food processor, process until smooth, add to eggs.
Add the rest of the chickpeas to the food processor, pulse 10 times, add to the mixing bowl.
Add remaining ingredients, use a spatula to fold in ingredients and distribute evenly.
Place mixing bowl in the refrigerator and chill for an hour.
Heat a nonstick griddle over medium heat, spray with EVOO or nonstick cooking spray.
Form into 6 large or 12 small patties, and place on the griddle.
Cook for 6-8 minutes, until browned, and flip.
Cook for an additional 5 minutes.
Serve on a bun with optional toppers: lettuce, tomato, sprouts, red onion, avocado, cheese, pickles, salsa, etc.

Friday, October 22, 2010

Roasted Vegetable Salad with Lemon Rosemary Vinaigrette


On Tuesday afternoon, my sister and her husband welcomed Evan Henry to the world. I am so excited for them, for our family, and to be an Aunt! I'm so lucky and happy that my sisters and I are as close as we are. I was able to really feel like a part of Kris' pregnancy even though I'm 1000+ miles away. While technology can be annoying - and even unsafe, it also provided me with labor-update texts, emails with photos, and even video camera chatting. While I'm jealous of some of my friends who skype their grandparents and mine can barely work their cell phone, it's probably better Grandma can't skype. I still call them often, but sometimes less is more - haha.

I was never much of a turnip girl. My Popie's Thanksgiving specialty is mashed turnips. I bet you can guess what dish produces the most leftovers... With Thanksgiving on my mind (when I'll get to finally meet Evan!), so were the turnips. See, I've only ever had them once in my life, when I made this Roasted Vegetable, Barley and Lentil salad. I considered making it, but I planned to pair it with veggie burgers and wanted a less starchy side. I thought about tossing roasted vegetables with a spring salad, but decided to just skip it all together, and make a roasted root vegetable based salad with a light vinaigrette and some traditional salad toppers. I think my favorite part of this dish is the rutabaga, but really, they are all so delicious together! If you want to keep all of the vegetables from turning red, roast the beets separately, but they're bound to stain the others eventually.


Roasted Root Vegetable Salad with Rosemary Lemon Vinaigrette

1 lb. beets, peeled and diced
1 large rutabaga, peeled and diced
2-3 turnips, peeled and diced
3 large carrots, peeled and sliced
3 large parsnips, peeled and diced
1 large sweet potato, peeled and diced
1/4 c. walnuts, toasted
1/4 c. goat cheese, crumbled
1 tbsp. EVOO

vinaigrette:
juice of 1 lemon
1 tbsp. honey
1 tsp. fresh minced rosemary
2 tbsp. red wine vine vinegar
1 shallot, minced
1/4 c. EVOO
kosher salt and pepper

Preheat oven to 400*
Trim, peel, and dice all root vegetables.
Arrange on a foil lined baking sheet drizzled with EVOO.
Toss with salt and pepper, cover with additional foil.
Roast for 30 minutes, uncover and roast for another 15 minutes, or until tender.
Roast an additional 15 minutes if you want vegetables to caramelize.
In a small dish, whisk together dressing ingredients.
Arrange vegetables in a bowl, drizzle with dressing, top with goat cheese and walnuts. 
Serve warm.

Wednesday, October 20, 2010

Roasted Corn Pudding in Acorn Squash


If I was absolutely forced to choose my favorite fall squash, I'd have to go with Butternut. Not only is it sweet and not at all stringy, but it's by far the easiest to peel and cube. I always go for a thick neck, almost the same size as the cup, if possible. Sure the long, skinny, bendy ones look interesting, but they're hard to butcher! The same can be said for acorn squash. It's pretty much impossible to peel, so cubing it and adding it to a dish is pretty much not going to happen. However, acorn squashes are great bowls for stuffing, which is my favorite way to utilize them. 


The acorn squash themselves have a slightly nutty taste, but are still a bit sweet when roasted. Eating the skin is optional, I tend to eat a bit if it makes its way into a forkful. I've seen countless recipes for squash stuffed with quinoa, cous cous and other grains, so I wanted to do something different. I found this recipe on 101 Cookbooks, and decided to make it immediately. Not only was it an interesting acorn squash recipe, but it called for corn, which is one it's way out of season right now, so I feel the need to squeeze in as much as I can. 


The dish was simple, but full of flavor. The spice combination made it interesting and warm. The cheddar made it a bit indulgent, but not heavy. The sweet corn balanced well with the earthy squash, and the scallions made the dish pop. Though corn pudding sounds unhealthy and heavy, this dish contained so little that it was not. I halved the filling recipe, but wrote the full version below, and it fit perfectly in my squash. If you make 2 full (4 halves) you should have enough filling for all 4 halves.

Roasted Corn Pudding in Acorn Squash

1 small acorn squash, halved lengthwise (about 2 lbs.)
1 tbsp. butter
1 c. milk
1 egg plus 2 whites (I used only 2 whites)
1 ear of corn, husked and kernels cut off (about 1 c)
1/4 tsp. anise seed, chopped
1/2 c. chopped scallions
Pinch of nutmeg
Pinch of sea salt
1/3 c. grated sharp white cheddar

Preheat the oven to 375*
Rub the flesh of the squash with butter, place cut side up in a roasting pan, slicing a bit off the bottom to stabilize if necessary.
Cover with foil and bake for 40 minutes, or until squash is tender.

In a mixing bowl, combine milk, eggs, corn, anise, half the scallions, nutmeg and salt.
Fill each squash until it's just about full.
Carefully place back in the oven, bake uncovered for 30 minutes, or until pudding is cooked through.
Sprinkle the remaining cheese on top and broil or bake for another few minutes (my roasting pan says do not broil, so I just melted the cheese on top while it baked).
Place on a serving platter and sprinkle with additional scallions.

Tuesday, October 19, 2010

Three-Sisters and Four-Corners Stew


I have a soft spot in my heart for anything that has "Three Sisters" in the title. Whether it be a business, restaurant, book, or recipe, I'm going to check it out. Being the middle of three sisters, I've found that it's given me many advantages in life. While most people sign-on with the "strange/crazy middle child" notion, I believe that being the middle child has resulted in a well-rounded, well-adjusted me. 

I wasn't nearly as sheltered as my older sister, and I wasn't babied like my younger sister. I didn't have to fight to earn privileges my older sister did, like reading Teen magazine and an 11 o'clock curfew. The family car was passed down to me on my 16th birthday, unlike my older sister who had to push for it at 17. I wasn't confined to the 4-hour drive limit when choosing a college like my older sister, and I wasn't left alone with my parents for three years like my younger sister was when Kris and I were away at school. Best of both worlds, in my opinion! And while I'd like to think I'm the shining star among the sisters, I honestly believe my parents did a wonderful job raising all of us. 


Another Tale of Three-Sisters: A year has passed since JJ and I adopted Charlotte and Belle, which is so hard to believe! JJ was away with the soccer team, and I was browsing www.petfinder.com on a Saturday morning. We had talked about getting a pair because we were ready for 3 dogs, and paired dogs can be so hard to adopt out together. I saw their little photo and fell in love. Sure, I had promised JJ we'd get a lab mix, but come on, 9 month old wiener dogs! So I called the rescue and they told me they were having an adoption day at Petsmart later that day. As soon as I saw them, I fell in love. I filled out my application, and was accepted pending a home visit to meet Pumpkin. That's when the red light went off. See, Pumpkin likes other dogs, but she likes to play rough, and she's the alpha. So I set the visit for the next morning, and they told me as long as the home visit was okay, they'd leave the girls with us and they'd be ours. I sent JJ a photo text of the dogs, and he said we'd talk about it. 

That night was a little rough, JJ wasn't sure he wanted them, but I had fallen in love. We agreed that he'd meet them at the home visit, and so would Pumpkin. If they  both approved, we'd take them. So the home visit went well, they all barked at each other, sniffed, but then were indifferent. JJ said if I wanted them, we could get them, so we did! Throughout the next month or so, Pumpkin was not happy with me. She'd growl at them when they came over and licked her, and she'd bark at them when they started wrestling, but here we are, one year later. I think they've all adjusted well.


This dish is called three sisters at four corners because the three sisters of Indian crops were corn, soybeans and squash. The reason for the four-corners is because of the region where New Mexico, Arizona, Colorado and Utah meet is in the southwest and where many Native Americans lived. I absolutely loved this stew. It had a spicy, flavorful broth with a little sweetness from the squash and corn, and the savory tomatoes and edamame. I've never had edamame in soup before, but it was delicious! 

Three-Sisters and Four-Corners Stew
adapted from Moosewood Restaurant Cooking for Health

1 tbsp. EVOO
3 c. peeled, cubed butternut squash
1 yellow onion, chopped
1 red bell pepper, diced
1 jalapeno, minced
3 garlic cloves, minced
Kosher salt and pepper
2 c. vegetable stock
1 tbsp. ground cumin
1 tsp. dried thyme
2 c. chopped tomatoes (I used a 15 oz. can whole peeled tomatoes)
2 c. shelled edamame
2 c. fresh corn kernels (I used 3 ears of corn kernels)
Queso fresco, for garnish

Heat a dutch oven over medium.
Add EVOO, squash, onion and garlic, red pepper and jalapeño, season with salt and pepper.
Sauté for 10 minutes, until vegetables have softened.
Add vegetable stock, cumin, thyme, tomatoes, edamame and corn.
Bring to a simmer, cover and cook for 20 minutes, or until vegetables have softened.
Taste, adjust seasonings, and serve with crumbled queso fresco.

Monday, October 18, 2010

Barley and Butternut Squash Risotto


For some reason I don't cook rice very often. I'm a huge risotto fan, but making fluffy brown rice pilafs just aren't my thing. I don't have a rice cooker, and find that it's nearly impossible for me to make a decent pot of rice. It's usually too gummy, too al dente, too wet, stuck to the bottom of the pot, etc. I've seen several recipes in magazines for risottos made with barley, which is marginally healthier than brown rice, and much healthier than white rice. 

This recipe came together really easily, and was perfect for a cool Autumn evening. I used some fresh Rosemary from my herb garden, but sage or thyme would compliment the dish as well. If you like your risottos especially creamy, you can add a splash of cream. This recipe can be multiplied easily, this made two dinner portions.

Barley and Butternut Squash Risotto

1 tsp. EVOO
1 tsp. butter
1 small yellow onion, minced
1 garlic clove, minced
1.5 lbs. butternut squash
Kosher salt and pepper
2/3 c. pearled barley
1/4 c. dry white wine
3 cups vegetable stock, warmed
2 tsp. fresh minced rosemary
1/2 c. grated Parmesan cheese

Add vegetable stock to a stockpot, heat over medium-low.
Heat a deep skillet over medium heat.
Add EVOO and butter, swirl together and melt.
Add onion, garlic and squash, season with salt and pepper, sweat for 2-3 minutes.
Add barley, toss and sauté for a minute. 
Add the white wine, reduce and stir well.
Add 1/2 c. stock, cover and simmer for 10 minutes, until absorbed.
Ladle in 1/3 c. of stock, stir and cook until absorbed uncovered.
Continue to add stock 1/3 c. at a time, cooking and stirring.
When barley is plump and tender, stir in the rosemary and Parmesan.
Plate and garnish with additional rosemary. 

Friday, October 15, 2010

Hummu-Ghanoush


I'm a big fan of hummus and veggies. I have them as part of my lunch every day. However, since apparently eggplant grow phenomenally well in Florida, I've had quite the surplus. Instead, I've been making baba ghanoush each week, which I like, but it doesn't have the same nutritional stats, specifically the protein.

So as I do every weekend, I roasted up a few of the ripe eggplant and planned to make a batch for the week. However, as I was making the warm butternut and chickpea salad with tahini, I thought why not just add chickpeas and combine the two. Then I use up my eggplant while getting the protein from the chickpeas.

The eggplant flavor was definitely more present than the chickpeas, but this was delicious! If you're not a huge fan of baba ghanoush, this version might help ease you into it. And if you've got a garden full of eggplant like I do, this is a great way to use them! I bring my hummus or baba ghanoush to work each week and share it with my coworker, and he very much enjoyed saying "hummu-ghanoush" every day all week. That wasn't annoying...


Hummu-Ghanoush

2 eggplant, roasted and skinned (about 3 c.)
1 15 oz. can chickpeas, drained and rinsed
2 tbsp. to 1/4 c. well-stirred tahini 
Juice of 1 lemon
1 garlic clove, smashed (or 1 tsp. granulated if you don't like raw)
1 tsp. ground cumin
1 - 2 tbsp. EVOO
Kosher salt and pepper
Paprkia, for garnish

Place eggplant on a baking sheet, pierce with a fork a few times.
Roast for 1 hour, or until eggplant are deflated and shrivel a bit.
Cool for 10 minutes.
Peel off skin (or insides might just slip right out) and place into a blender or food processor.
Pulse to a chunky puree.
Add chickpeas, 2 tbsp. tahini, lemon juice, garlic, cumin, salt and pepper.
Pulse 10 times to mix, then run to puree mixture.
If necessary, add 1-2 tbsp. EVOO to thin the mixture.
Stop, taste and adjust seasonings, add additional salt, pepper, cumin and tahini, if necessary. 
Spoon into a dish, sprinkle with paprika and serve.
I prefer this warm, but my coworker likes it cold. It's really up to you! 

Thursday, October 14, 2010

Potato and Sauerkraut Fritters


Growing up on Long Island, just about all of our friends and neighbors were Italian. When I think of the favorite foods from my childhood, I have vivid memories of arancini (fried risotto balls stuffed with cheese), real Italian Ice, cannolis, and boatloads of pizza by the slice from a pizza parlor we could walk to from our house. I think it was a mile or two, and it felt like so long, but I think I'd run 100 miles for that pizza now.

Because I grew up with the Italian food, and my mom is an excellent Italian cook, I felt like I should be a honorary Italian. Besides Oktoberfest, beer and brats, who really knows anything about German food? It's not really known for elegance, romantic dinners and beautiful sounding words. Fettuccini a la Carbonara sounds much prettier than Sauerbraten und Kartoffeln. I loved my German heritage, but it didn't seem as cool or fun as the Greek and Italian dishes and families around me.

While I still find it hard to create diverse German dishes, I've learned to embrace my heritage. Creampuffs may have initiated the change, but it's knowing that the spaetzle press I use was once used by my great-grandmother decades ago. Or the Sauerbraten my mom taught me to make is a really old family dish. And the fact that there aren't many German restaurants open, which makes me feel like I have a hidden gem in my dining room when a German feast hits the table.

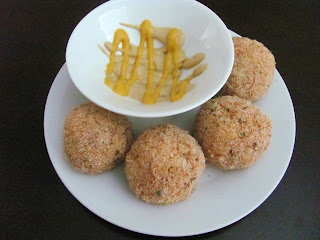
While I'm not a Bratwurst eating gal anymore, I still say the more kraut the better. Last fall, JJ and I went to an Oktoberfest and tried deep fried Sauerkraut and Potato fritters at a small booth. They were so delicious, salty, tangy, and crisp. I could have eaten a dozen, and even JJ, who doesn't like anything pickled, enjoyed the fritters. When I saw an ad for the Oktoberfest, I remembered the amazing fritters, and decided to make a baked version at home. These weren't as good as the deep fried fritters, but the flavor was still there and very present. I would serve these with a grainy, German mustard, but I was out. They're great paired with a nice Warsteiner!


Potato and Sauerkraut Fritters

2 lbs. yukon gold potatoes, peeled and diced
2 c. Sauerkraut, drained well
1/4 c. Sour Cream
Kosher salt and pepper
1/2 tsp. paprika
1 c. breadcrumbs (panko recommended, I used regular fine ground)

Place diced potatoes in a steamer basket, place over boiling water and steam until fork tender.
Cool to room temperature, then add to a mixing bowl with the sour cream.
Use a potato masher and mash potatoes so they're mostly mashed with a few pea-sized chunks of potato.
Add the sauerkraut, paprika and pepper.
Use a spatula to fold in and distribute.
Taste and adjust salt and pepper.
Place mixture in the refrigerator for 30 minutes.
Preheat oven to 450*
Add breadcrumbs to a shallow dish.
Form mixture into golf ball sized mounds, roll in breadcrumbs, then place on a baking sheet.
Repeat until all balls are made, yields around 12-16.
Place baking sheet in the oven and bake for 18-20 minutes, until golden brown and crisp.
Serve warm with German mustard.

Wednesday, October 13, 2010

Warm Butternut and Chickpea Salad with Tahini


Today is a very special day for me, it's my houseiversary. Yes, one year ago JJ, Pumpkin, Charlotte, Belle and I moved into our first house. I can't believe it was one year ago that all hell broke loose, resulting in us moving in a week early due to our apartment flooding. That apartment was a nightmare, and a huge contributor to why I wasn't really impressed with life in Florida. It was the worst possible place for a food blogger to live because there was zero natural light. I was unemployed when we moved here, so I spent much of my time in the kitchen, cooking up some really great dishes. Unfortunately they either went undocumented due to poor photographs, or the photographs don't do them justice. One of them was this dish, quite possibly one of my absolute favorites.

So I'm not going to dwell on the horrible apartment, and instead celebrate a year in my first house. One of the main things I wanted to do when I had a house was plant a vegetable garden. I've had some great successes and failure, with this being a huge success. Over the weekend, I finally picked my first butternut squash! I had been babysitting this squash for weeks, waiting for it to be ready for harvest. He's was not very big, but I couldn't wait any longer. I was afraid of bugs, dogs, and any other catastrophe that could take him away from me.

After I picked him, I sat him on the counter and thought about what I could possibly make with the squash that would honor him. I realize this makes me sound crazy and/or weird, but I'm ok with that. I have so much emotional stock in my garden, I've spent so much time, energy (and money), so the crop yield is magical for me.


Finally, it hit me like a ton of bricks. It was Saturday around noon, I was hungry for lunch, and had the always fun task of cleaning the house ahead of me. I needed a great lunch to power me through. I always have chickpeas on hand, and just bought a new jar of tahini (because the eggplant crop has been quite plentiful, and making baba ganoush is a great way to use them up!), so this salad was inevitable.
I preheated the oven, crossed my fingers, and sliced this guy right down the center. I had visions of rot and bugs and mushy, brown insides. But no, he was perfect!


When I cook butternut squash, I always chop off the bottom cup, seed it and roast it along with the chopped up neck, never knowing what I'll do with it. Sometimes I sprinkle in some cinnamon and a pat of butter and eat it for a snack, sometimes it's saved for a soup and gets pureed, and sometimes I stand over the stove and eat it when no one is looking. I have minimal self-control around squash.
So into the oven it went. And let me tell you, when you have cubed butternut squash on a cutting board and some people think it's cheddar cheese, it's quite funny to watch them grab a cube and pop it in their mouth...

Yes, more eggplant... always more eggplant!

After I made up the salad, I had a light bulb go off, and I spooned the salad into the squash butt cups. The dressing soaked into them, and they were absolutely delicious to scrape out at the end of the meal. I found a new way to eat my squash butts! 

This recipe had made its way around the bloggosphere for a few years, and there's a reason why. It's so delicious. Do yourself a favor, pick up a butternut squash and make this now! 

Tips and Trades:
-I like my garlic and shallots raw in the dressing, and heated up from the squash, but you can roast them right along with the squash if you prefer.
-Try making this salad with any squash variety, not just butternut.

Warn Butternut and Chickpea Salad with Tahini
seen on Orangette, from Casa Moro

salad:
2-3 lb. butternut squash, peeled, seeded, and cut into 1/4" dice
Kosher Salt and fresh Black Pepper
15 oz. can of chickpeas, drained and rinsed
Juice of 1 lemon
2 tbsp. tahini
1 tbsp. olive oil
2 garlic cloves, minced
1 shallot, minced
Salt and pepper
1/2 tsp. ground cumin
1/4 c. minced cilantro

Garnish:
Chopped cilantro and sesame seeds

Preheat the oven to 425 degrees.
Line a baking sheet with parchment or foil.
Add diced butternut squash, drizzle with EVOO, salt and pepper, toss.
Bake for 20 minutes, until tender.
In a large serving bowl, whisk together lemon juice, tahini, olive oil, garlic, shallot, salt and pepper. 
Taste and adjust ingredients.
Add chick peas and cilantro, mix.
Gently fold in squash, then spoon into squash cups.
Sprinkle with extra cilantro and sesame seeds.

Tuesday, October 12, 2010

Nutella Chocolate Chip Cookies


It's very strange how grocery prices vary so much from state to state. When I lived in Indiana, a jar of Nutella was $5.99 at Kroger. Here in Florida, it's $3.99. I found a coupon for $1 off in the paper a few weeks ago, so I've been eyeing up the Nutella each week. If I didn't 'need' it for something, and just had it sitting in the pantry, I'd constantly have my finger in the jar, not such a good idea. 

Yesterday my baby sister turned 23. I think it's harder for me to accept when my sister turns one year older than myself. I also found out over the weekend that my older sister is going to be induced in two weeks, and her doctor told her to keep eating, she could afford to gain a few pounds. If those two occasions don't call for Nutella, I don't know what does! I mailed these off to my sisters, and within days, they were complaining about stomach aches from eating too many cookies. Not so good for them, but a cookie-win for me!

I shoot for soft, chewy cookies when I mail them to people that way when they get them a few days later, they're not hard and dry. I found this recipe on simplyrecipies.com, and the cookies looked so good! I did make a few changes, I eliminated the cocoa powder because I was out, and I didn't add the hazelnuts because there were none to be found at the grocery store. I believe they would be better with the addition of those two ingredients, but these cookies were fantastic without. 

While the Nutella flavor was very present, I highly recommend a smear right on top as an icing, or make a Nutella filled cookie sandwich. Or make Nutella ice cream and make ice cream sandwiches. The possibilities are endless, and delicious!

Nutella Chocolate Chip Cookies
adapted from simplyrecipes.com

1 1/2 sticks salted butter, softened
3/4 c. light brown sugar, packed
3/4 c. granulated sugar
1 c. Nutella
1 tsp. vanilla extract
2 eggs
2 1/4 c. unbleached all-purpose flour
1/2 tsp. baking soda
1/2 tsp. salt
1 c. mini semi sweet chocolate chips

In the bowl of a stand mixer, cream butter and sugars until light and fluffy.
Add Nutella, mix until incorporated.
Turn mixer speed to low, add eggs one at a time, followed by the vanilla.
Turn mixer off, add flour, baking soda and salt.
Turn speed on low, and mix until flour is just moistened.
Add chocolate chips, mix until incorporated, do not over mix!
Place cookie dough in refrigerator.
Preheat oven to 350*
When oven is preheated, remove dough from the refrigerator.
Spoon by the heaping tbsp. full onto a silpat lined cookie sheet.
Bake for 10-12 minutes, until edges crisp and center is set.
Cool on the pan for 5 minutes, transfer to a wire rack and cool to room temperature.
Store in an airtight container.

Monday, October 11, 2010

Chef Symon's Mom's Lasagna


I'd like to think that if I ever met Chef Symon, we would have so much in common and we'd be best foodie friends. As I got to 'know' him more through reading his cookbook, it seemed more and more likely. I found out he loves dogs, as their photos are peppered throughout his cookbook (um, mine too)! It's also clear he loves pickles and pickled things (give me a pickle and call it dinner)! And finally, he is from Ohio, and has a deep love for Cleveland (ok, I'm a Cincinnati girl, but my sister lives in Cleveland and I love the city)! 

Then I read his prologue to this recipe. His mom's lasagna, a Sunday specialty, slow cooking sauce, pasta baked with creamy cheeses, the scent lingering from the oven all day long... he's describing my childhood! My dad's favorite food for as long as I can remember was my mom's lasagna. Since it's labor intensive, she made it from scratch every few weekends, always an all day affair. She would only use Polly-O brand ricotta and mozzarella and grated Parm from the Italian specialty store. The sauce would cook all day, bubbling away, and we'd all fight over the crunchy corners at dinner time.

My mom would add ground beef to the sauce sometimes, but not always. However, Chef Symon's mom doesn't mess around. She uses veal neck bones, beef, sausage and pork. And three pounds of cheese. Though I do love to indulge and have one splurge-type meal each week, I don't eat meat and couldn't use 3 lbs. of cheese. Instead, I added mushrooms for some body and texture, cut the mozzarella, made my 2% ricotta from scratch, and picked up these beautiful lasagna noodles!


While this lasagna isn't exactly the same as Michael Symon's, it still evokes the feeling of Mom's homemade, Sunday specialty. The scent reminds me of being a kid, waiting for Mom to yell, "Dinner time!" And the feeling that perhaps one day, I'll have kids hoping that every Sunday I'll be in the kitchen constructing a lasagna for dinner.

Thank you to Kim of Stirring the Pot for choosing this week's Symon Sundays recipe. This completes Round 5, our selections are up for the next round, check the schedule in the right column!

Tips and Trades:
-I made my ricotta from scratch, which is very simple to do, and it tastes amazing! A 1 lb. tub of organic ricotta is around $5, but I purchased a 1/2 gallon of organic 2% milk for $3 and made 1 lb., almost half price!
-The fresh basil in this dish really brings a nice, fresh burst of flavor. Because the recipe has so much cheese (and meat, if you go with the original), I recommend not skimping on the basil.
-I prefer to make my lasagna with uncooked noodles, make my sauce a little more watery, and bake the lasagna off and have the noodles cook while absorbing the liquid. It keep the lasagna from being wet, and saves the annoying process of cooking the noodles. The noodles will grow though, so make sure there is a bit of space in the pan for them to expand!

Mom's Sunday Lasagna

1/2 lb. lasagna noodles
1 lb. ricotta cheese
1/2 c. grated Parmesan cheese
1 yellow onion
3 garlic cloves
8 oz. cremini mushrooms
Kosher salt and pepper
1/4 c. tomato paste
1/2 c. red wine
1 28 oz. can San Marzano tomatoes (whole)
1 tsp. dried Italian seasoning blend
1/2 tsp. crushed red pepper flakes
1 c. vegetable stock or tomato juice
1 c. fresh basil, roughly chopped or torn

Heat a pot over medium heat.
Add 1 tbsp. EVOO.
Add onions and garlic to a food processor, pulse until very finely minced, add to the pot.
Add mushrooms to the food processor, pulse to a fine mince, add to the pot.
Season veggies with salt and pepper, sauté for 10 minutes, until liquids are cooked out.
Add tomato paste and red wine, reduce liquid by half.
Add tomatoes, break up with a wooden spoon, add dried seasoning, crushed red pepper flakes and stock.
Stir well, cover, turn to low and simmer for 1 hour. 
Preheat oven to 350*
Turn heat off from sauce, add basil and fold in.
Spoon sauce to cover the bottom of a casserole dish.
Layer the noodles, spoonful of ricotta, sprinkle of Parmesan, and another ladle of sauce. 
Cover with another noodle, and repeat until noodles and cheese are gone.
Ladle the remaining sauce over top noodle layer, cover with foil and place in the oven.
Cook lasagna for 45 minutes, uncover, sprinkle with a layer of Parmesan and place back in the oven.
Bake for 10 minutes.
Remove from the oven, rest for 10 minutes, then slice and serve.


Please visit the other Symon Sundays Participant's blogs listed here. For the authentic recipe from the book, be sure to check out Kim's blog, Stirrting the Pot!
Joanne at Eats Well with Others (Project Food Blog Star Contender!)

Friday, October 8, 2010

Butternut Squash Enchiladas with Mole


If you put 100 bloggers in a room together and asked them what the most difficult food item to photograph is, you'd have a few responses. I think enchiladas or other casserole type dishes would be at the top though. If you go for a shot out of the oven, you don't see in innards. If you cut it up to show the insides, you have sloppy looking sauce smears in the pan and a cut up product on the plate. Neither are going to win awards for aesthetics. 

I've found that the only benefit of taking 20 minutes to get a decent photo is the casserole has time to set up, and isn't a total disaster when you finally cut it! I can't tell you how many lasagnas slid apart pre-blogging days as a result of bypassing the "remove from the oven and rest 10 minutes to set up" instruction.

So I tried with this. I tried really hard, because I want this recipe to look as amazing as it tastes! This mole is spicy, sweet, smoky, the butternut tones down the sauce and it is a winning combination. I decided that a few dollops of sour cream would add to the aesthetics, as well as a sprinkle of cilantro. I almost put the sour cream in a squirt bottle to make nice zig-zag pattern and really class it up, but like I said, I can only wait so long to eat.


I guess you'll just have to take my word for it, and Joanne's, whose blog this recipe comes from, that it tastes far better than it looks. And it is a great way to incorporate the flavors of fall into a Tex-Mex dish.

While Mole can be intimidating because of the laundry list of ingredients, they are probably things you already have on hand. And honestly, you can make adjustments to use what you have rather than go buy ingredients. I made a few changes, substitutions, and additions, which I reflected in my recipe below. You can check Joanne's blog to see what she used.


Butternut Squash Enchiladas with Mole Sauce
from Eats Well with Others, Originally from How to Cook Everything Vegetarian

1 medium butternut squash (about 2 lbs.)
1 tsp. ground cinnamon
2 tbsp. milk, cream, sour cream, etc. 
4 dried ancho chilies
2 dried chipotle chilies
1/4 c. silvered almonds
1 tbsp. tahini
1 heaping tbsp. dark cocoa powder
1 heaping tsp. ground cinnamon
1 small yellow onion, chopped
4 garlic cloves, smashed
4 whole plum tomatoes, seeded (canned works fine)
1/4 c. raisins
2 c. vegetable stock
1 tbsp. EVOO
1 bay leaf
2 tsp. ground cumin
1 tsp. ground allspice
Salt and black pepper
6 flour tortillas
1/2 c. fresh grated sharp cheddar cheese
Sour cream
Chopped cilantro

Preheat oven to 400*
Slice squash in half, scoop out seeds and discard.
Place cut side up in a casserole dish, fill with 1/4" water.
Sprinkle squash with 1 tsp. ground cinnamon, cover with foil and roast for 30-45 minutes, until tender.
Remove from the oven and set aside to cool, lower oven temperature to 350.
While squash cooks, prepare Mole. 
Place the chilies in 1 c. boiling water to reconstitute for 10 minutes, drain and chop chilies.
Place chilies, almonds, tahini, chocolate, onion, garlic, tomatoes and raisins in a blender, add enough vegetable stock to achieve a puree. 
Heat EVOO in a large pot over medium heat, add the puree, bay leaf, cumin, allspice, salt and pepper. 
Sauté for about 5 minutes, constantly stirring. 
Add vegetable stock, bring to a simmer, turn to low and reduce for an hour or so. 
Scoop squash from the skins and place in a bowl.
Mash with a potato masher, adding milk/cream as necessary.
Ladle Mole into a casserole dish to coat the bottom.
Fill tortillas with 1/6 of the squash mixture, a sprinkle of cheese, and roll. 
Place in the casserole dish seam side down and repeat. 
Cover all enchiladas with remaining Mole (I had about 1 c. extra, which I froze).
Bake for 25 minutes, remove from the oven and rest for 10 minutes.
Serve with sour cream and cilantro.